Visual Studio Code
Visual Studio Code is a simple text editor with some powerful IDE-like features. It is a separate product from Visual Studio, Microsoft’s full-featured and well-known IDE. While VS Code is only a couple of hundred megabytes and is free, Visual Studio is at least several Gigabytes and it is not free. VS Code is also open-source and is easy to customize. You can quickly set keybindings and syntax highlightings based on the programming language you are using and your experience. Moreover, it has a built-in file explorer, source control, terminal, remote explorer, and supports extensions that add greats capabilities.
Visual Studio Code supports macOS, Windows, and Linux.
Installing
You can download and install VS Code for your system architecture from here.
When you open VS Code for the first time, you will see the “Welcome Screen”, which has links to access tutorials or create a new file and open folders.
User Interface
Visual Studio Code comes with a simple layout. The user interface is divided into 5 areas:
-
Editor - the main area to edit your files. You can open many editors and arrange them side by side.
-
Activity Bar - lets you switch between the tools available on the far left-hand side and gives context-specific information, such as the number of outgoing changes when Git is enabled.
-
Side Bar - contains different views that can be toggled using the icons in the Activity Bar.
-
Status Bar - shows information about the open file in the editor, like the number of lines and programming language
-
Panels - different panels are located below the editor region to show debugging information or an integrated terminal.
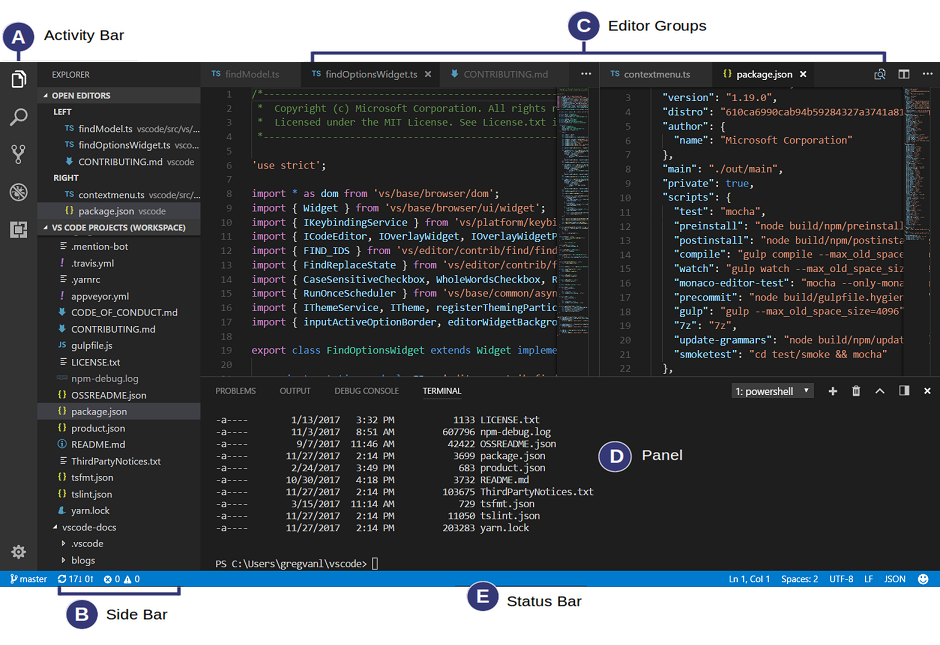
Visual Studio code also shows a Minimap on the far right-hand side that gives you a high-level overview of the code in the editor, which is useful for quick navigation or understanding the structure of the code.
To learn more about VS Code user interface, take a look at User Interface article on VS Code website.
Keyboard shortcuts
Like any other code editor, Visual Studio Code has an extensive number of shortcuts that are editable using Keyboard Shortcut editor. You can find a list of them in File > Preferences > Keyboard Shortcuts. You can also find a condensed PDF version here or by clicking Help > Keyboard Shortcut Reference
While an experienced user might take advantage of nearly all shortcuts to increase his efficiency, we are going to introduce some of the most useful shortcuts here:
-
Ctrl + Shift + P - shows the command palette that contains recently used commands and a search box for finding the right command.
-
Ctrl + P - Quickly open files
-
Alt + Click - insert a second cursor where you clicked
-
Ctrl + Alt + up/down arrow - insert a second cursor above or below (Multi-cursor selection is an efficient way to modify multiple lines simultaneously. )
-
Ctrl + Shift + L - select all occurrences of current selection
-
Ctrl + Space - triger code completion suggestion
-
F5 - Start/Continue debugging
-
Shift + F5 - Stop debugging
-
F9 - Toggle breakpoint
-
Ctrl+` - Show integrated terminal
Themes
You can modify the colours in VS Code user interface by colour themes. Open the colour Theme picker with File > Preferences > Workbench > Appearance > colour Theme. You can preview the colours of the theme using the cursor keys and select the theme you want and press Enter.
You can also find colour themes in VS Code Extension Marketplace developed by the community. The colour themes can be customized both in the Appearance section. Use the keyboard shortcut Ctrl + K + T to display the theme picker and select the theme you want by pressing Enter.
If you like to customize your theme, Look at Customizing a color theme
Settings
Visual Studio Code offers User and Workspace settings:
- User Settings apply globally to any instance of VS Code
- Workspace Settings are stored inside your workspace and override user settings when the workspace is opened.
- Language-specific settings apply the settings only when you are using a certain language.
To open settings, use File > Preferences > Settings menu command or open Command Palette (Ctrl+Shift+P) and search for settings. Visual Studio Code will open a settings editor, a graphical user interface for settings.json.
VS Code stores all settings in JSON files,key:value files. You can also set language-specific editor settings by finding Preferences: Configure Language Specific Settings in the Command Palette and pick the language you want.
When you change Workspace Settings, VS Code creates a .vscode folder in the directory of your project and keeps the settings.json file in that folder.
To customize your editor by language, search for Configure Language Specific Settings in the Command Palette and pick the language you want. A new entry with the name of the language you picked will appear in the settings.json.
Examples
- You can add a ruler to the code editor by opening menu>Preferences>Settings and searching for ruler or opening Command Palette and opening settings.json. If you want the ruler to only appear for a certain language, use the language-specific settings.
You can also sync everything you customized on VS Code with your GitHub account, from settings to keyboard shortcuts to other VS Code extensions. Nowadays, we are accustomed to using more than one device and with this extension, you do not need to manually set up everything again. To turn on syncing, click on the gear menu at the bottom of the Activity Bar and choose Turn On Settings Sync. Then, you will be asked to sign in and choose the items you would like to sync. For more information, visit Settings Sync.
Loading last updated date...