This is the source that most of the following material is obtained from: https://www.zotero.org/support/
Getting started (Pre-workshop Tasks)
Register for a free account
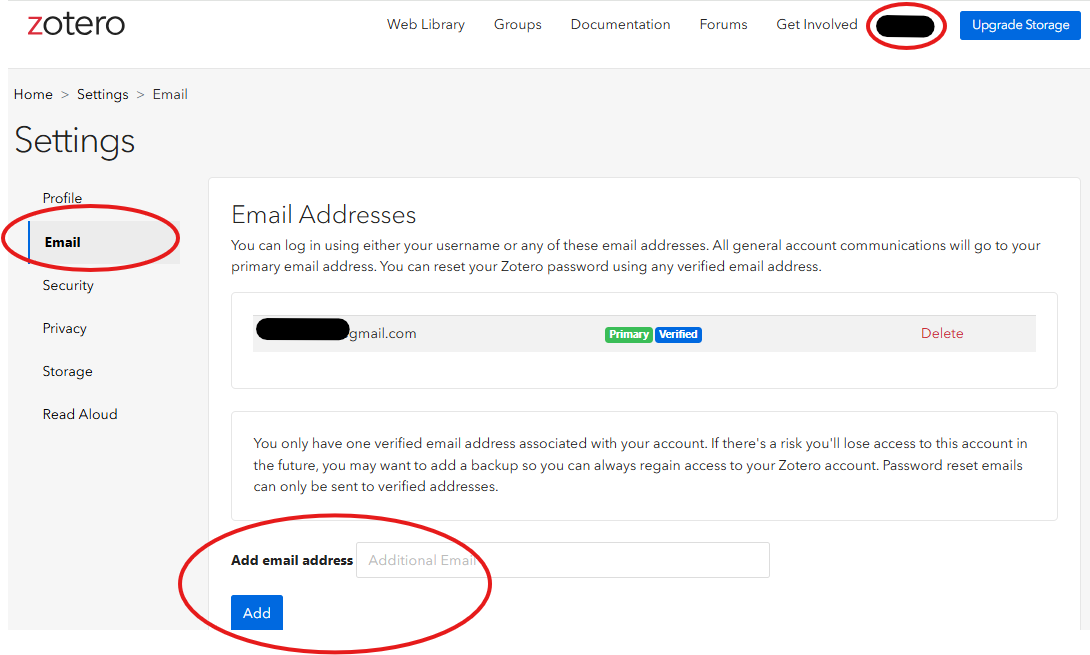
If you haven’t already created a Zotero account, please take a few moments to register for a free account here. It is recommended to use your personal email rather than your UBC email to create an account. The reason is that for some folks, you will eventually lose access to your UBC email and then it is hard to access your account. If you have already used ubc email to create an account, you can add your personal email as a backup. Password reset emails can only be sent to verified addresses on your Zotero account. To add backup email, go to your Zotero online account, click on your username and select settings. Then on the left pane select “Email” and add your backup email.
Installation instructions
Zotero Desktop app
Download and install the Zotero desktop app on the Zotero download page. The Zotero Desktop app is required when inserting and managing in-text citations and bibliographies in Microsoft Word. However, even without the desktop app, you can still log in to your Zotero online account to access and manage your online library. Your online library can be synchronized with the Zotero Desktop app whenever it is installed and connected.
Zotero Connector
You also need to install the Zotero Connector for your browser which is available for Chrome, Firefox, Edge, or Safari (The Zotero Connector for Safari is bundled with Zotero. You can enable it from the Extensions pane in the Safari settings).
Word Processor Plugins Installation
Zotero has available plugins for Microsoft Word, LibreOffice, and Google Docs which allow you to create dynamic bibliographies and insert an in-text citation in your manuscript.
The word processor plugins are bundled with Zotero Desktop App and should be installed automatically for each supported word processor on your computer when you first start Zotero. If you have just installed the Zotero Desktop App, it will usually appear the next time you open Microsoft Word. If it does not, close both the Zotero Desktop App and Microsoft Word, then restart your computer. In most cases, after restarting, the Zotero tab will appear in the Word ribbon and function correctly.
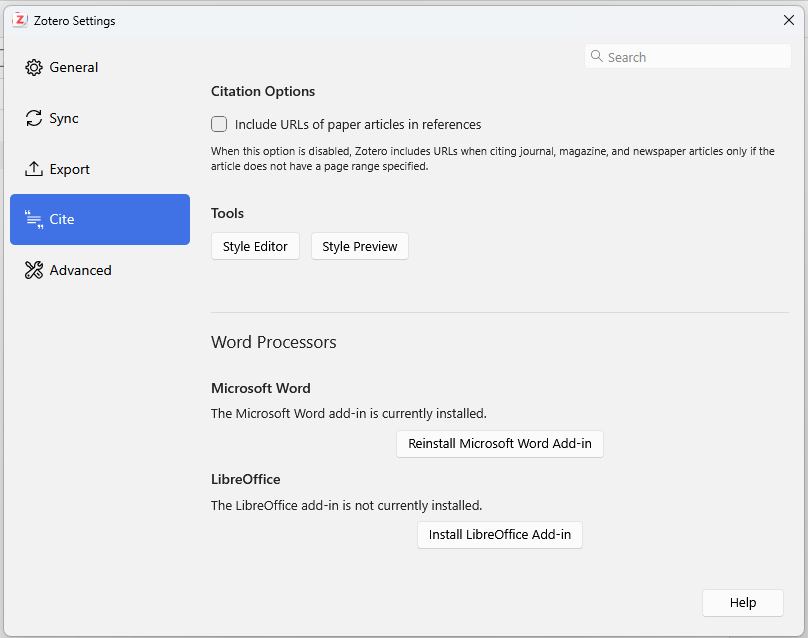
You can reinstall the plugins later from the Cite -> Word Processor Plugins pane of the Zotero preferences. If you’re having trouble, see Manually Installing the Zotero Word Processor Plugin or Word Processor Plugin Troubleshooting.
Optional Step: Zotero Mobile App
Optionally, you can also install the Zotero mobile app, available for both iOS and Android devices.
Syncing
While Zotero stores all data locally on your computer by default, Zotero’s sync functionality allows you to access your Zotero library on any computer with internet access. Zotero syncing has two parts: data syncing and file syncing.
Data Syncing#
Data syncing merges library items, notes, links, tags, etc. — everything except attachment files — between your local computer and the Zotero servers, allowing you to work with your data from any computer with Zotero installed and to view your library online on zotero.org. Data syncing is free and unlimited, and it can be used without file syncing.
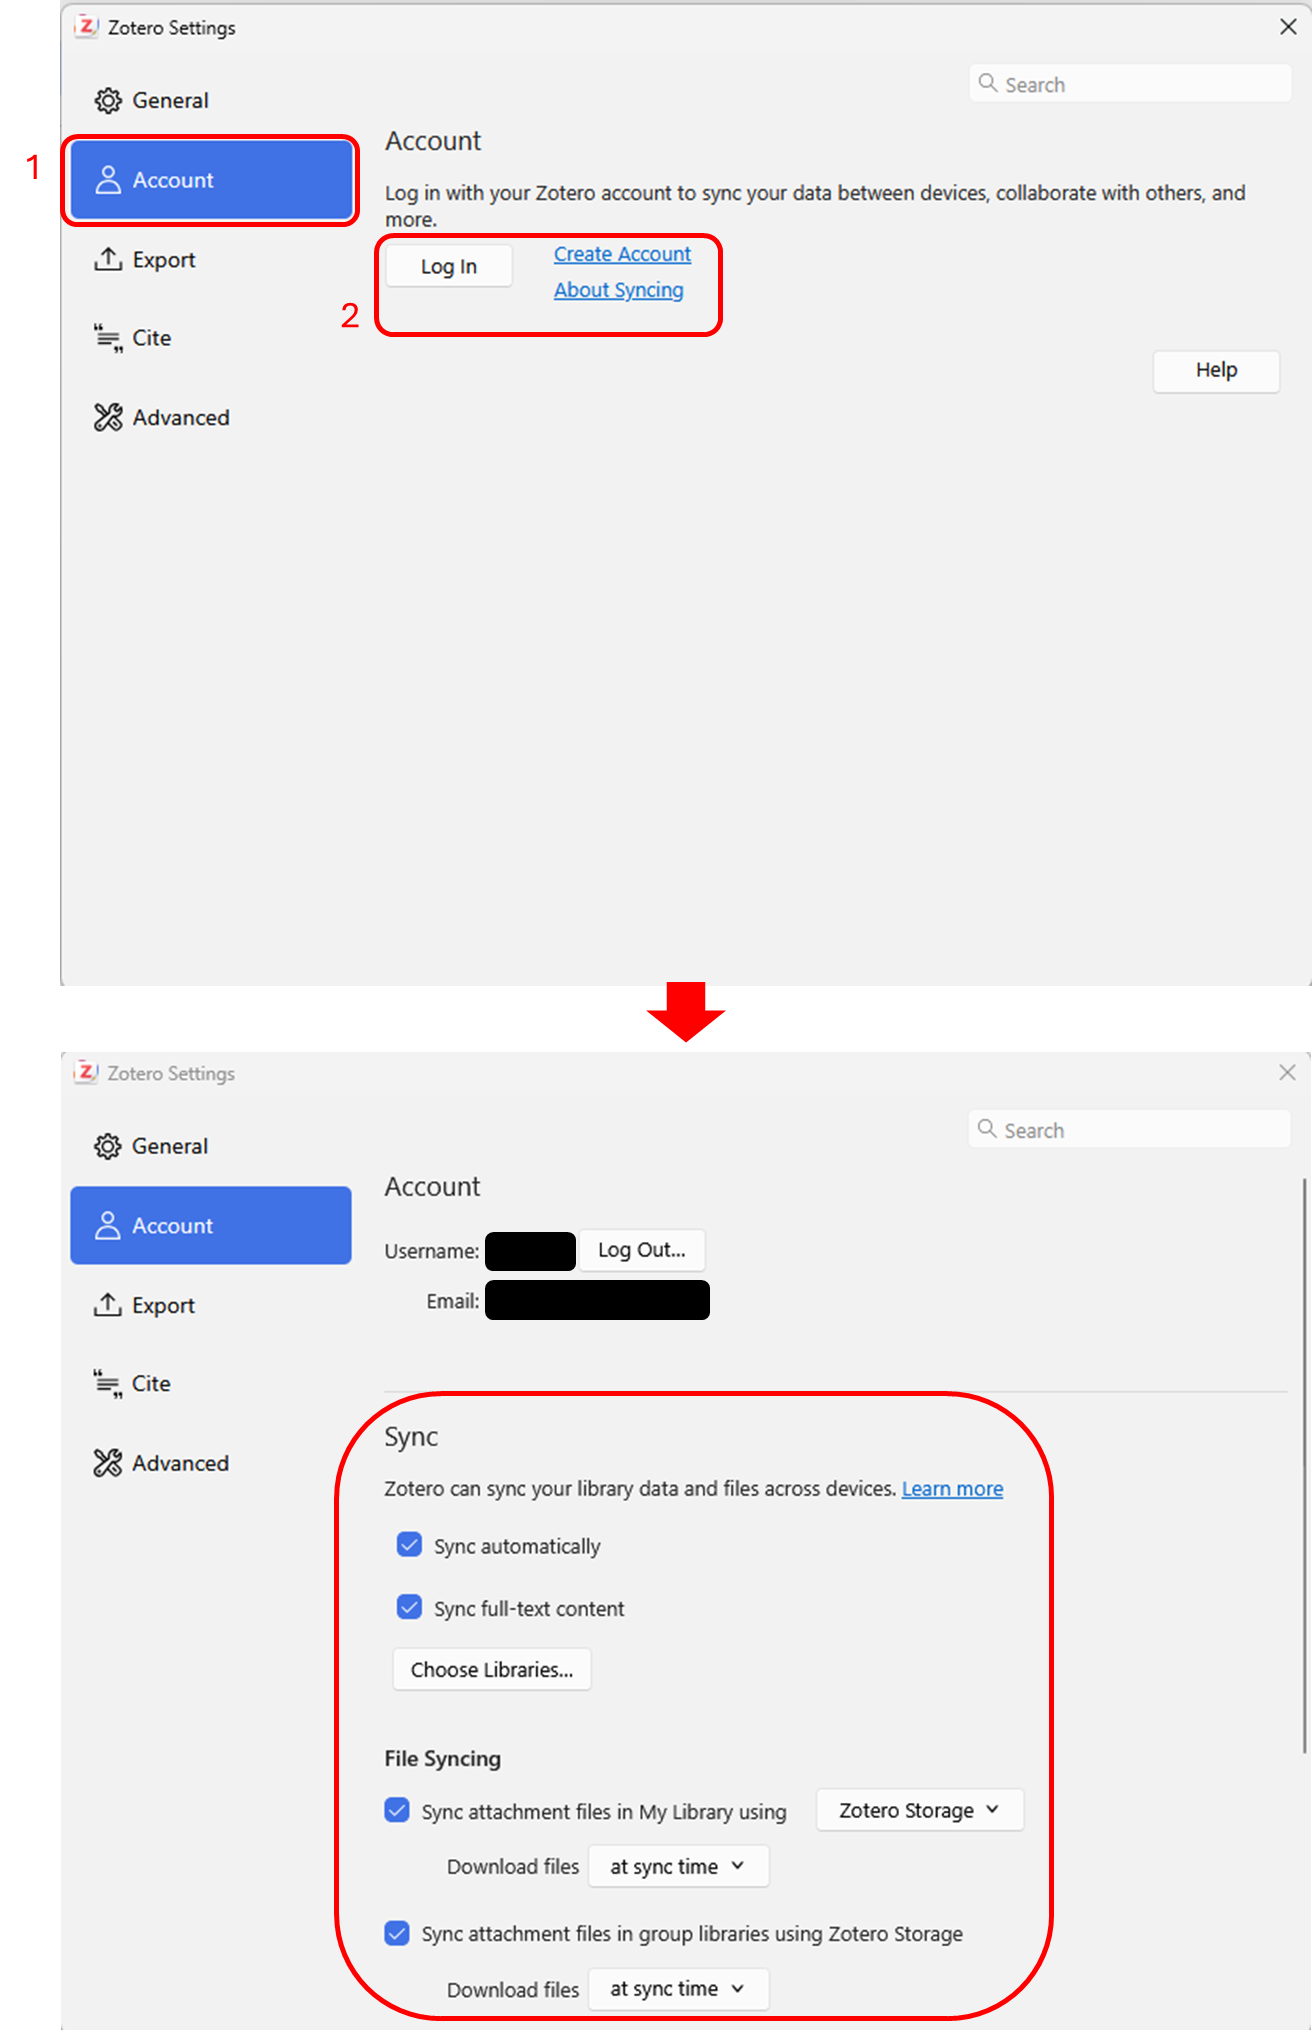
The first step to syncing your Zotero library is to login to your Zotero account (create an account if you don’t have it already). Then, open the Sync pane of the Zotero preferences and enter your login information in the Data Syncing section.
By default, Zotero will sync your local data with the Zotero servers whenever changes are made. To disable automatic syncing, uncheck the “Sync automatically” checkbox in this section. You can sync manually at any time by clicking the “Sync with zotero.org” button ( ) on the top right-hand side of the Zotero toolbar.
When Zotero syncs, it automatically applies changes in both directions — any changes you make in one place will be applied to all other synced computers. If an item has changed in multiple places in conflicting ways between syncs, you’ll receive a conflict resolution dialog asking which version you’d like to keep. If you find yourself using a new computer, you can simply set up syncing and Zotero will automatically download all data from your online library.
File Syncing#
Data syncing syncs library items, but doesn’t sync attached files (PDFs, audio and video files, images, etc.). To sync these files, you can set up file syncing to accompany data syncing, using either Zotero Storage or WebDAV.
Zotero Storage#
Zotero Storage is the recommended file sync option. It has several advantages over WebDAV syncing, including syncing of files in group libraries, web-based access to PDFs and other attachments, easier setup, guaranteed compatibility, and improved upload performance for certain files. Each Zotero user is given 300 MB of free Zotero Storage for attached files, with larger storage plans available for purchase.
However, if you want to bypass the 300 MB free limit without paying for a premium plan, you can use linked attachments option (instead of stored files) or install a third-party plugin like ZotMoov. Instead of uploading PDFs to Zotero’s servers, this method automatically renames and moves your files into a local folder synced by your own cloud service (such as Google Drive, OneDrive, or Dropbox). Because Zotero only needs to sync lightweight text citations rather than bulky PDFs, you can expand your library indefinitely using the free storage you already own.
Adding Items to Your Zotero Library
This section describes the various ways to add items (including books, journal articles, web pages, etc.) as items in Zotero.
Using Zotero Connector via your web browser
For this you need to install the Zotero Connector for Chrome, Firefox, Edge, or Safari, in addition to the Zotero desktop app.
The Zotero Connector’s save button is the most convenient and reliable way to add items with high-quality bibliographic metadata to your Zotero library. As you browse the web, the Zotero Connector will automatically find bibliographic information on webpages you visit and allow you to add it to Zotero with a single click.
For example, if you’re on the main page for a journal article, the save button will change to the icon of a journal article (circled in red):

On a library catalog entry for a book, the save button will show a book icon:

Clicking the save button will create an item in Zotero with the information it has identified.
On many sites, Zotero will also save any PDF accessible from the page or an open-access PDF that can be found for the saved item.
Generic Webpages
If you click the save button on webpages, Zotero will import the page as a “Web Page” item with a title, URL, access date and snapshot. Zotero can archive a webpage by creating a snapshot — an offline file reflecting the state of the page at the time the snapshot was taken.

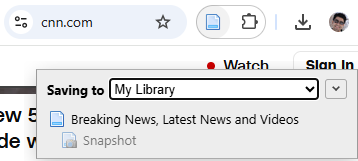
If the Zotero Connector does not recognize data on a page, you can save the page as a Web Page item with an attached snapshot by clicking the Zotero save button in the browser toolbar. You can also take a snapshot of any page by right-clicking (click-and-hold in Safari) on the Zotero save button and choosing “Save to Zotero (Web Page with Snapshot)”.
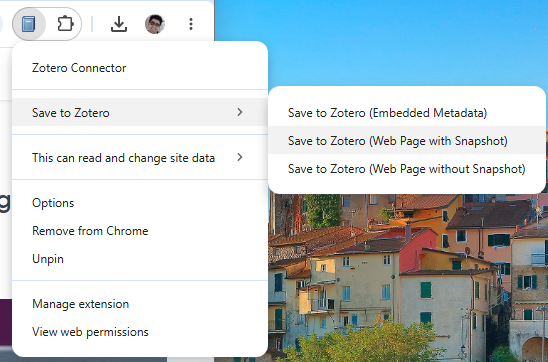
By default, Zotero will save snapshots when importing items from webpages. You can disable this setting in the Zotero preferences.
Such snapshots and PDFs are stored as copies in Zotero data directory, and appear as child items of the saved item.
PDFs
If you are viewing a PDF file in your browser, the save button will show a PDF icon. Clicking this button will import the PDF file alone into your library and then automatically attempt to retrieve metadata about it. While this will often produce good results, it is usually better to use the save button from the publication’s abstract page or catalog entry, as described above, if there is one.
If you save a PDF directly and Zotero isn’t able to retrieve metadata, it will leave the PDF as a standalone attachment. To add metadata, you’ll need to create a parent item, either by saving a regular bibliographic item and dragging the PDF on top of it or by right-clicking on the PDF, choosing Create Parent Item, and entering an identifier such as a DOI or ISBN. If all else fails, you can click Manual Entry after selecting Create Parent Item and manually enter metadata for the item.
Multiple Web Search Results
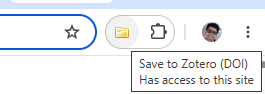
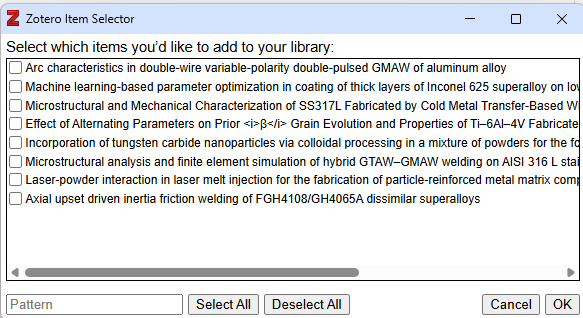
On some webpages that contain information about multiple items (e.g., a list of Google Scholar search results), the save button will show a folder icon. Clicking this folder icon will open a window where you can select the items that you want to save to Zotero:
Saving to a Specific Collection or Library
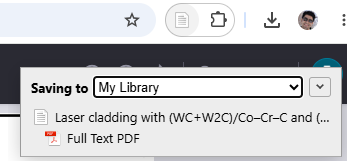
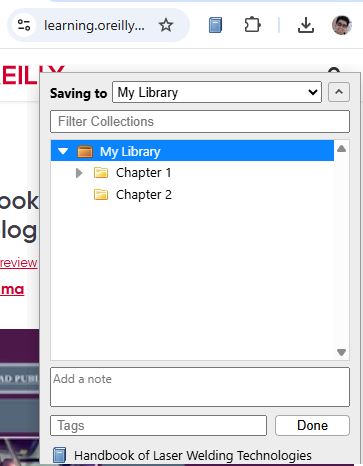
After you click the save button, a popup will appear indicating which Zotero collection the item is being saved to. If you want to save the item to a different collection or library, you can change the selection there, as well as enter tags to assign to the new item.
Data Quality and Choosing a Translator
The quality of the data Zotero imports is determined by the information supplied on the webpage. Some websites include high-quality data for tools like Zotero in the page itself (“embedded metadata”). Other websites provide only limited metadata (e.g., only the title of a blog post) or no metadata at all. For many sites, Zotero has website-specific “translators” to obtain the best quality metadata. Zotero recognizes almost all library catalogs, most news sites, research databases, and scientific publishers. (For more information, see Zotero’s compatible websites list.) Metadata for the same item may vary in quality across sites providing it. For example, importing an item from the publisher’s website will generally yield much better data than importing from Google Scholar.
Zotero will generally choose the best translator available for each site automatically. You can choose an alternative translator by right-clicking on the Zotero save button (or the page background in Safari) and choosing one of the available options.
Add Item by Identifier
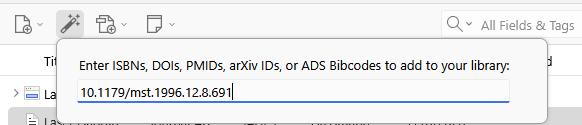
You can quickly add items to your library if you already know their ISBN, DOI, PubMed ID, arXiv ID, or ADS Bibcode. Click the Add Item by Identifier button ( ) in the toolbar, type or paste in the identifier, and press Enter/Return on your keyboard. To add more than one item, separate identifiers by spaces, commas, or line breaks.
To look up metadata, Zotero uses Library of Congress, WorldCat, and other catalogs for ISBNs, CrossRef and other registries for DOIs, NCBI PubMed for PubMed IDs, arXiv.org for arXiv IDs, and ADS for ADS Bibcodes.
Drag and Drop#
Files can be copied into your library by dragging a file from your operating system’s file browser into the Zotero window, and either dropping it onto a collection in the left pane, or onto the center pane. Files dropped onto an existing regular Zotero item in the center pane are added as child items. Files dropped onto a collection, or in an empty space or between items in the center pane, are added as standalone items.
By default, files dragged into Zotero are added as copies of the original files. To instead add links to the original files, hold down Ctrl+Shift (Windows/Linux) or Cmd+Option (Mac) while dropping. (On macOS, it may be necessary to allow the Zotero window to come to the front before letting go for the modifier key to take effect.)
You can also drag and drop an existing standalone file item in Zotero onto a regular Zotero item to create a child item.
Stored Files
Files can be added to your Zotero library as either stored files or linked files.
Stored files, which are the default, are stored within the Zotero data directory, and Zotero will automatically manage them, including deleting them if you delete the attachment item in Zotero. If you use file syncing, Zotero will automatically sync stored files between devices and make them available in your online library on zotero.org. If you add a stored file from a file on your computer, the file is copied to the Zotero data directory, so you may wish to delete the original to avoid confusion.
To use stored files outside of Zotero, you can use Zotero’s search and organization abilities to quickly find the relevant items and then either drag the attachments straight from Zotero (e.g., into an email) or right-click and choose Show File to view the files in your file manager. If you prefer to find files without going through Zotero, you can use your operating system’s search features (e.g., Spotlight on macOS) or create a smart folder in your OS to show a list of all PDFs within your Zotero data directory and interact with the files directly. Zotero automatically renames files based on the parent item’s bibliographic data, so you can easily find files by title, author, or year even from outside Zotero.
Linked Files
With linked files, Zotero only stores a link to the location of the original file on your computer. Linked files are not synced, nor are they deleted if the attachment item is deleted in Zotero. They also can’t be used within a group library, as there’s no guarantee that other group m embers would have access to the same file location. Linked files are also not supported in the Zotero iOS app or the Android app.
You can add a linked file by selecting an existing item and choosing “Attach Link to File…” from the Add Attachment menu in the Zotero toolbar or, to use PDF metadata retrieval, by selecting “Link to File…” from the New Item menu. You can also use the appropriate OS-specific modifier key for linking files while dragging in a file from the filesystem.
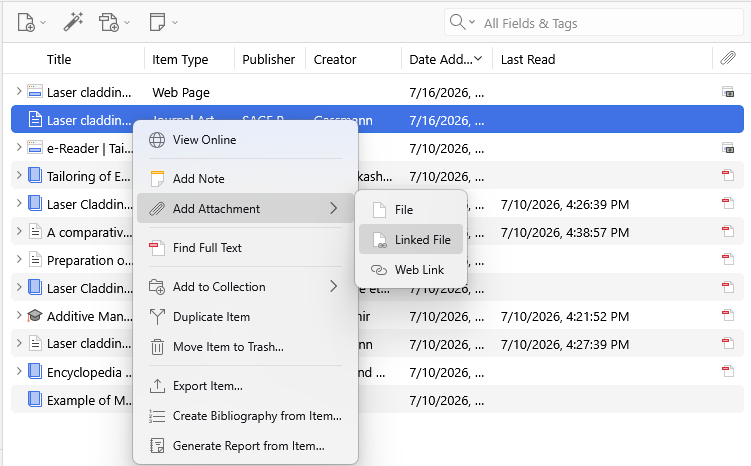
If you sync linked files using an external tool (Google Drive, etc.) for use on multiple computers, it is a good idea to set the linked attachment base directory so that the files can be found by Zotero on each computer even if the containing folder is at a different location in the filesystem.
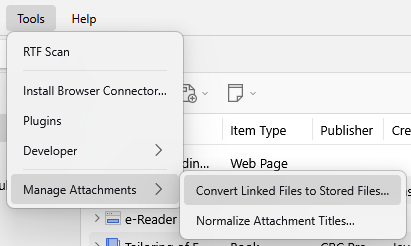
If you wish to convert linked files to stored files in order to allow Zotero to manage them, you can do so from the Tools → Manage Attachments menu.
Child versus Standalone Attachment Files
Files can be added either as standalone items or as child items to regular Zotero bibliographic metadata items. It is generally always a good idea to work with files as child items. Standalone files cannot be used with many of Zotero’s features, including citing, My Publications, and most types of searching, because they lack bibliographic metadata.
If you save a PDF directly to your library, Zotero will attempt to retrieve metadata for it and create a parent item automatically. If the item can’t be recognized, you’ll be left with a standalone attachment. You can add a parent by either saving an item from the web and dragging the PDF on top of it (if a PDF isn’t attached automatically) or by right-clicking on the PDF, choosing Create Parent Item, and entering an identifier such as a DOI or ISBN. If all else fails, you can click Manual Entry after selecting Create Parent Item and manually enter metadata for the item.
Attachment Menu#
When you have selected a single item in the center pane, you can click the “Add Attachment” button at the top of the center column. Select either “Attached Stored Copy of File…” or “Attach Link to File…” to add files as attachments to the item.
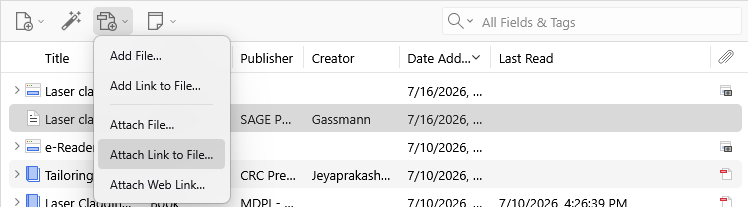
You can also “Attach Link to URI…” to add a link to a web page (http:// or https://) or to another program on your computer (e.g., OneNote <onenote://> or Evernote evernote://).
These options are also available when you right-click an item and choose “Add Attachment”.
Manually Adding Items#
Zotero is designed to help you avoid manual entry whenever possible, however if you really need to add something manually — for example, a source that isn’t available anywhere online — you can do so by clicking “New Item” ( ) button at the top of the middle pane and selecting the desired item type from the drop-down menu. An empty item of the selected item type will now appear in the center column. You can then manually enter the item’s bibliographic information via the right-hand pane.
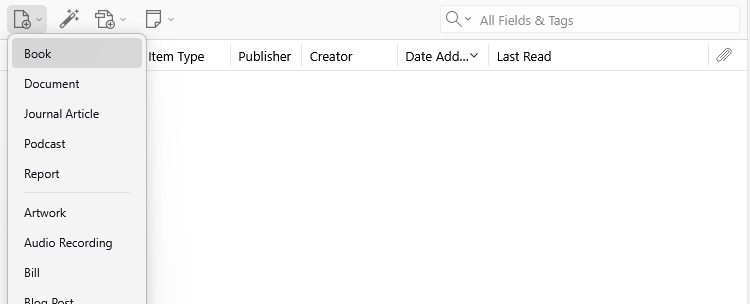
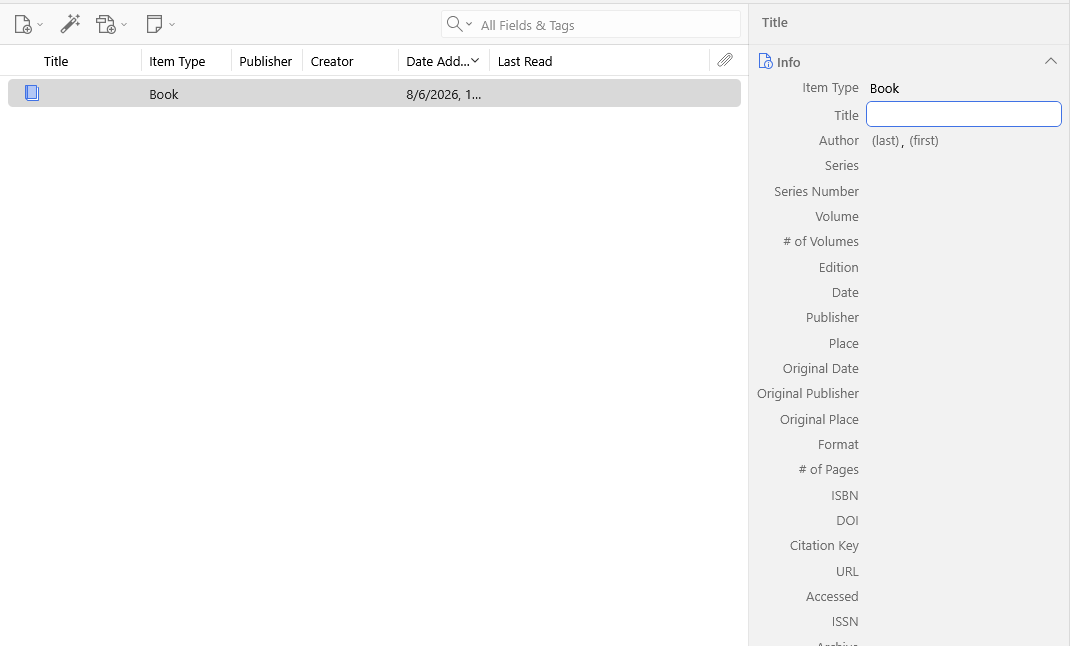
Note: Since it’s almost always better to visit a webpage in your browser and use the “Save to Zotero” button, the Web Page item type is not included in the “New Item” menu. However, if you really want to create a webpage item by hand, you create an empty item of another type and switch the item type to Web Page in the right-hand pane.
Accessing Files#
Files in your library can be accessed by double-clicking the item in the center pane. Alternatively, you can right-click the item and select “View PDF” or “View File”.
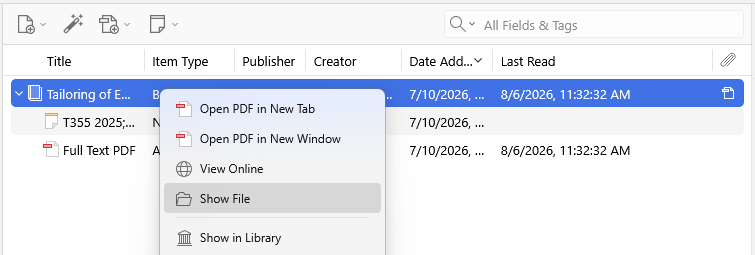
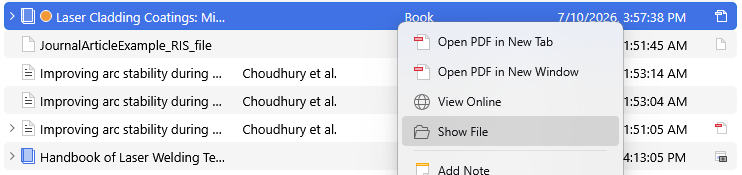
To locate a stored (copied) or linked file, right-click the item in the Zotero pane and select “Show File”. Copied files are stored in the Zotero data directory, and each file has its own subdirectory, which is named with a random 8-character string.
Feeds
Feeds are a great way to discover new research. With feeds, you can subscribe to updates from a journal, website, publisher, institution, research group, or other source and quickly find new articles or works. If you find an item in a publication’s feed that you want to save and read further, you can add it to your Zotero library with the click of a button.
Subscribing to Feeds#
To subscribe to a feed, click File –> New Feed in the Zotero Menu bar. You can add feeds in two ways. First, you can add a feed using the URL provided on the journal’s (or other source’s) website. For journals, these are usually available from the journal homepage. Look for the RSS icon ( ) or search for the journal name and “RSS feed” in a search engine. Many publishers place the RSS icon next to social media buttons or email alert links.
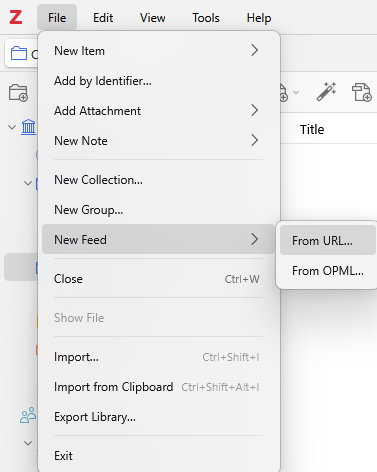
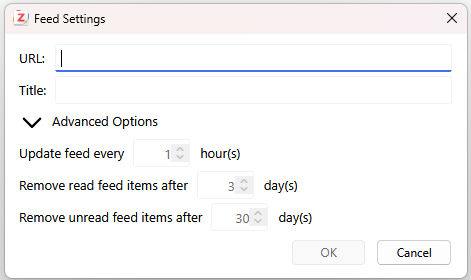
Once you’ve found the RSS feed URL for your source, click the Add Feed menu, then choose “From URL…”. The Add Feed window will open. Paste the RSS feed URL to the URL text field. If the URL is for a valid feed, you will be able to enter a title for the feed and click “Save”. You can click “Advanced Options” to adjust how frequently a feed updates and to set how long read and unread items are kept in a feed before being removed.
You can also import a set of feeds using an OPML file (e.g., from a list of subscriptions exported from Feedly or other RSS Reader services). To import an OPML file, choose “From OPML…” from the Add Feed menu.
Reading Feeds#
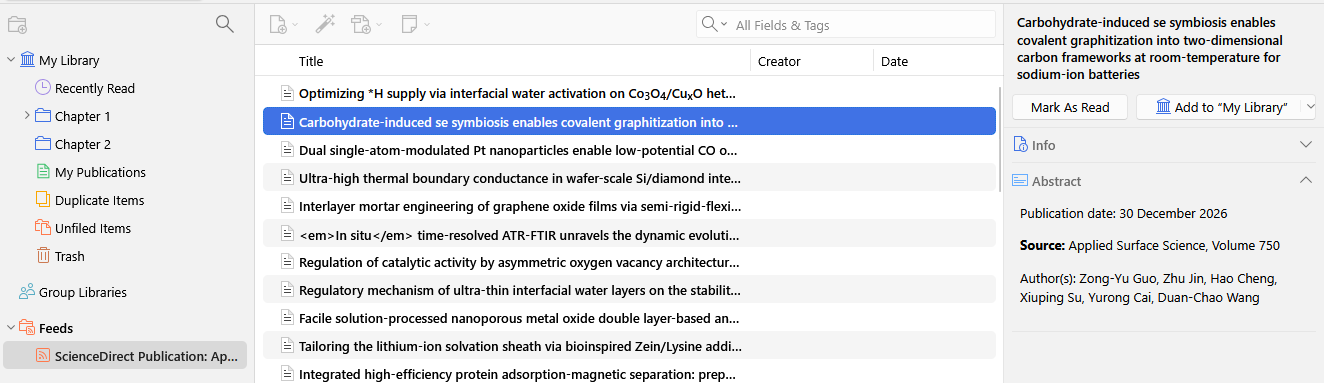
Feeds you have subscribed to will appear at the bottom of the left pane of the Zotero window, below My Library and your Group Libraries and above the tag selector. Click on a feed to view currently available items in the feed. Right-click on a feed to manually refresh it, mark all items in the feed as read, modify feed settings, or unsubscribe from the feed.
When viewing a feed, unread items will be shown in bold text, while read items are shown in regular text. When you select an item in the feed, you can mark it as read or unread by clicking the “Mark As Unread/Read” button or pressing the ` key. Save the item to your Zotero library by clicking on the “Save to My Library” button or pressing Ctrl/Cmd-Shift-S. You can save a feed item to a group library by clicking the dropdown arrow on the right side of the “Save to My Library” button and choosing the group library.
Note, the read/unread state of items is not synced across computers when using Zotero sync.
Organizing and Taking Notes
Items in Zotero libraries can be organized with collections (the name Zotero gives to folders) and tags.
Collections allow hierarchical organization of items into groups and subgroups. The same item can belong to multiple collections and subcollections in your library at the same time. Collections are useful for filing items in meaningful groups (e.g., items for a particular project, from a specific source, on a specific topic, or for a particular course). You can import items directly to a specific collection or add them to collections after they are already in your library.
Tags (often called “keywords” in other contexts) allow for detailed characterization of an item. You can tag items based on their topics, methods, status, ratings, or even based on your own workflow (e.g., “to-read”). Items can have as many tags as you like, and you can filter your library (or a specific collection) to show items having a specific set of one or more tags.
Tags are portable, but collections are not. Copying items between Zotero libraries (My Library and group libraries) will transfer their tags, but not their collection placements. Both organizational methods have unique advantages and features. Experiment with both to see what works best for your own workflow.
Collections#
It is important to understand that items can belong to multiple collections and subcollections. Adding an item to multiple collections does not duplicate the item. In this sense, collections are more like music playlists than folders in your computer filesystem. Just as a single song can be added to more than one playlist, a single item in a Zotero library can be added to multiple collections.
Creating Collections#
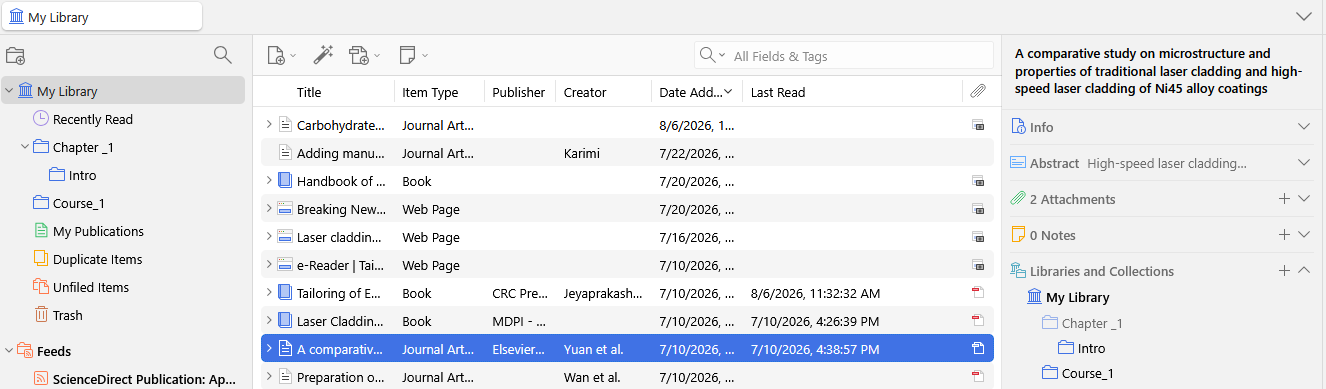
Click the “New Collection…” button ( ) above the left pane in Zotero to add a new collection. You can also right-click on “My Library” or the name of a Group library and choose “New Collection…” to add a new collection. The new collection will appear as a folder under “My Library” or the selected Group library.
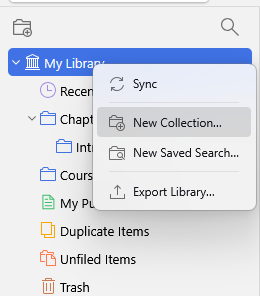
Subcollections can be created by dragging and dropping an existing collection onto another collection or by right-clicking a collection and choosing “New Subcollection…”. You can convert a subcollection into a top-level collection by dragging it to the library root (e.g., “My Library”).
You can drag collections between Zotero libraries in the left pane. If you have editing privileges for the destination library, the collection (and all of its items and subcollections) will be added to the destination library.
Adding Items to Collections#
New items are automatically saved into the collection selected at the time. When saving from the browser, you can choose a different collection from the popup after clicking the save button.
To add existing items in your library to a collection, select them in the center pane and drag them onto the collection in the left pane. By default, the items will be added to the new collection but won’t be removed from their original location.
To move items between collections, hold down Cmd (Mac) or Shift (Windows/Linux) when dragging items to the new collection. Remember that the “My Library” view always shows all items in your library, so you cannot “move” items out of this view. To see only items that do not belong to any collection in your library, open the Unfiled Items special collection.
Renaming Collections#
Right-click on the collection and choose “Rename Collection…” to give a collection a new name. Collections are sorted alphabetically in your library. You can use punctuation marks to sort collections to the top of the list.
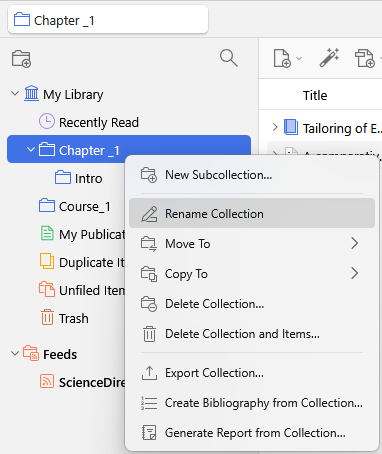
Deleting Collections#
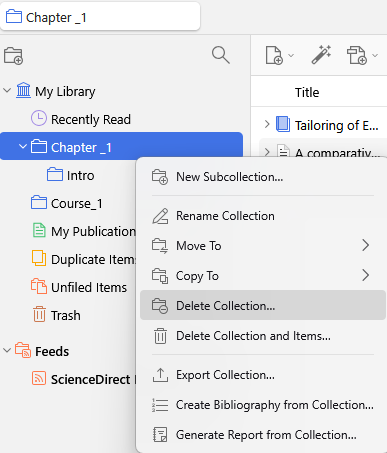
Right-click on the collection and choose “Delete Collection…” to remove a collection from your library. Deleting a collection does not delete the items in the collection. Items are still accessible by clicking on My Library or the Group library name.
Deleting a collection will also delete its subcollections (but not the items in them).
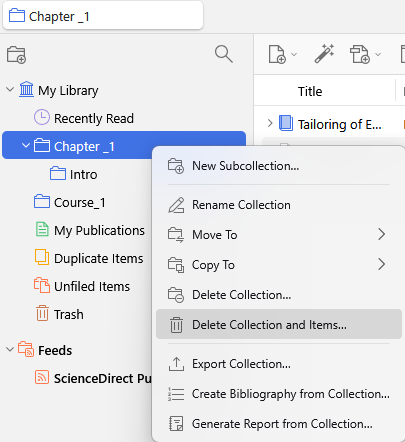
To delete both the collection and its items, right-click on the collection and choose “Delete Collection and Items…”.
Removing Items from a Collection#
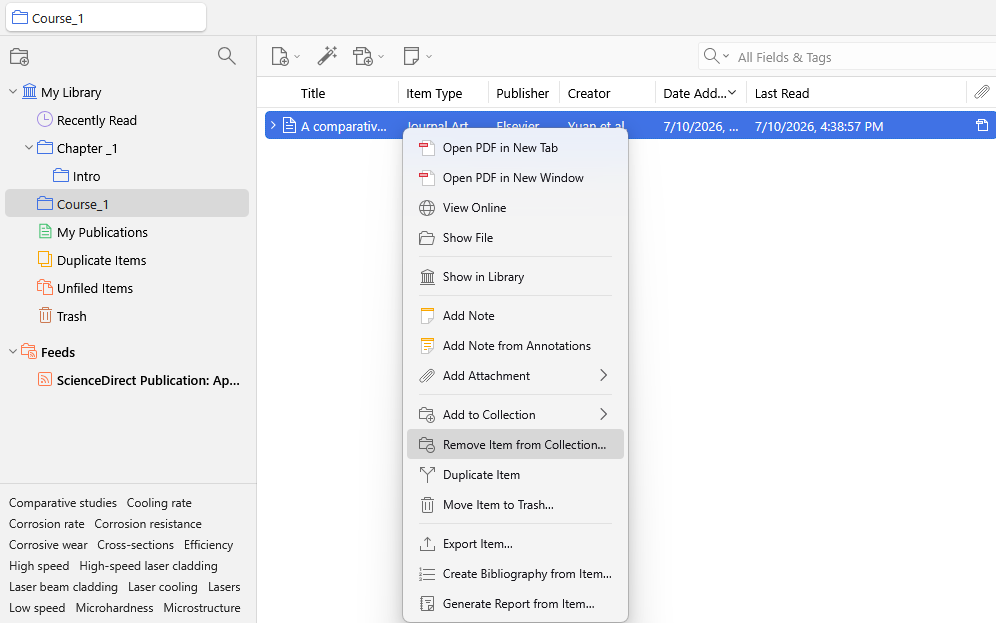
Select a collection in the left Zotero pane, then select the items in the center pane that you want to remove from the collection. Press the Delete key to remove the items from the collection. You can also right-click the selected items and choose “Remove Item(s) from Collection…”. This only removes the items from the selected collection, not from “My Library” or any other collections.
To delete an item in a collection, select the items in the collection, right-click on them, and choose “Move Item(s) to Trash…”. When “My Library” or a Group library name is selected in the left Zotero pane, pressing the Delete key will also move items to the trash. When a collection or subcollection is selected, press Cmd/Ctrl-Delete to move the items directly to the trash.
Identifying Collections an Item is In#
Zotero 7 and higher versions include a section in the item pane showing a list of collections an item is in. You can also select the item and then hold down the Option key (macOS), Control key (Windows), or Alt (Zotero 6)/Ctrl (Zotero 7) key (Linux). This will highlight all collections that contain the selected item.
Saved Searches#
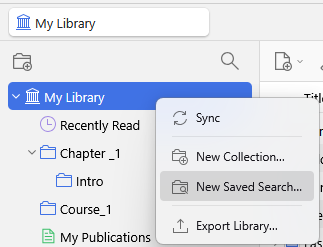
Saved Searches are like smart collections. They automatically update to include all the items in your library that meet the search criteria. For example, you can create a “To Read” Saved Search with the criteria Tag is not read. Then, opening the Saved Search will show you all of the items in your library that you haven’t read yet (i.e., the ones without a “read” tag). To mark an item as read, add the “read” tag to it.
|  |
|  | |—-|—-|
###
Special Collections#
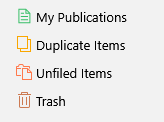
Zotero has four special collections: “My Publications”, “Duplicate Items”, “Unfiled Items”, and “Trash” which is listed on the left pane.
My Publications#
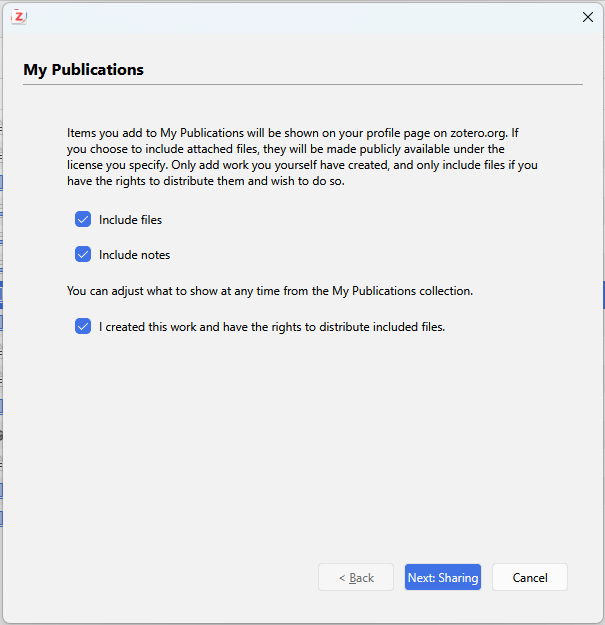
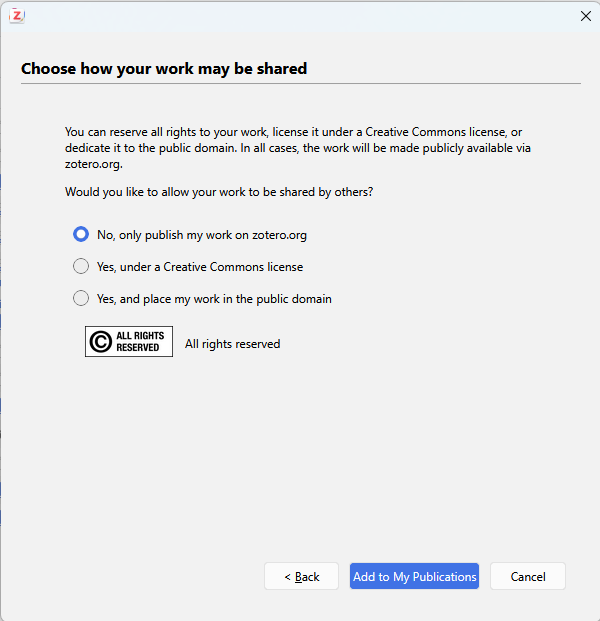
The My Publications special collection allows you to create a list of your own work and share it publicly on your profile page on Zotero.org. You can add notes to each item and even share PDFs or other files under a license of your choice.
To add an item, first add it to your library; then drag it from your library to “My Publications” to launch the My Publication wizard. You’ll be able to choose whether to include attached notes and files. Only add work you yourself have created, and only include files if you have the rights to distribute them publicly and wish to do so.
Duplicate Items#
The Duplicate Items special collection displays items that Zotero has identified as potential duplicates. As you build your Zotero library, you may occasionally add the same item more than once. For example, you might save the same item twice from a webpage or import an item that is already in your library. You can use this collection to review and merge duplicate items.
Finding Duplicates#
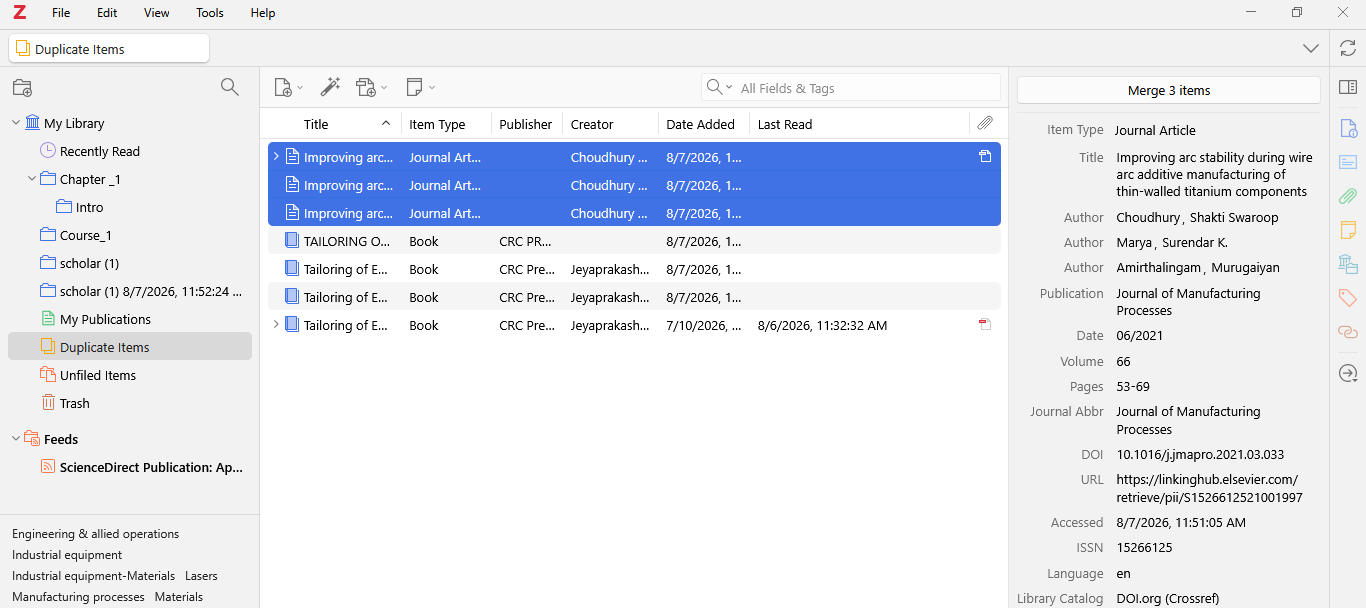
Clicking on the “Duplicate Items” collection in your library will show the items Zotero thinks are duplicates in the center pane.
Zotero currently uses the the title, DOI, and ISBN fields to determine duplicates. If these fields match (or are absent), Zotero also compares the years of publication (if they are within a year of each other) and author/creator lists (if at least one author last name plus first initial matches) to determine duplicates. The algorithm will be improved in the future to incorporate other fields.
At this time, it is not possible to mark false positive matches as non-duplicates. This functionality will be added in the future.
Note that duplicate detection only works within a library. Items in different group libraries are separate items. They won’t show up in the “Duplicate Items” collection of any one of the libraries.
Merging Duplicates#
You should always resolve duplicate items by merging them, rather than deleting one of the duplicates. Merges will retain all of the collections and tags of the merged items; deleting one item will lose these data. Merges are also automatically recognized by the word processor plugins and don’t affect your automatically generated citations and bibliographies.
To merge items in the “Duplicate Items” collection, select an item in the center pane. Zotero will automatically co-select the other items that it thinks are duplicates. Click the “Merge <number> Items” button in the right pane to merge the items. If the item fields don’t match completely, you can select one item to be the “master” from the list at the top of the right pane, then select alternative versions of mismatched fields using the icons to the right of each field.
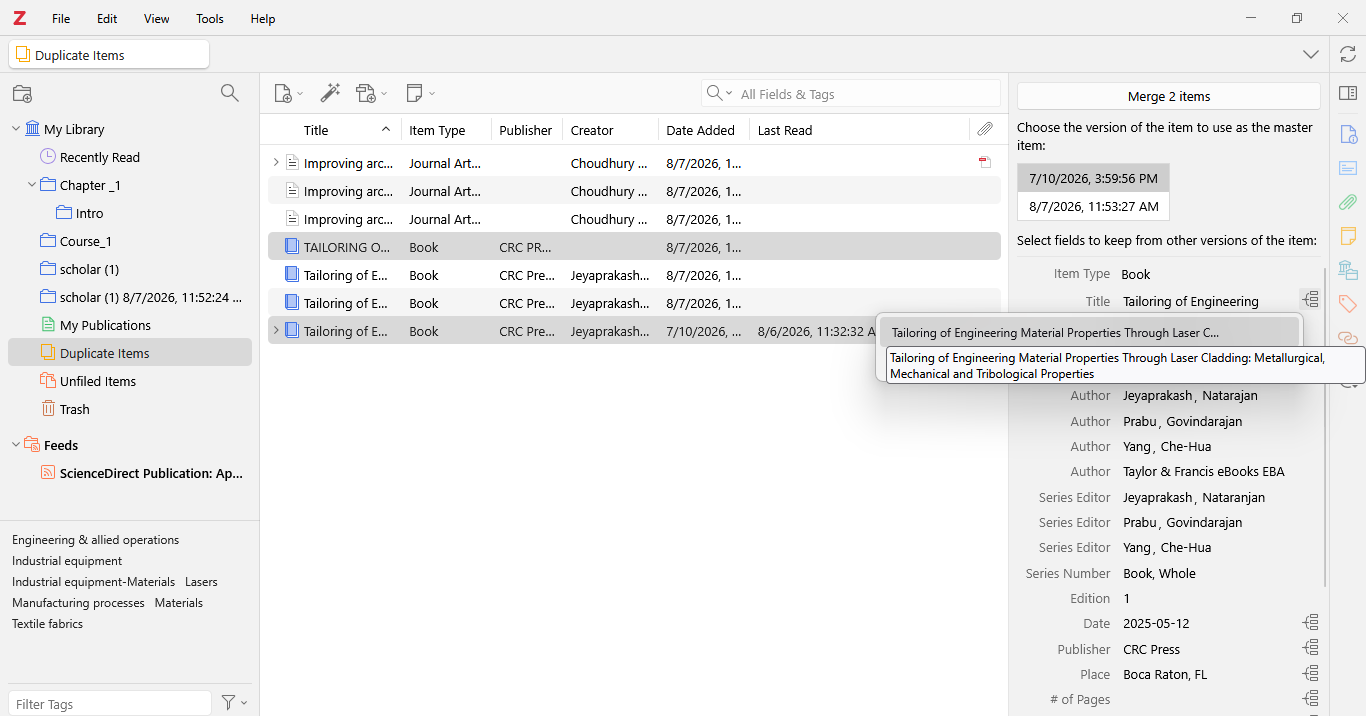
It may be easier to see which items are selected if you sort the items by Title. You can select a single item in the “Duplicate Items” view by holding down Alt/Option while clicking. You can de-select an item from a set of duplicates by holding down Ctrl (Windows/Linux) or Cmd (Mac) while clicking.
You can also select a group of two or more items of the same item type anywhere in your Zotero library, right-click, and select “Merge Items…” from the context menu.
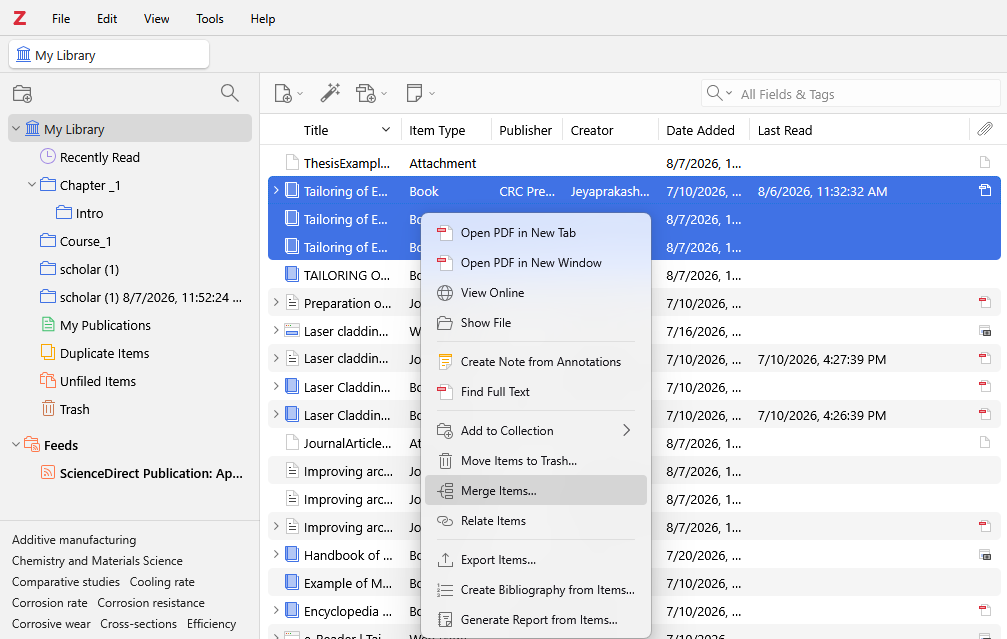
Unfiled Items#
Items that are not in any collection can be found in the “Unfiled Items” special collection at the bottom of the collections list in the left Zotero pane. If the “Unfiled Items” collection is not visible, right-click on “My Library” or the Group library name and choose “Show Unfiled Items”.
Trash#
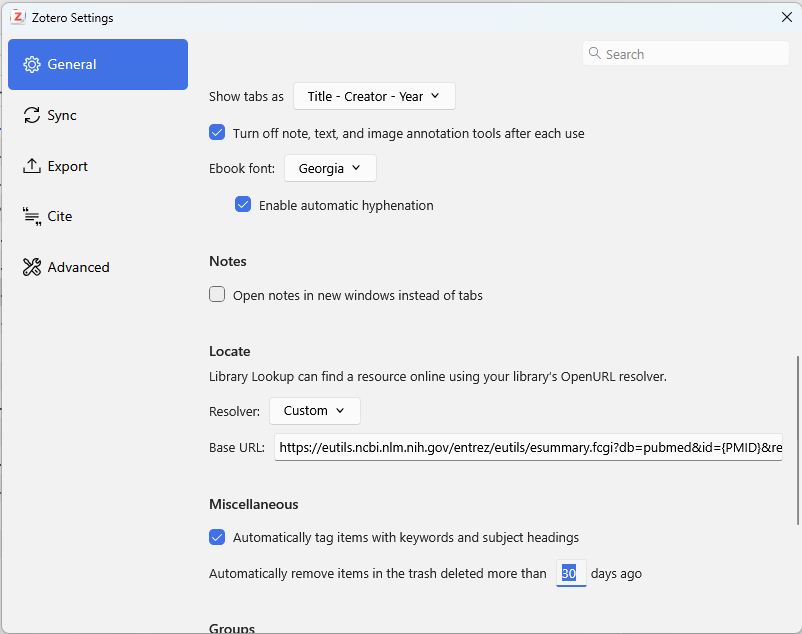
When you delete an item by pressing Delete (Cmd/Ctrl-Delete in a collection) or by right-clicking and choosing “Move Item(s) to Trash”, they are moved to the Trash special collection. By default, items remain in the Trash for 30 days (you can adjust this period in the General pane of Zotero preferences; Click Edit –> Settings –> General Pane), after which they are deleted permanently. You can restore an item from the Trash to your library by selecting it in the Trash and clicking the “Restore to Library” button (or by right-clicking and choosing “Restore to Library”). You can delete an item permanently by clicking the “Delete Permanently…” button (or by right-clicking and choosing “Delete Item…”.
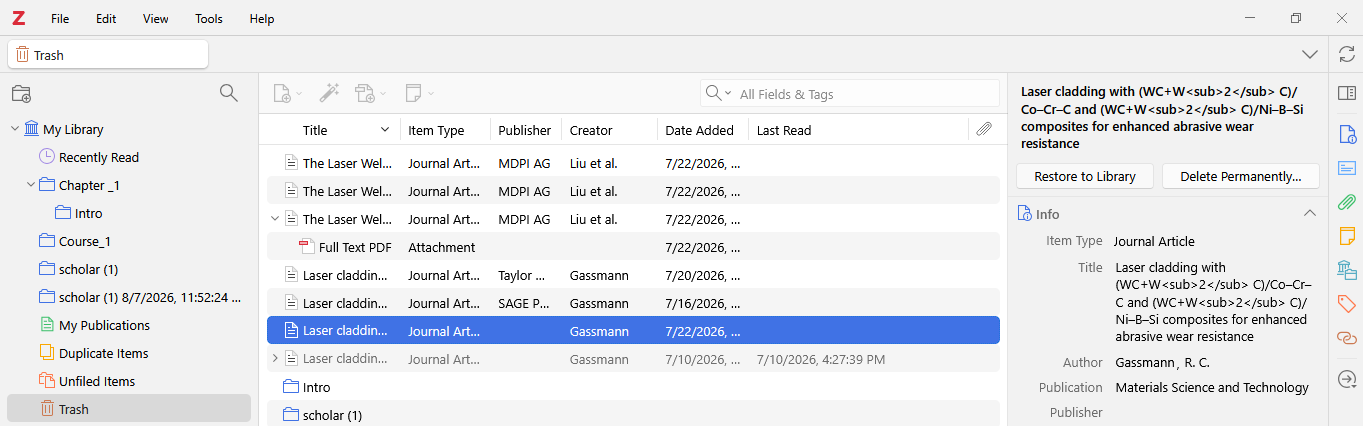 Or
Or
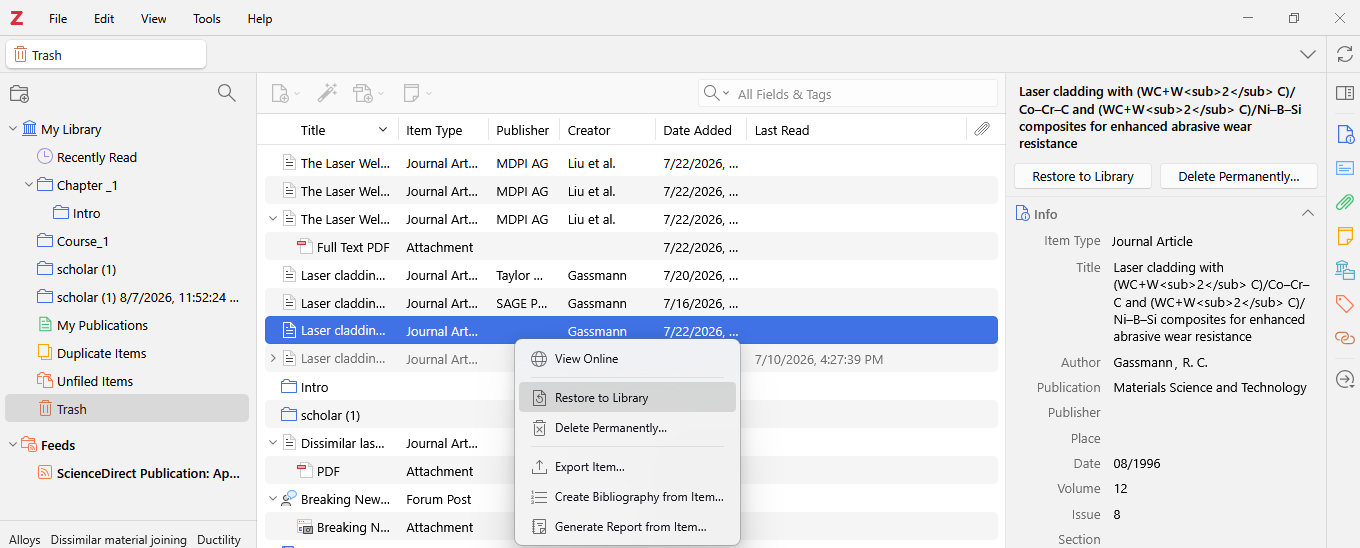
To update the preferences
| 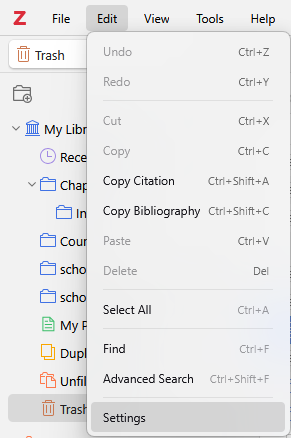 |
|  | |—-|—-|
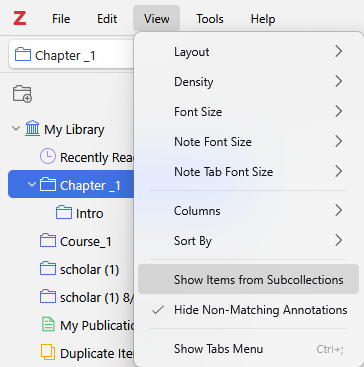
Show Items from Subcollections#
By default, items added to a subcollection do not automatically appear in parent collections. This can be changed by toggling “Show Items from Subcollections” in the View menu. This setting is not currently available in the online library.
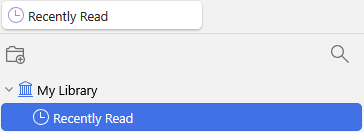
Recently Read feature
Zotero added a Recently Read collection to the top of the collections list. This is a virtual collection that shows the items in a library with attachments you’ve opened in the last two weeks, most recent first. It includes a Last Read column, which you can also add to other views if you’d like to.
Opening an attachment or changing pages will bump the item to the top of the list. (Changing pages will only update its last-read time once every few minutes.)
This data syncs between devices, so you can quickly find a file on another device that you’ve read elsewhere. We’ll be adding this view to the mobile apps soon.
Tags#
The Tag Selector#
The tag selector is located at the bottom of the left Zotero pane. It shows all the tags that have been assigned to the items currently shown in the center pane (i.e., items in the currently selected collection that match the current search). To show all of the tags present in the library, click the filter button ( ) in the lower-right corner of the tag selection and choose “Display All Tags in This Library”. Tags not assigned to currently shown items are greyed out. You can filter items by their tags by clicking on one more tags in the tag selector. Only items that have all of the selected tags will be shown in the center pane. As you apply filters, the list of tags in the tag selector will be updated to show only the tags assigned to currently visible items. Clicking on a tag again will deselect it. To deselect all tags at once, click the filter button and choose “Deselect All”.
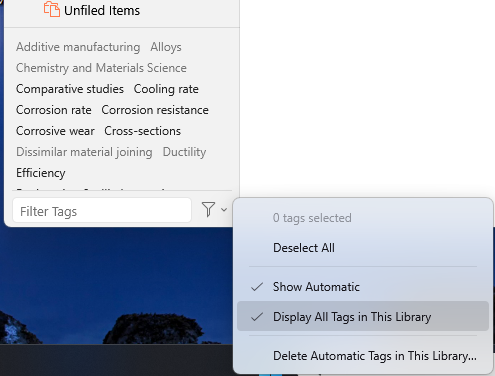
The filter box at the bottom of the tag selector can be used to search for tags. Type in the search box to see all tags that match. To go back to viewing all the tags in the collection, press the Escape key or click the “X” button on the right side of the search box.
Adding Tags to Items#
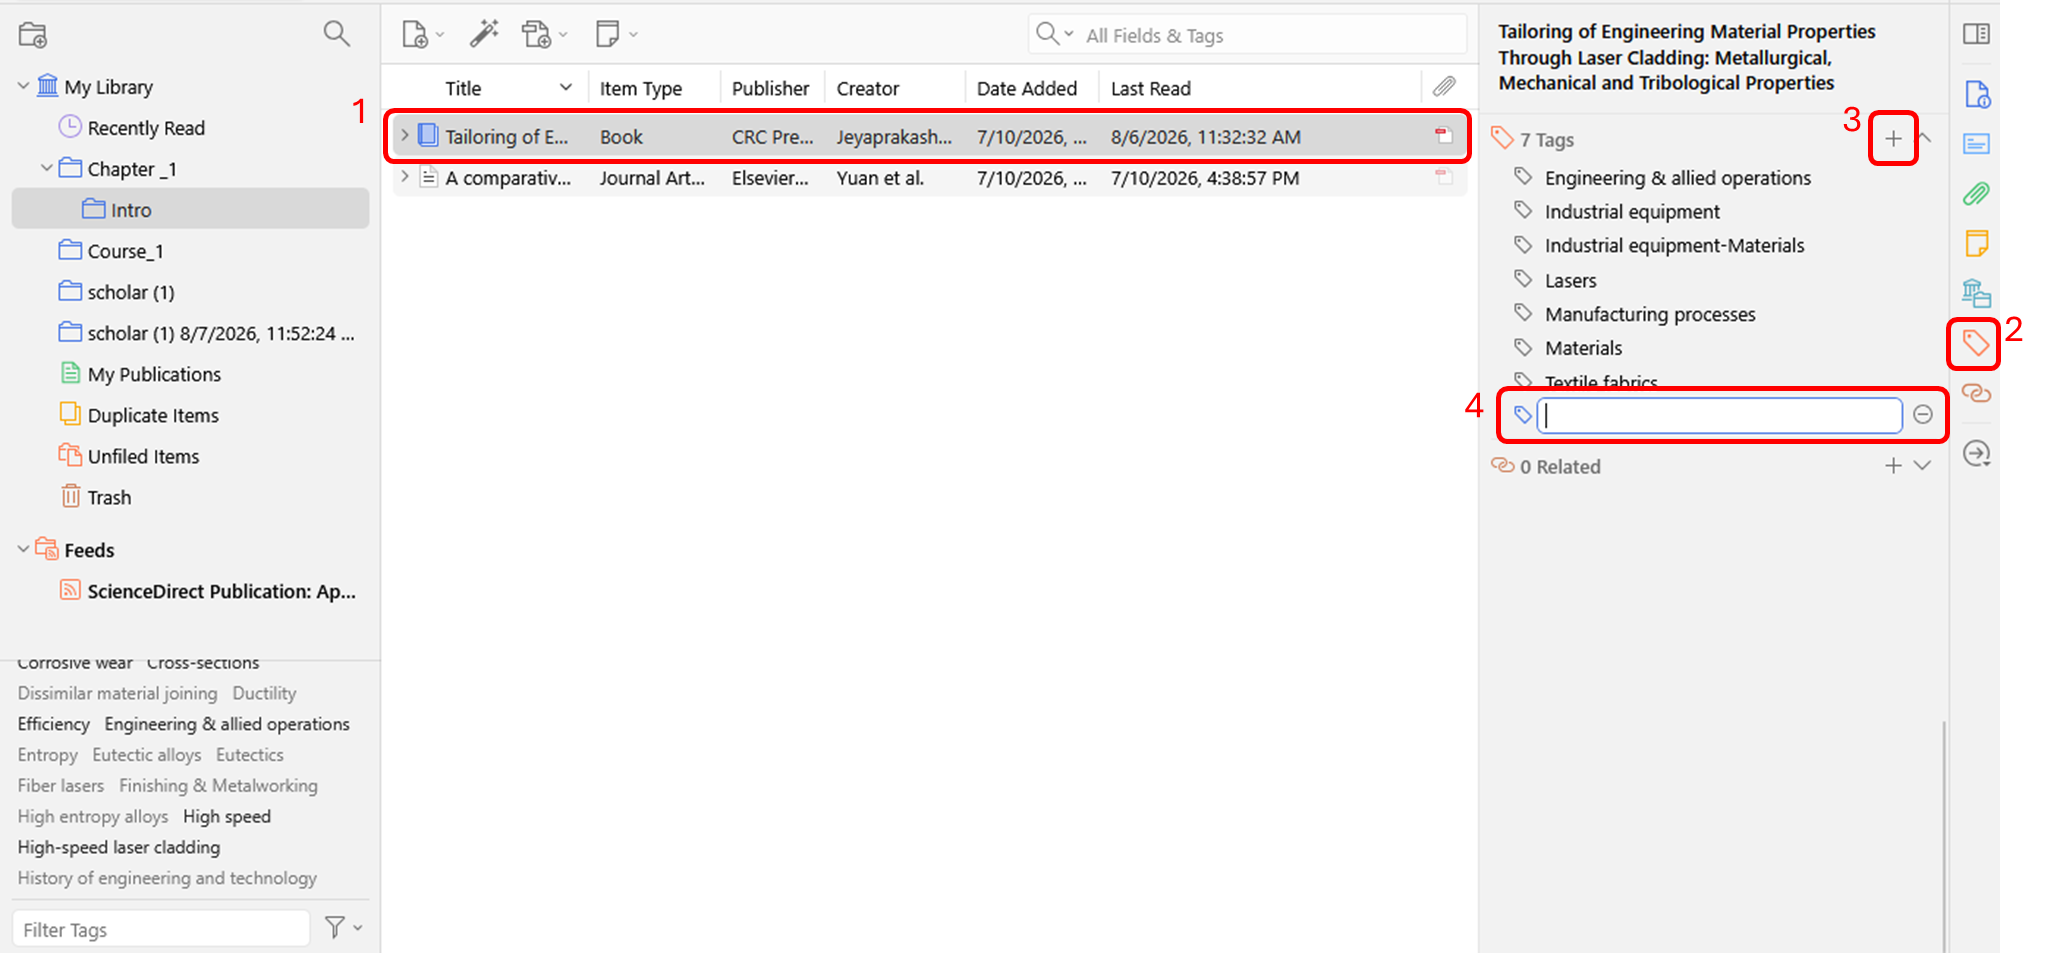
To add a tag to an item, select the item in the center Zotero pane, and then click the Tags icon in the right-hand pane. Click the Add button, type the tag name, and type Enter/Return. You can rename a tag by clicking on it and typing the new name. Once you have added the tag it will also appear in the tag selector in the bottom left.
As you type, you will be shown a list of matching existing tags. You can choose a suggested tag using the up and down arrow keys and insert it by pressing Tab or Enter/Return on your keyboard.
You can also drag items to a tag in the tag selector in the bottom left to quickly add the tag to all of those items.
Removing Tags from Items#
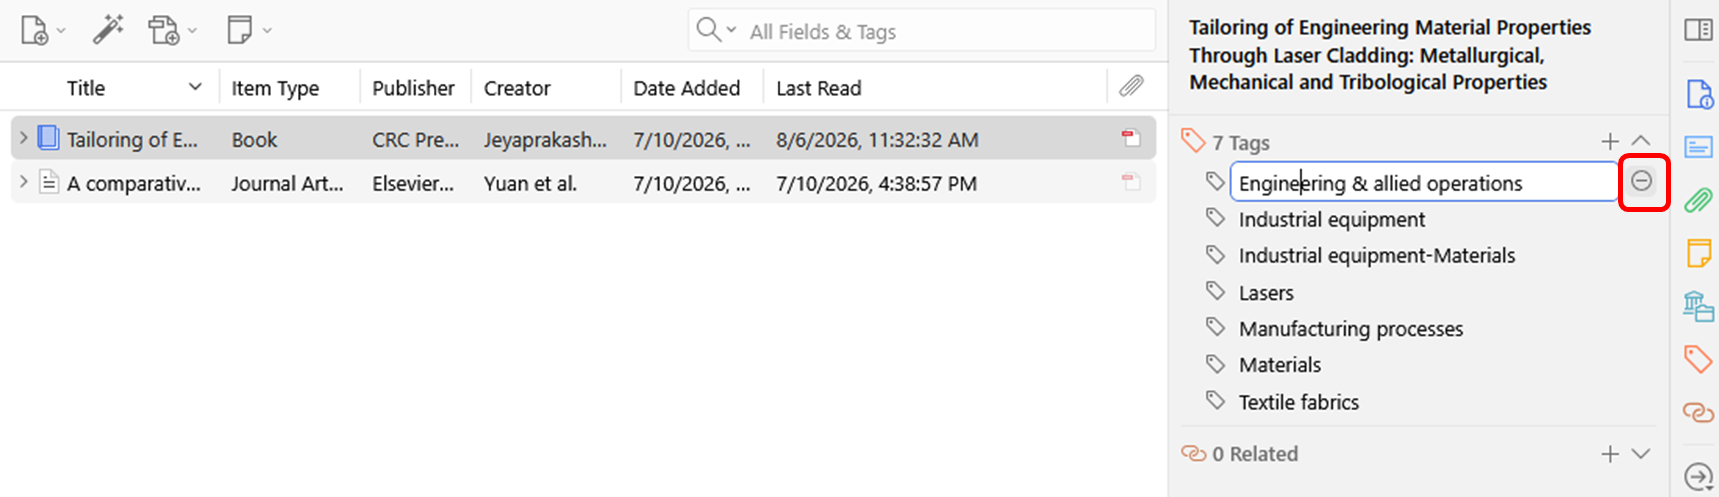
To remove a tag from an item, select the item in the items list, click the Tags tab in the right-hand pane, and click the “-” (minus) button next to the tag you want to remove.
You can also hold Cmd (Mac) or Shift (Windows/Linux) while dragging items to a tag in the tag selector in the bottom left to remove the tag from all of those items.
or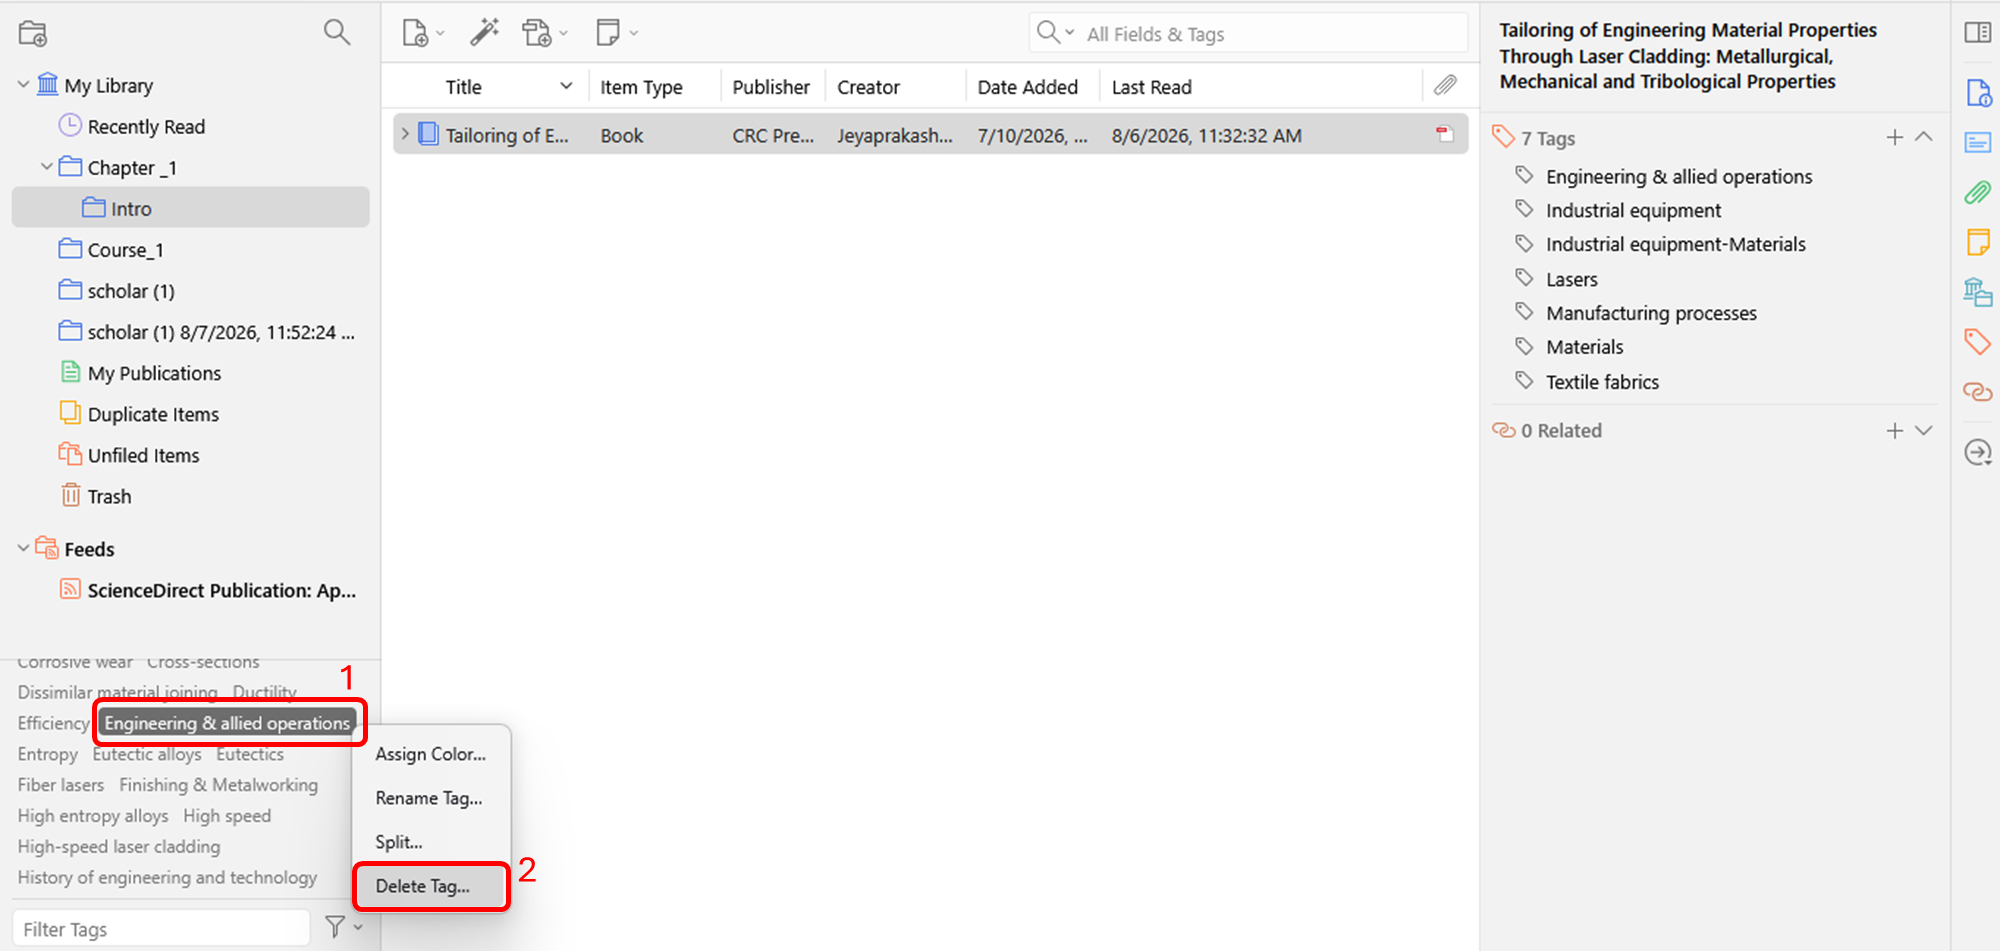
Bulk Editing Tags#
You can use the tag selector to globally rename and delete tags. To rename a tag across all items it is assigned to, right-click the tag in the tag selector and choose “Rename Tag…”. To delete a tag from all items, right-click the tag and choose “Delete Tag…”. You can merge tags by renaming one to have the same name as the other.
Emoji Tags#
If you use an emoji in a tag, it will be displayed directly in the items list.
Colored Tags#
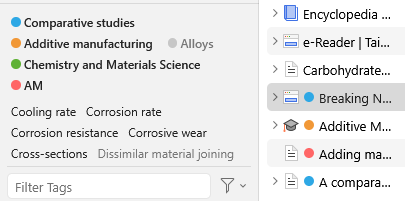
Colored tags appear as small colored squares next to items’ titles in the center pane. Colored tags make it easy to quickly scan your library for tags that have a certain tag. Colored tags are shown at the top of the tag selector and are always visible, even if not assigned to any visible items.
Some may use colored tags for “to read” or “favorite” items.
You can assign a color to a tag by right-clicking on it and choosing “Assign Color…” In the popup window, select a color from the dropdown box and click “Set Color”. You can remove a color from a tag by right-clicking, choosing “Assign Color…”, and clicking “Remove Color”.
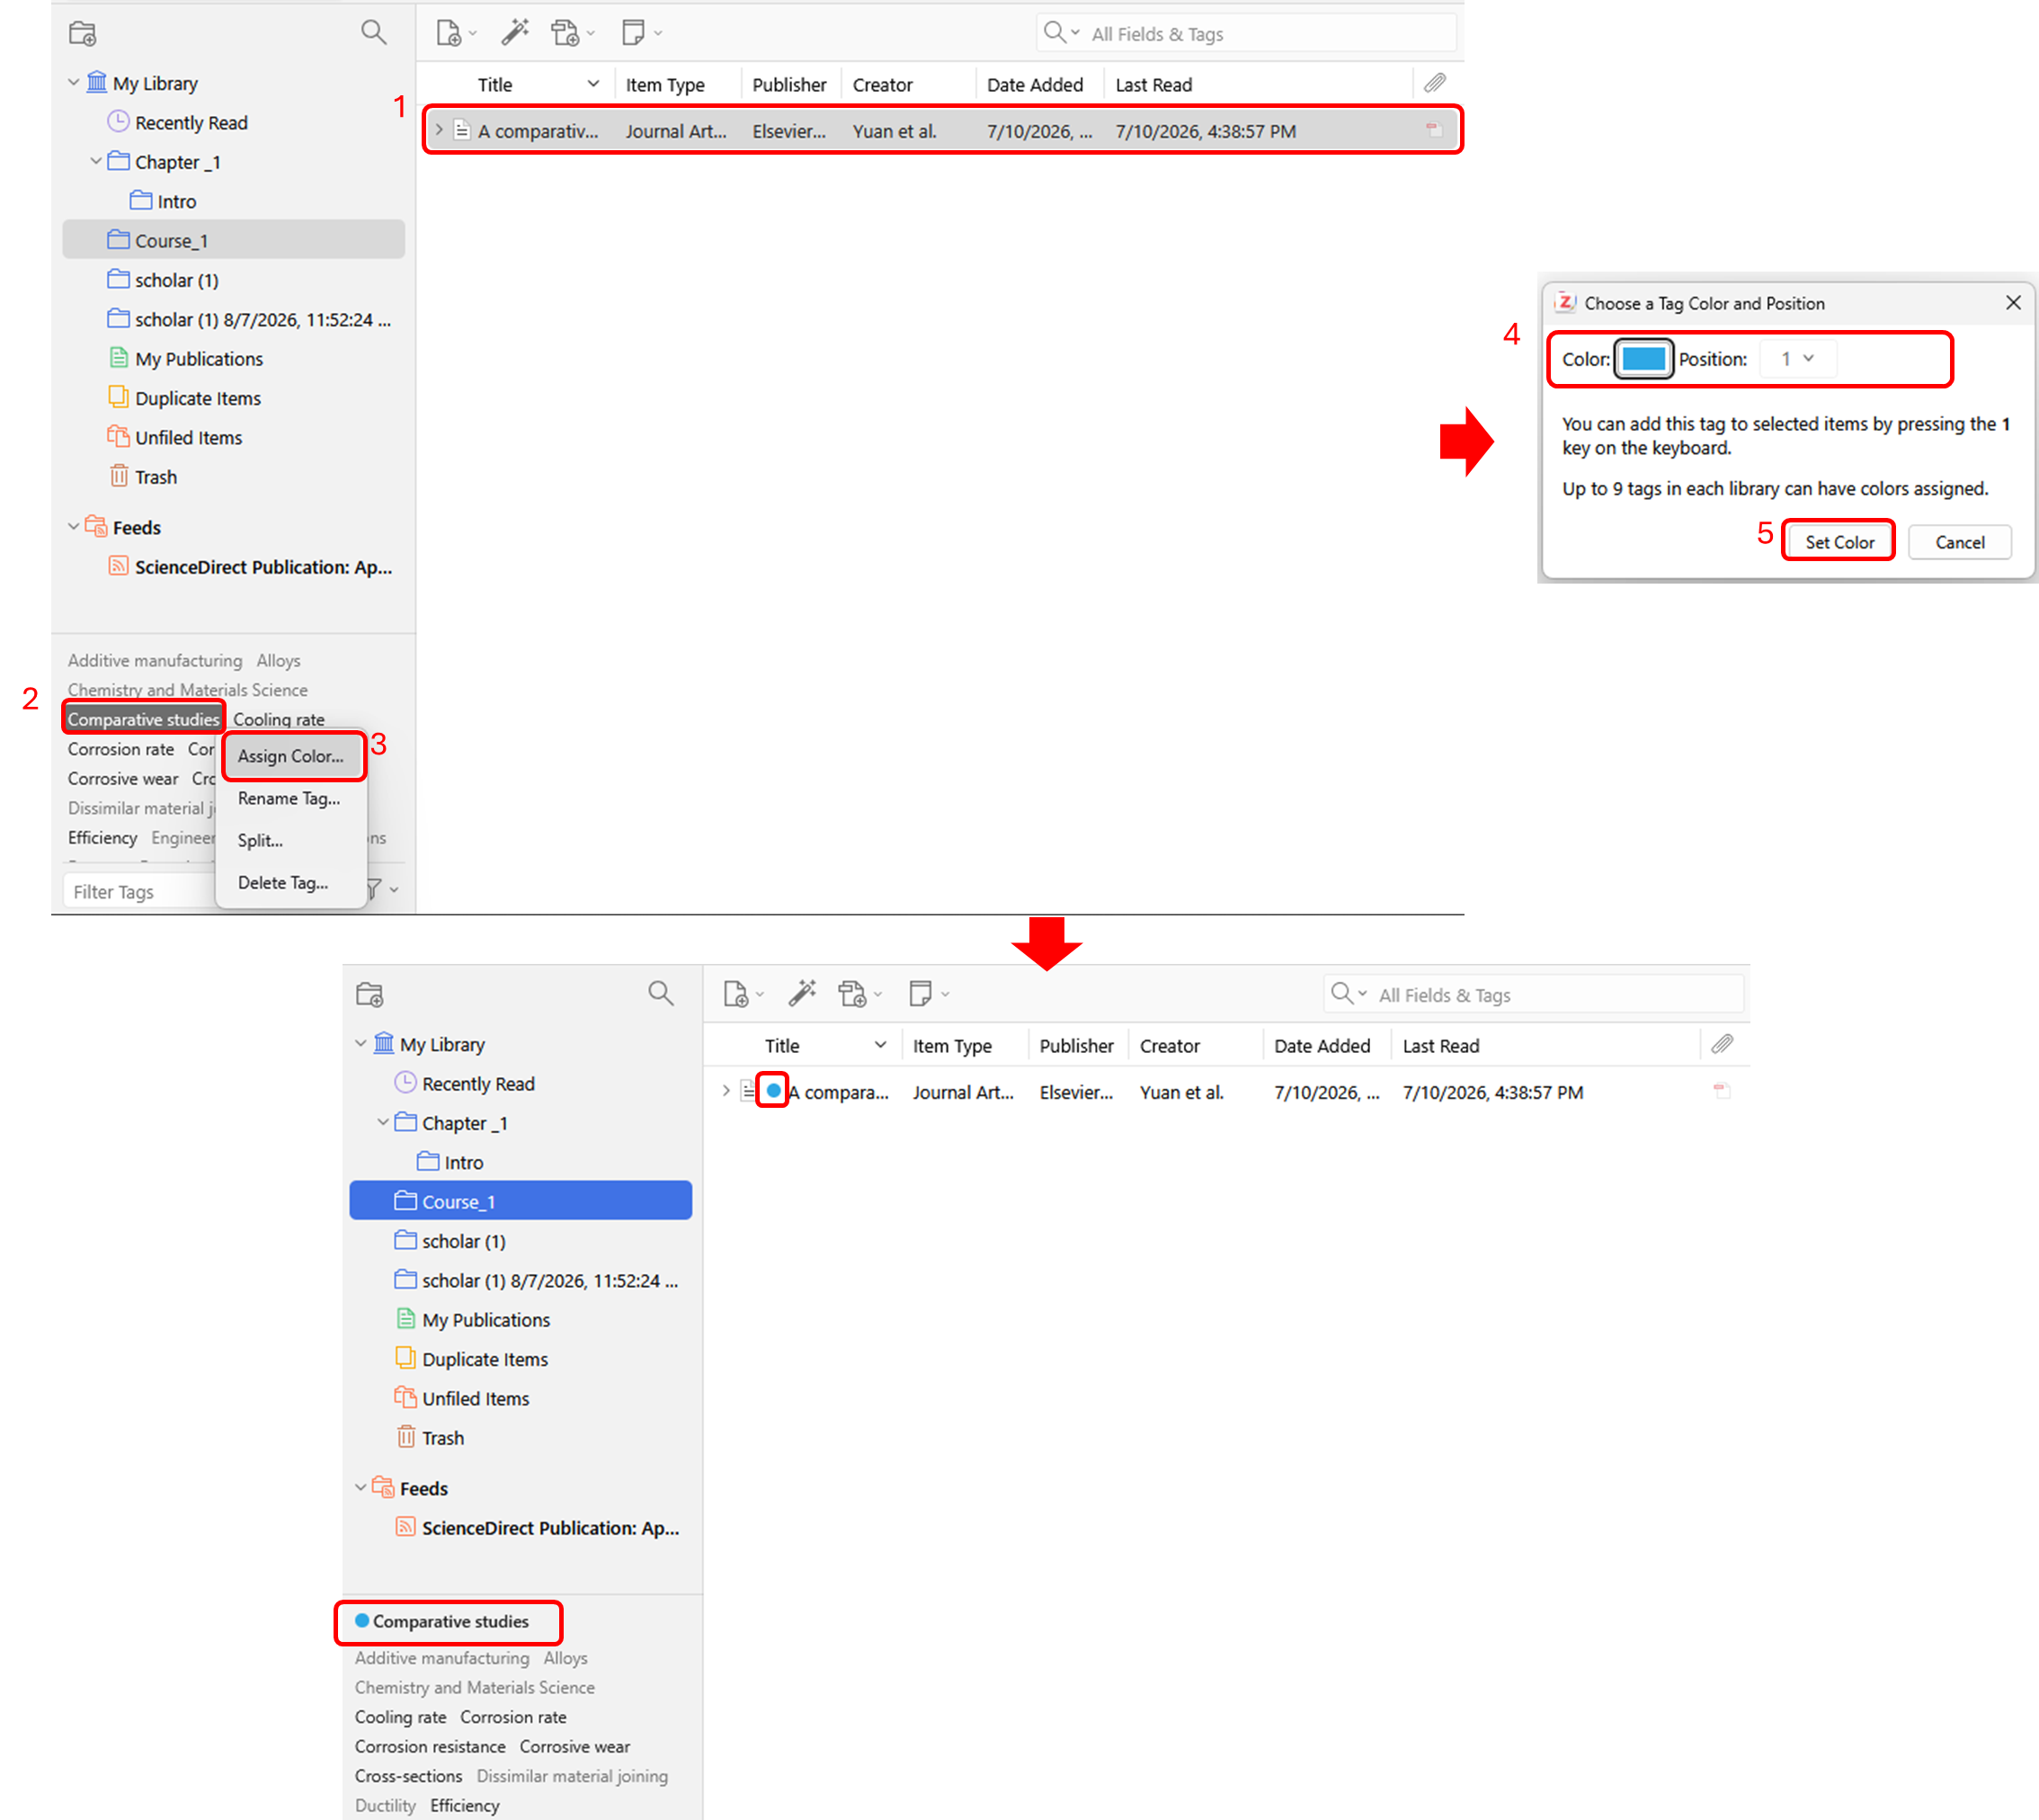
Each colored tag is also assigned a number, corresponding to its position at the top of the tag selector. You can quickly add or remove a colored tag from selected items by typing the corresponding number key on your keyboard. You can change a colored tag’s number by right-clicking on it, choosing “Assign Color…”, and choosing a new position.
If you use an emoji in a colored tag, the emoji will be displayed directly in place of the colored square. The tag will otherwise behave like a colored tag, showing at the top of the tag selector and being assignable with a number key. Up to 9 tags can be assigned colors and numbers.
Automatic Tags#
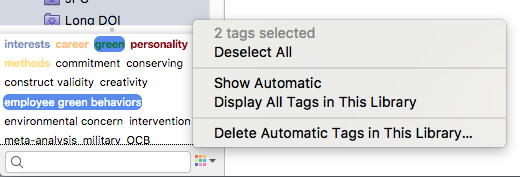
When items are saved to a Zotero library from the web, tags are sometimes automatically added to items. For example, OPAC library catalogs provide subject headings for their records, which are saved as Zotero tags. Automatic tags behave the same as manually added tags but are marked by a black icon in the “Tags” tab of the right-hand Zotero pane (versus the blue icon for regular tags).
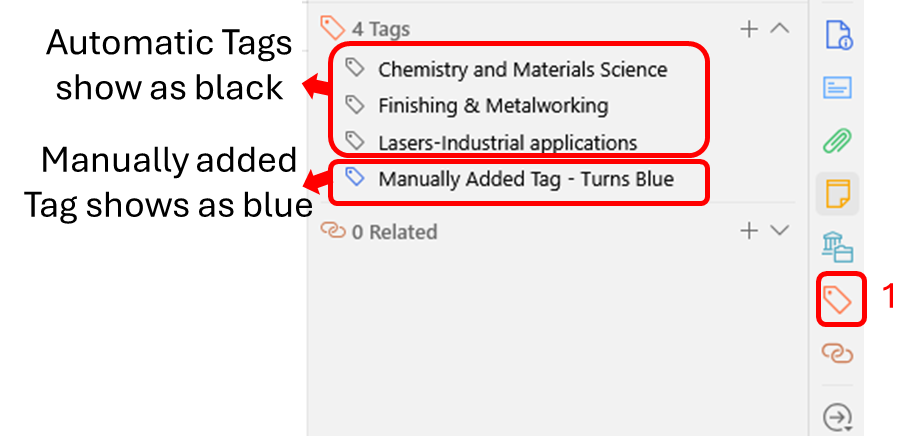
Automatic tags can be hidden from the tag selector by clicking the multi-color button in the lower-right corner of the tag selector and unchecking “Show Automatic”. You can delete all automatic tags from a library by clicking “Delete Automatic Tags in This Library”.
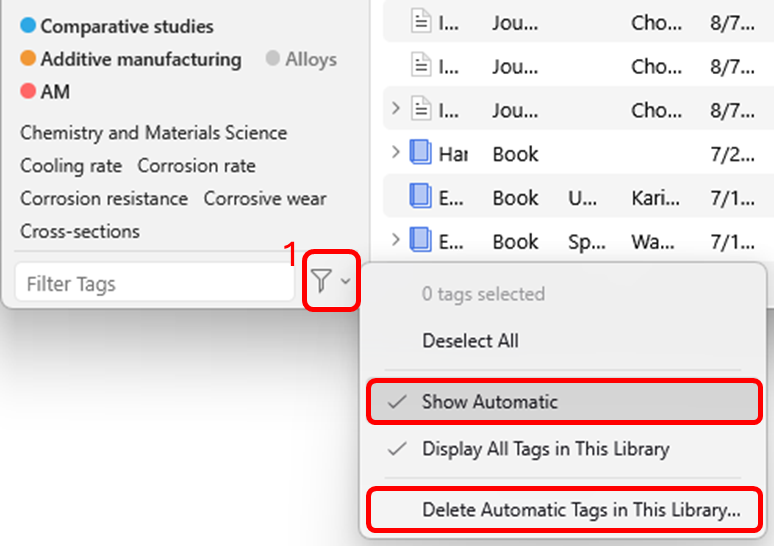
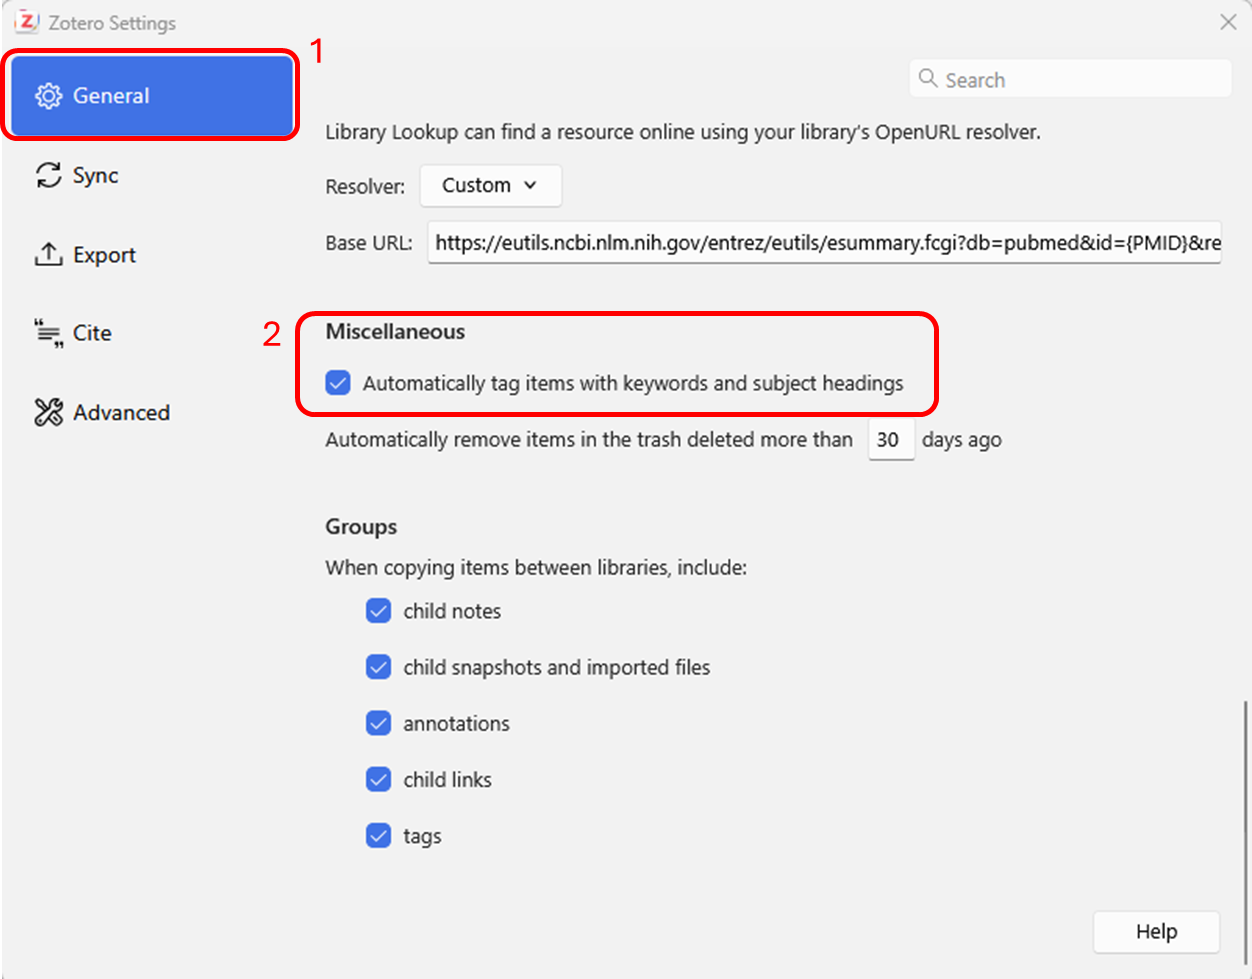
To prevent Zotero from adding automatic tags, uncheck “Automatically tag items with keywords and subject headings” in the General pane of Zotero preferences.
Searching
Quick Search#
Quick searches provide a fast way to find items in a library or collection.
Running a Quick Search#
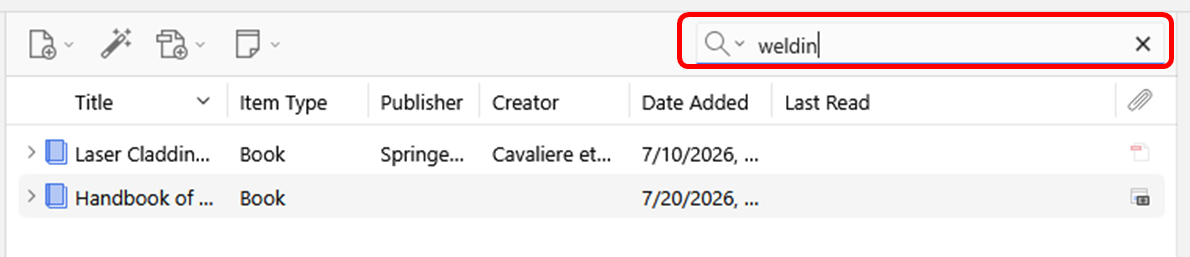
To begin searching, click inside the search box at the top-right of the center pane (or type Ctrl/Cmd-F) and start typing your search terms. As you type, only those items in the center column that match the search terms will remain.
Quick Search Options#
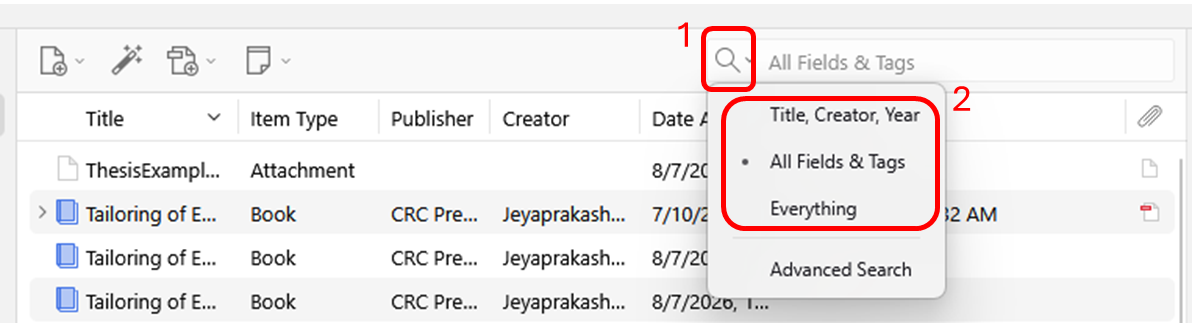
Quick search can be used in three different modes:
-
“Title, Year, Creator” - matches against these three fields, as well as publication titles
-
“All Fields & Tags” - matches against all fields, as well as tags and text in notes
-
“Everything” - matches against all fields, tags, text in notes, and indexed text in PDFs
Speeding Up Quick Searches#
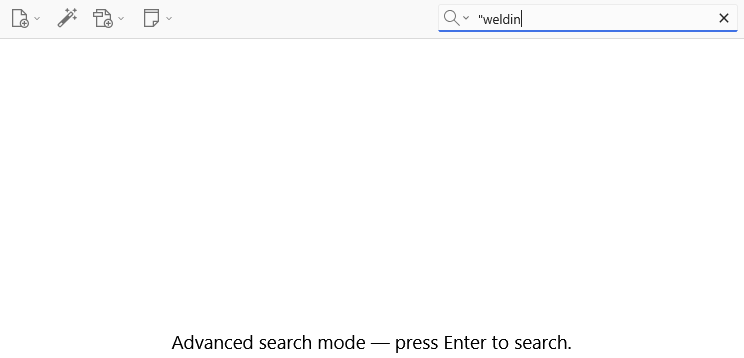
By default, the quick search searches automatically as you type. In very large libraries, this can result in a slow search experience. To speed things up, type a quotation mark (“) mark at the beginning of the search field. This causes the search to start only when you type Enter/Return.
Advanced Search#
Advanced searches offer more and finer control than quick searches, and allow you to make saved searches.
Running an Advanced Search#
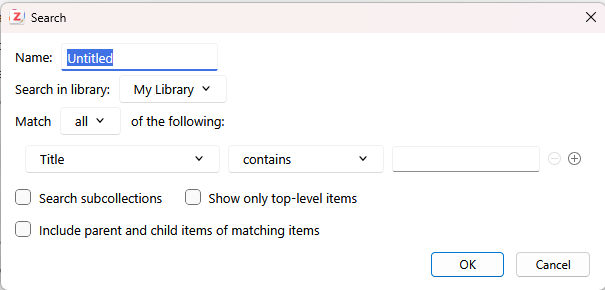
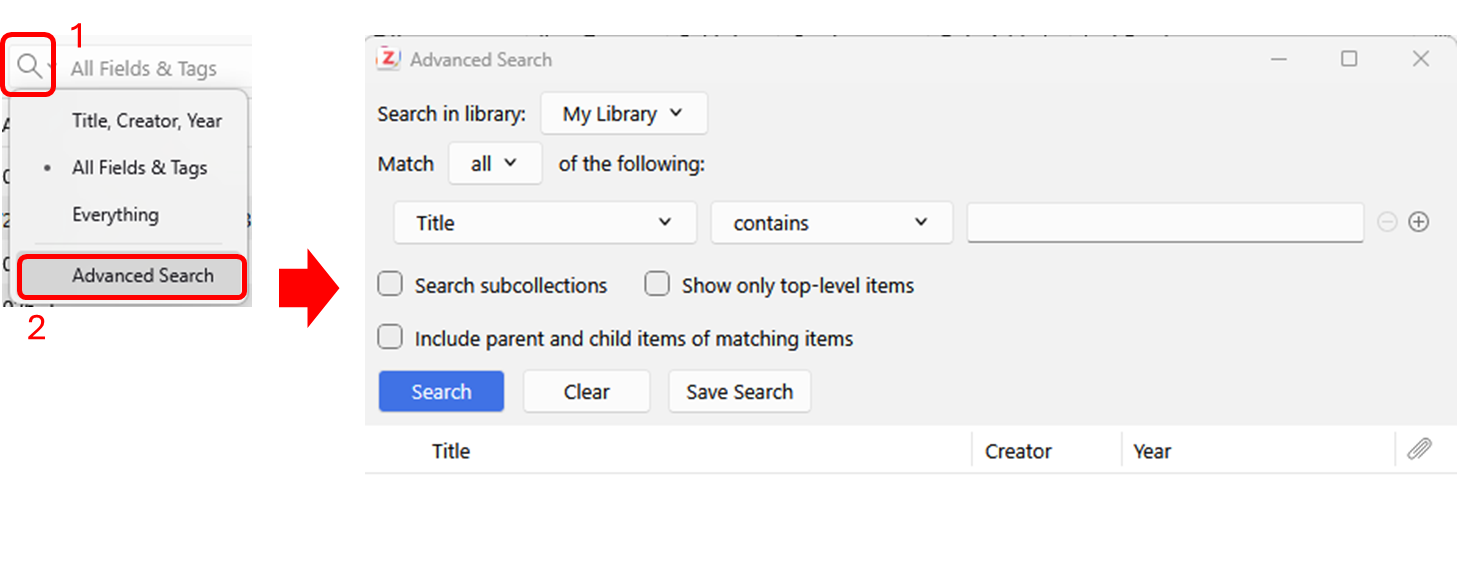
To open the Advanced Search window, click on the magnifying glass icon ( ) at the top of the center pane and select “Advanced Search”. In this window, you can filter items by the content of specific fields or by other properties, like item type or the collection an item belongs to. Multiple filters can be set up by clicking the plus button.
Set the library to search in by using the “Search in library:” option at the top of the window. It is not currently possible to search in multiple libraries at one time.
By default, items only show up in the search results if they satisfy all search criteria. To change the search so that all items matching at least one criterion are returned, change the “Match” option to “any”.
You can filter items by the collections or saved searches they belong to by searching by “Collection”. To include items in subcollections of matching collections in the search results, check “Search subcollections”.
To hide non-matching parent items with child items that do match the search criteria, and to collapse matching parent items with matching child items, check “Show only top-level items”.
To match search criteria against both parent items and their children, check “Include parent and child items of matching items”. If this option is selected and “Match” is set to “all”, parent/child items will still show up if just part of the criteria is met by the parent item and the other part by a child item.
Wild Cards#
The % percent sign character acts as a wild card in advanced searches, substituting for zero or more characters. For example, the search term “W% Shakespeare” will match “W Shakespeare”, “W. Shakespeare” as well as “William Shakespeare”.
To search for items where a field contains any content at all, search for the % percent sign character alone.
Saved Searches#
When you save an Advanced Search, it appears as a collection in your library but with a Saved Search icon ( ) instead of the regular collection icon (
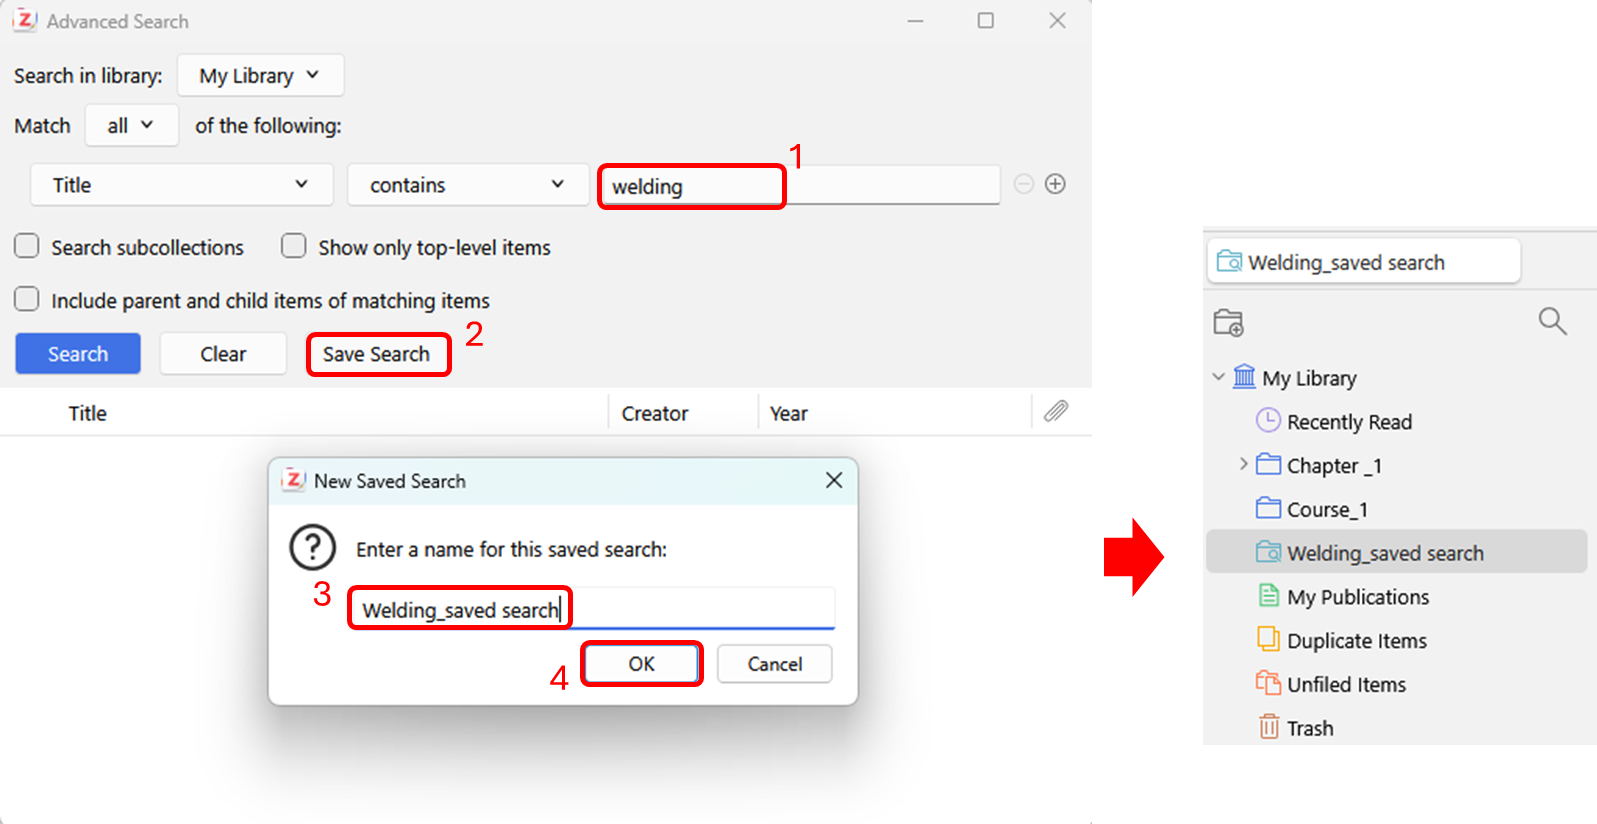
 ). Saved Searches are continuously updated. For example, if you set up a Saved Search for “Date Added” “is in the last” “7” “days”, the saved search will always show the items that have been added in the last 7 days. Saved searches only store the search criteria, not the search results. To save a search, click the “Save Search” button in the Advanced Search window and provide a name for the search.
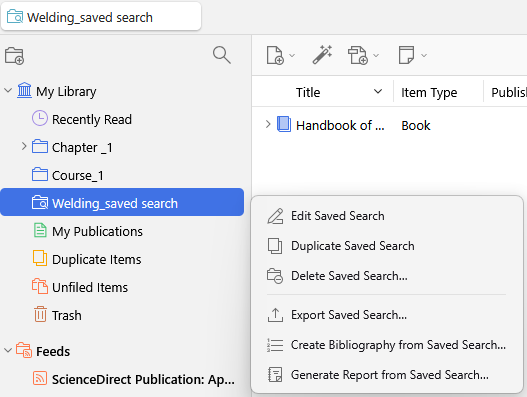
Saved searches can be edited or deleted by right-clicking the Saved Search and selecting “Edit Saved Search…” or “Delete Saved Search…”, respectively.
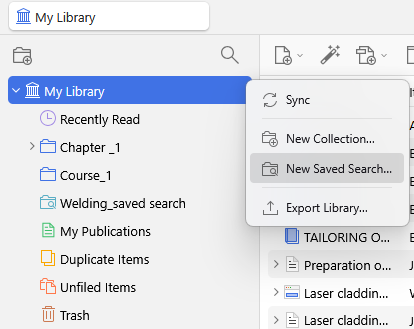
You can also create a saved search in a library by right-clicking on the library name and choosing “New Saved Search…”.
Complex Search Criteria#
It is possible to run complex Boolean searches by using multiple Saved Searches. For example, to run the search (a OR b) AND (c OR d), first make a Saved Search called “Condition1” for (a OR b), then make a Saved Search called “Condition2” for (c OR d). Finally, run a third Advanced Search and search for “Collection” “is” “Condition1” AND “Collection” “is” “Condition2”.
Full-Text Indexing#
Full-text indexing allows embedded text within PDFs, EPUBs, HTML, and text files to be searched with Quick Search (via the “Everything” option) and Advanced Search (via “Attachment Content”). Indexing happens automatically in the background when Zotero is idle.
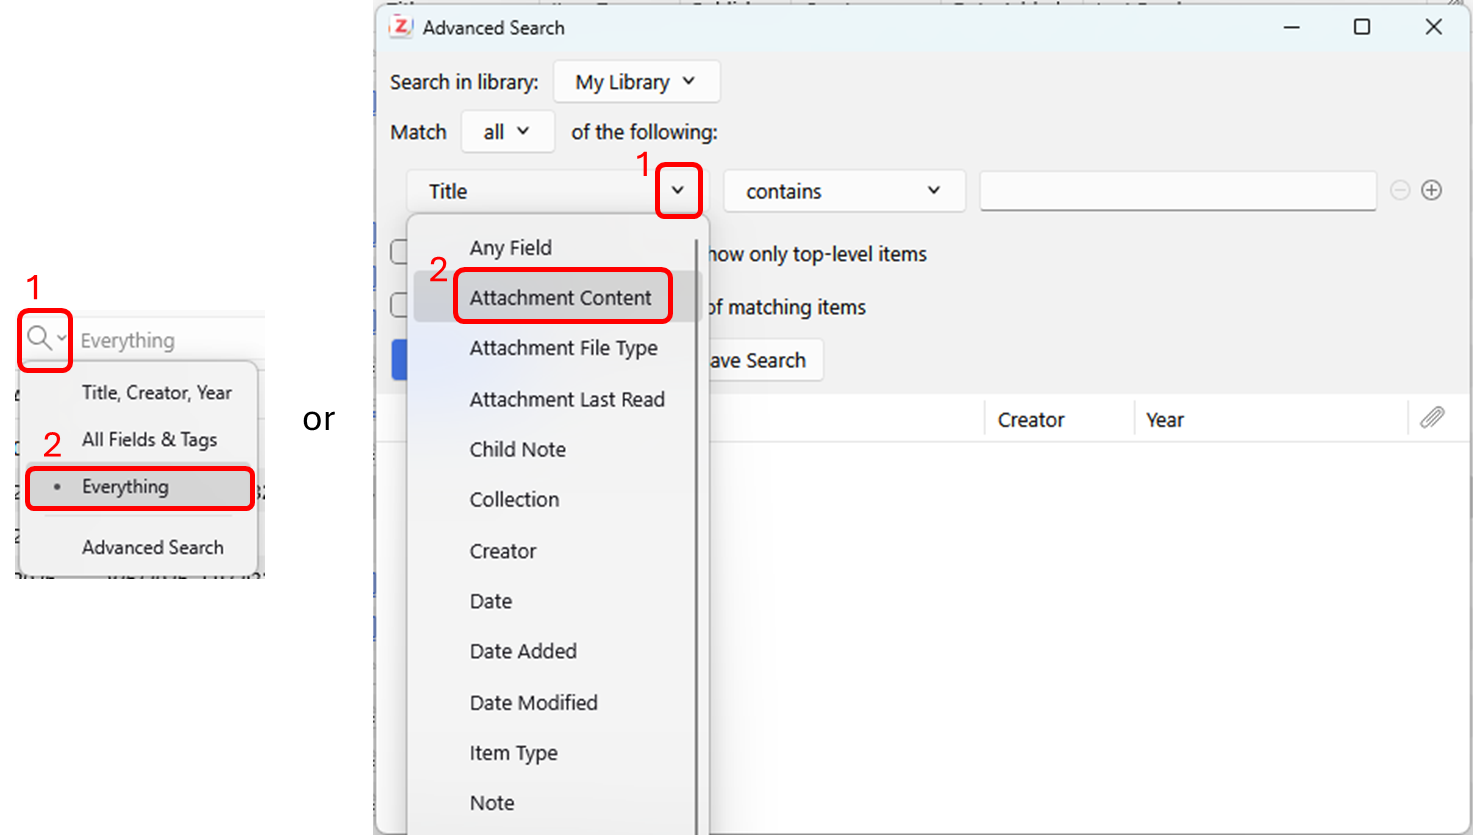
You can control how much text in a PDF/EPUB/HTML/text file is indexed in the Search pane of Zotero preferences (default: 500000 characters, 100 pages). You can remove indexed text with the “Clear Index…” button or re-create the index from scratch using the “Rebuild Index…” button. You can check the index status of any PDF/EPUB/HTML attachment by selecting the attachment item in the Zotero library and looking at the “Indexed:” field in the right pane.
If an item isn’t being indexed (e.g., if it is not showing up in an ‘Everything’ Quick Search), verify that the item has searchable text and that the text is properly stored in the PDF (e.g., try to copy text out of the document and ensure that it is high quality). If the PDF has valid text, rebuild the item’s index by right-clicking on it and choosing “Reindex Item”. If you are still having issues, please ask a question on the Zotero forums.
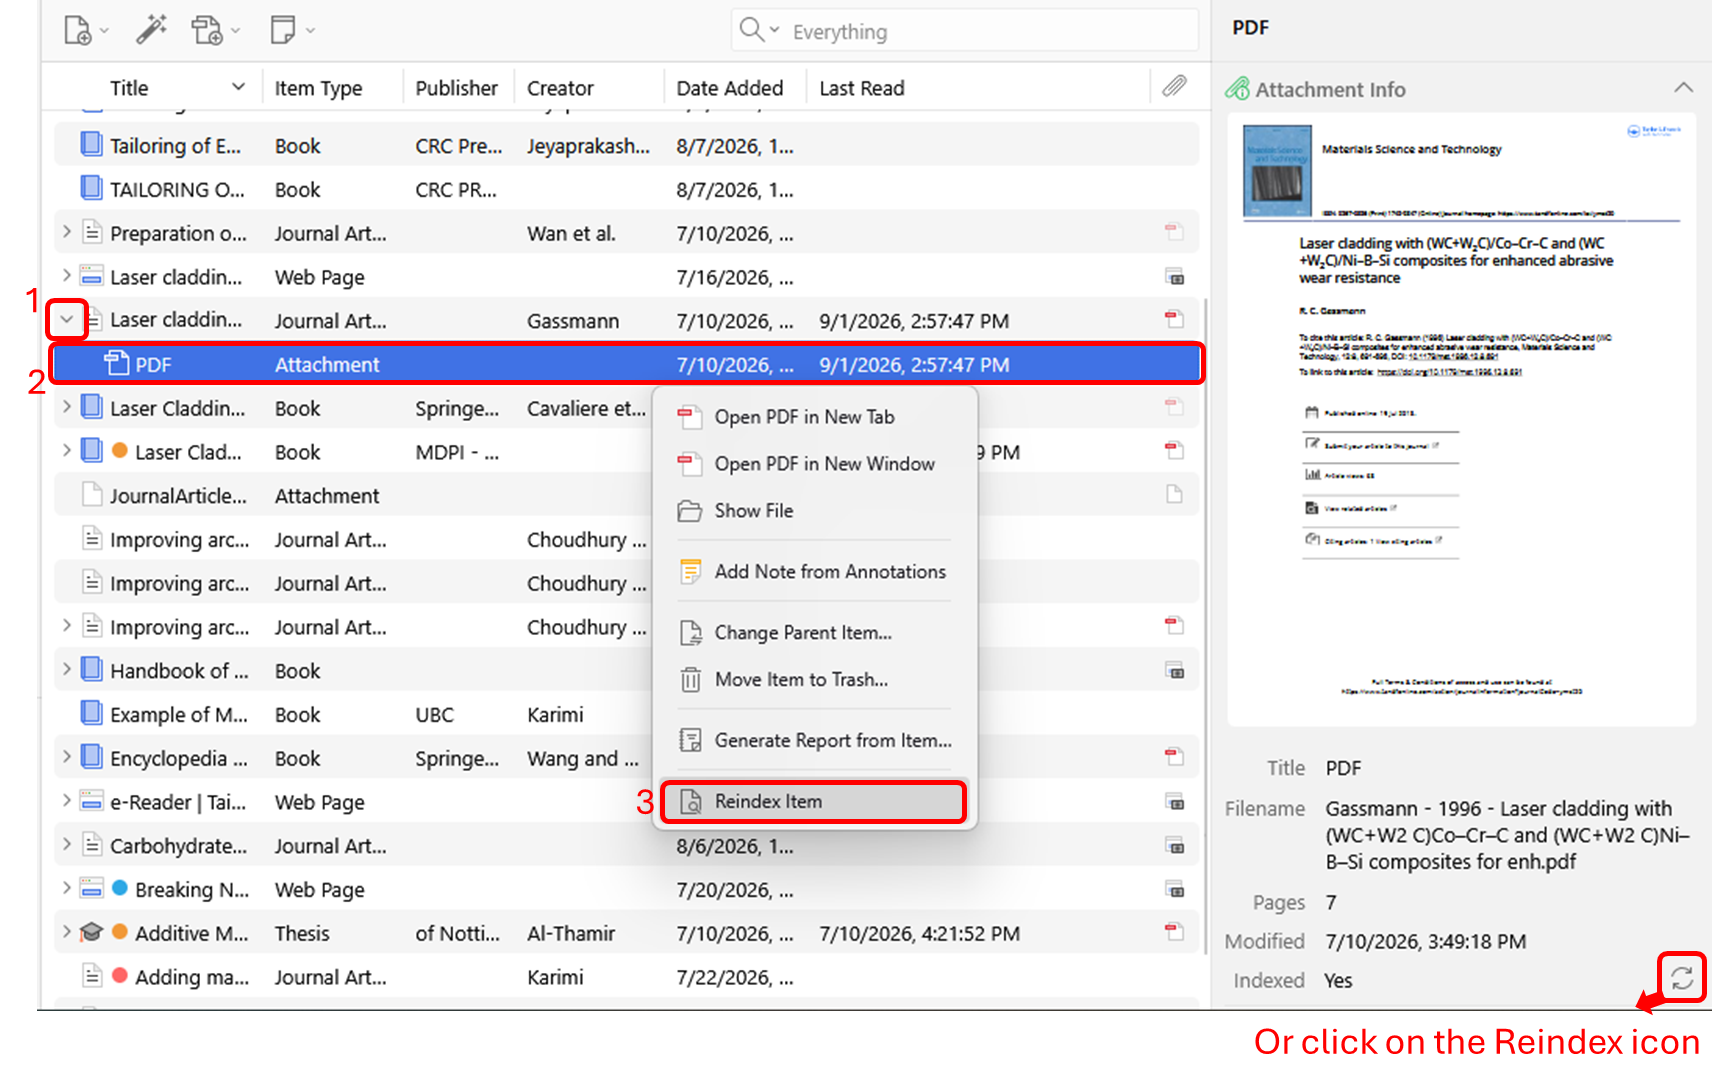 Note: At this time, only PDF/EPUB/HTML full text content (and plain text files) can be indexed by Zotero. Other document types (e.g., .docx, .odt) cannot be indexed by Zotero.
Sorting
Items in the center pane can be sorted by various fields, such as their title, creators, or the date they were added to your library.
To change the way items are sorted, click on any of the column headers at the top of the center pane. For example, if you click on “Title”, all your items will be sorted alphabetically by title. Clicking a header multiple times toggles between ascending and descending sorts. (The header will show an upward and downward arrow, respectively.)
By default, Zotero will show columns for the Title, Creators, and Attachments properties in the center pane. You can change which fields are shown by right-clicking on the column headers and selecting fields from the drop-down menu.
For each column, you can also choose the Secondary Sort field (the field that’s used to break ties when sorting).
By default, fields in the center pane are arranged from left to right in the order in which they are shown in the drop-down menu. You can rearrange them by dragging and dropping the headers. To reset the order, select “Restore Column Order” in the drop-down menu.
Notes
In addition to items and file attachments, you can also store notes in your Zotero library: child notes, which belong to a specific item, and standalone notes. Notes are synced along with item metadata; they don’t count against your Zotero file storage quota.
Child Notes#
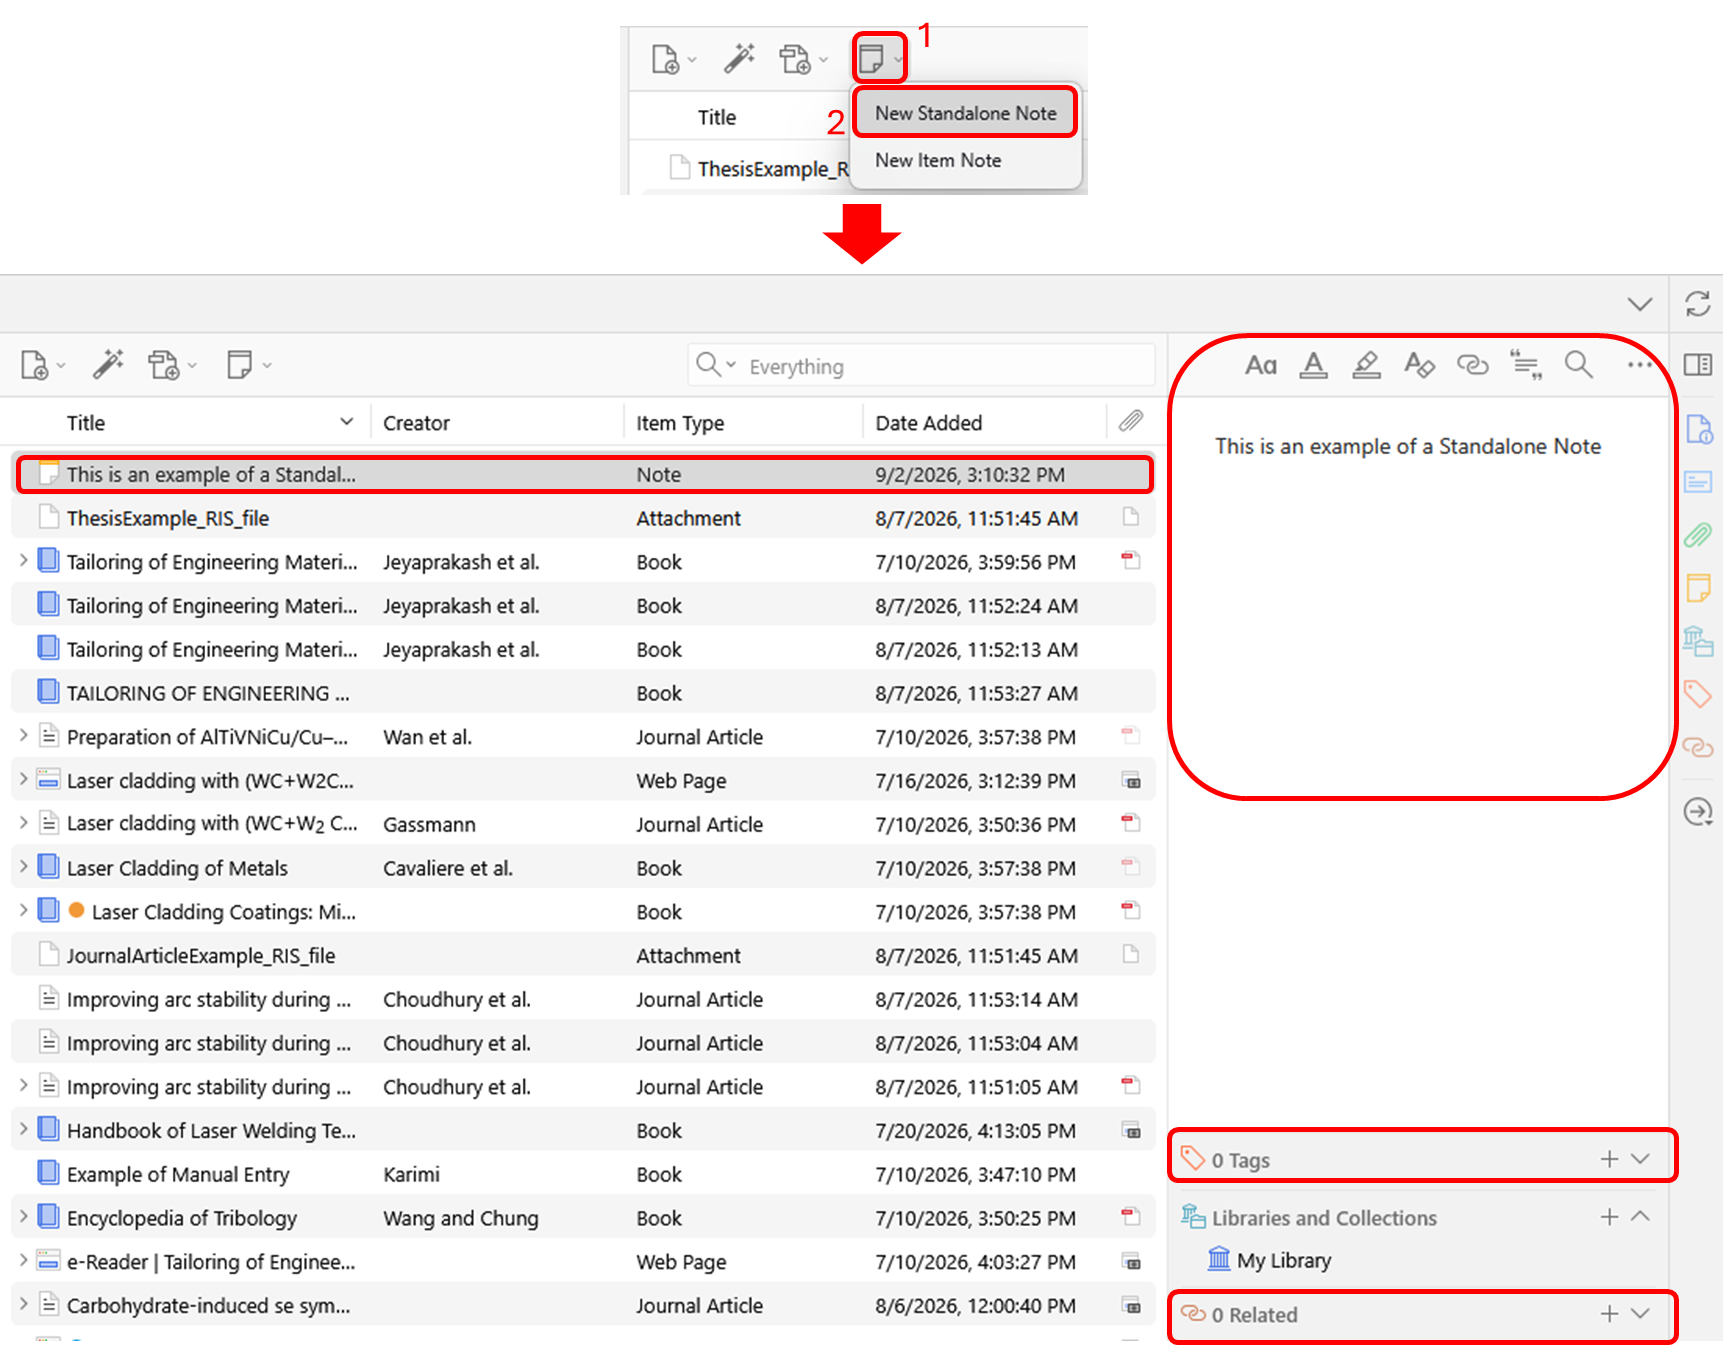
To create a child note, select an item in the center pane. Then, either click the “New Note” button at the top of the center pane ( ) and select “New Item Note”, or select the “Notes” icon (
 )in the right-hand pane and click the plus icon (
 ). You can also right-click an item and select “Add Note”.
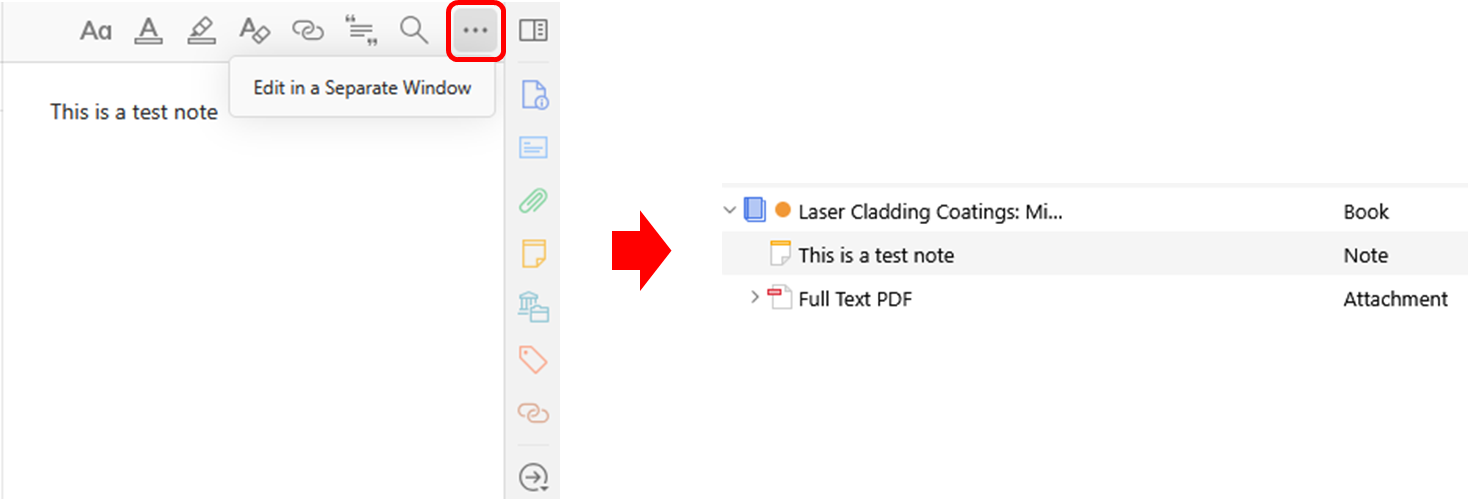
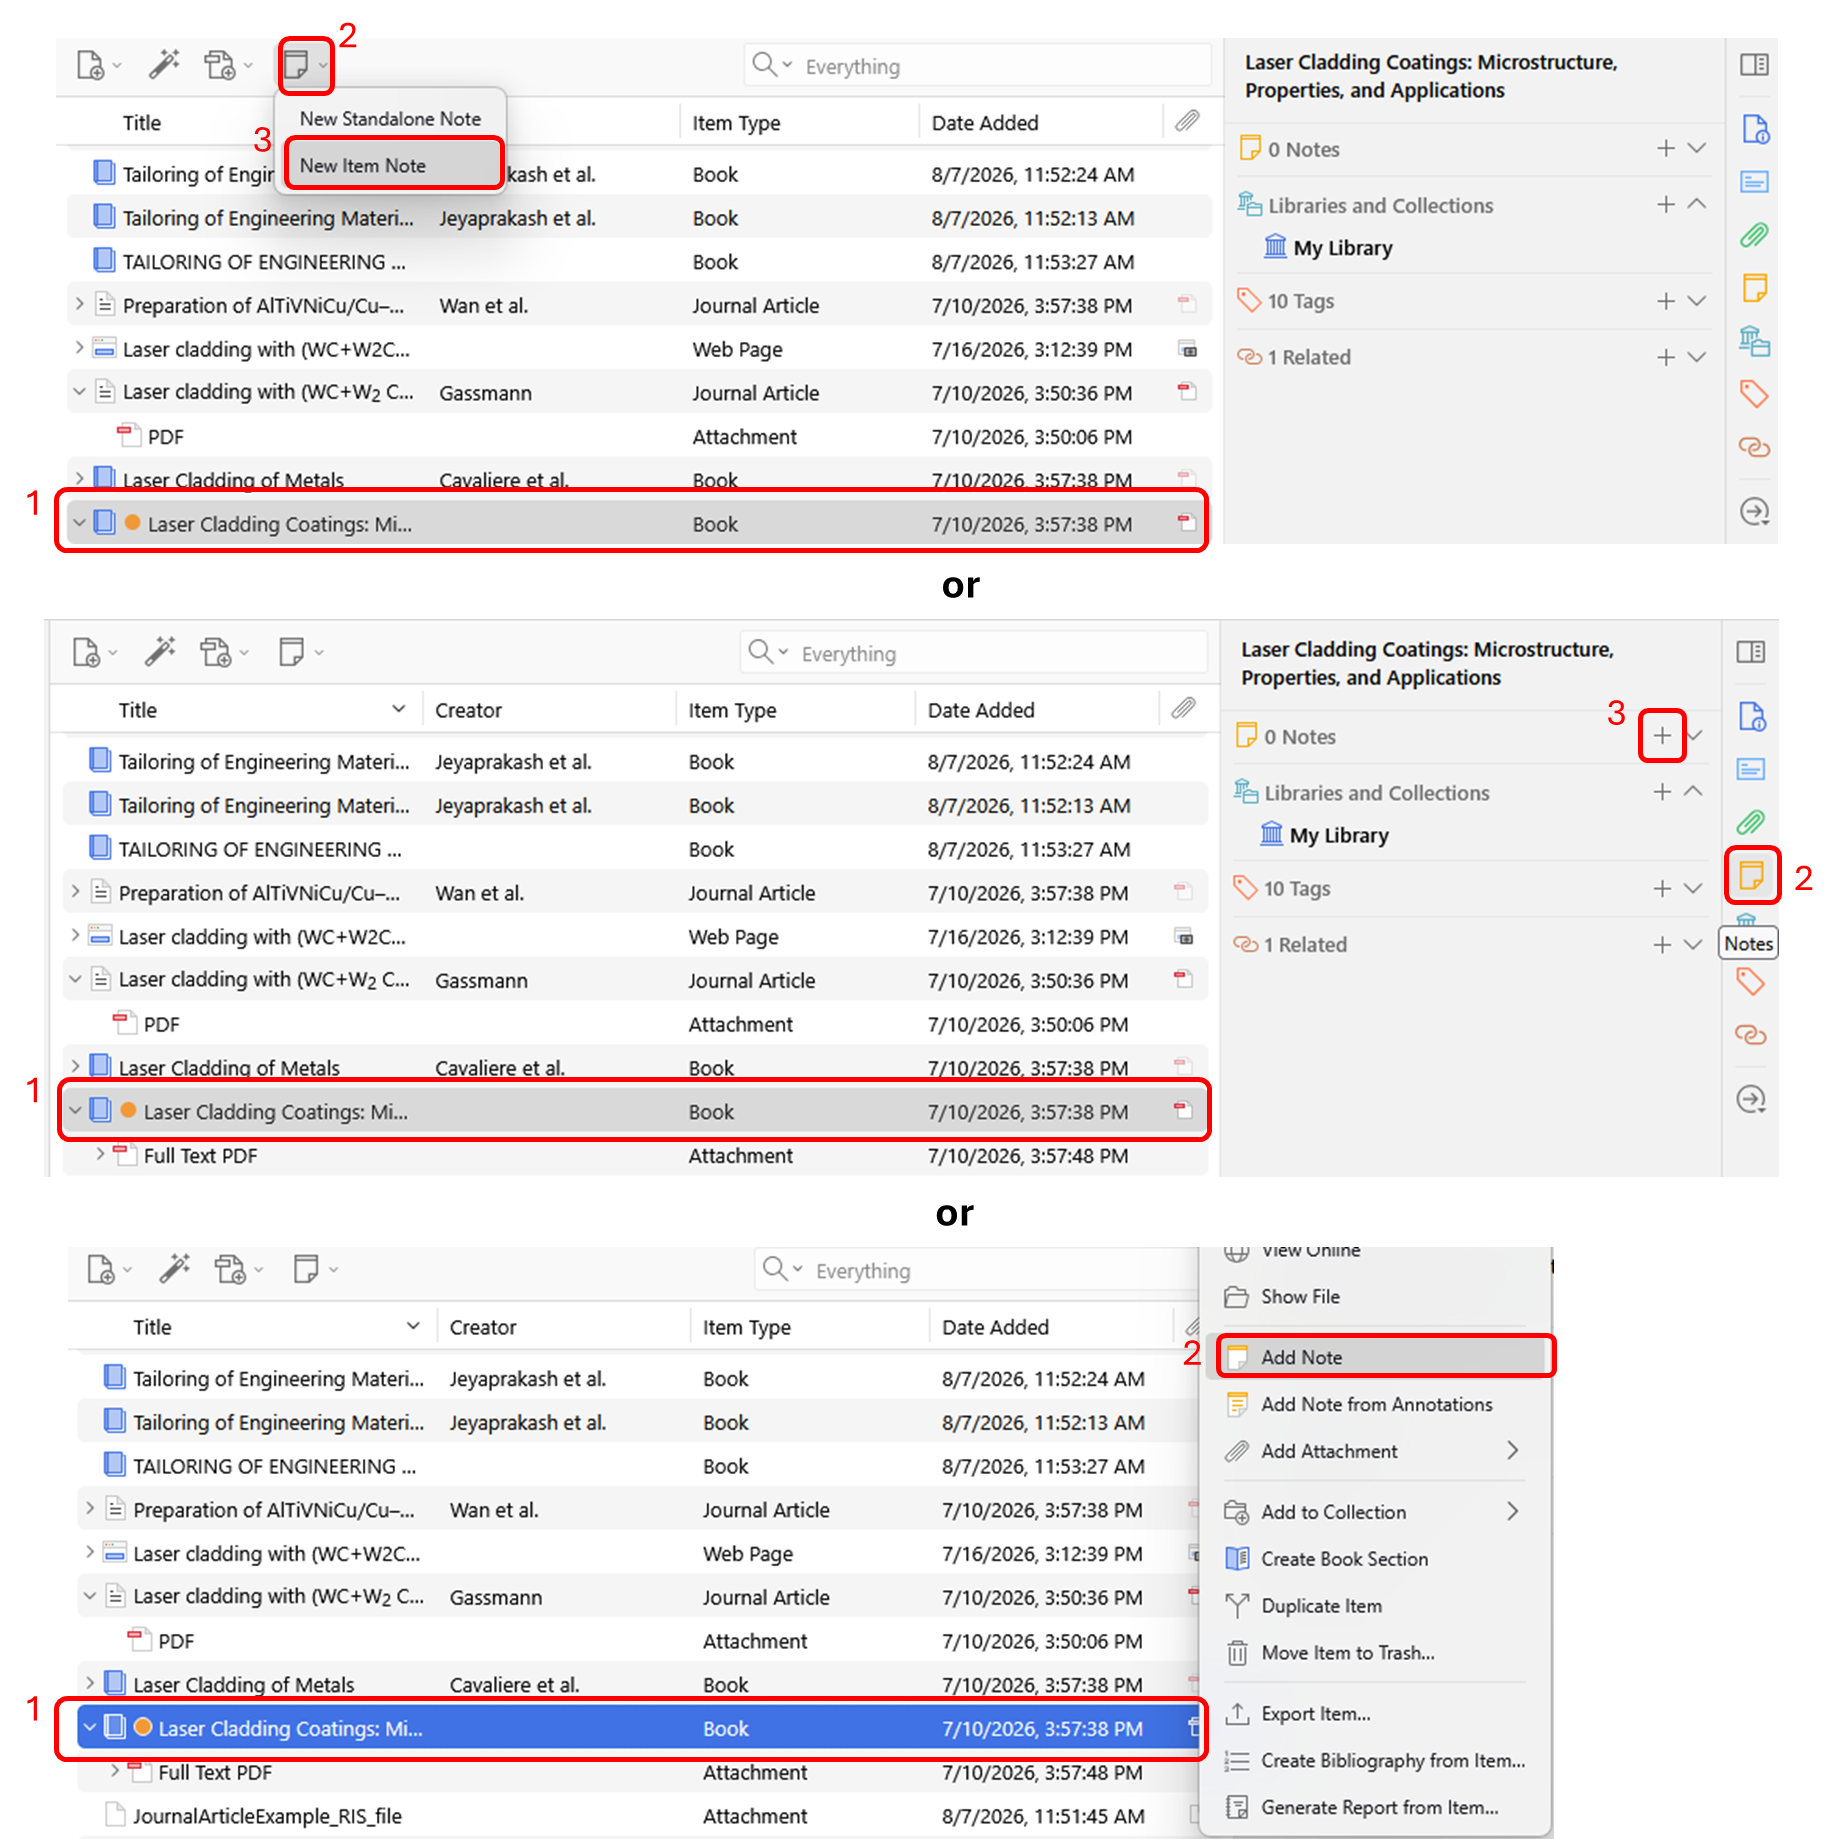 A note will be created as an attachment to the item (it will also show up under the “Notes”), and a note editor will appear in the right-hand pane. You can create a dedicated window for the note editor by clicking the “Edit in a separate window” button at the bottom of the editor. Text in notes is saved as you type.
Standalone Notes#
Standalone notes work the same as child notes, but are not directly related to any item in your library. Standalone notes will appear alongside any other items in your library. To create a standalone note, click the “New Note” () button and select “New Standalone Note”.
Tagging and Relating#
As with any other item in Zotero, notes or standalone notes can be tagged and related to other items. Both features can be accessed via the bottom of the note editor.
Searching Notes#
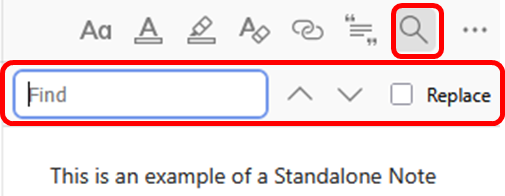
Notes can be searched via the general Zotero search. You can search text within a note using the note editor’s “Find and Replace” button or Ctrl/Cmd-F.
Images in Notes#
You can embed images into Zotero notes by dragging them from your filesystem or, in some cases, by pasting them in. Embedded images sync between devices and count against your Zotero Storage quota.
Zotero PDF Reader and Note Editor
Creating Annotations#
Highlights and Underlines#
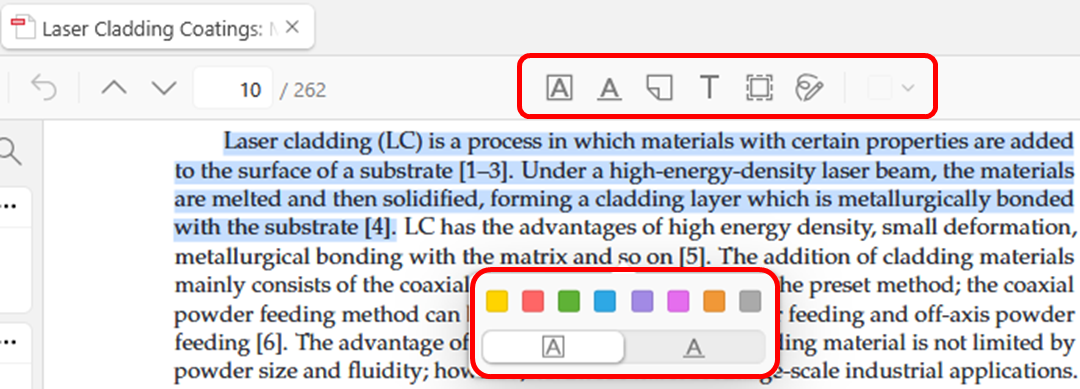
The reader supports two highlighting/underlining modes. You can use whichever mode works best for your workflow. In the default, unlocked mode, with nothing selected in the annotation toolbar, whenever you select text in the document, a popup will appear with a selection of colors, and you can click a color to create a highlight or underline on the selected text.
To quickly make many highlights or underlines, you can turn on locked mode: click the highlight or underline tool in the toolbar, and then choose a color using the color-picker button. Then, every time you select text in the document, a highlight or underline will be automatically created in the color you’ve picked.
Adding Annotations to Notes#
You can add annotations to notes in various ways. Annotations added to notes will automatically include links back to the PDF page as well as citations that you can later add to a Word, LibreOffice, or Google Docs document with one of the word processor plugins.
In the PDF reader#
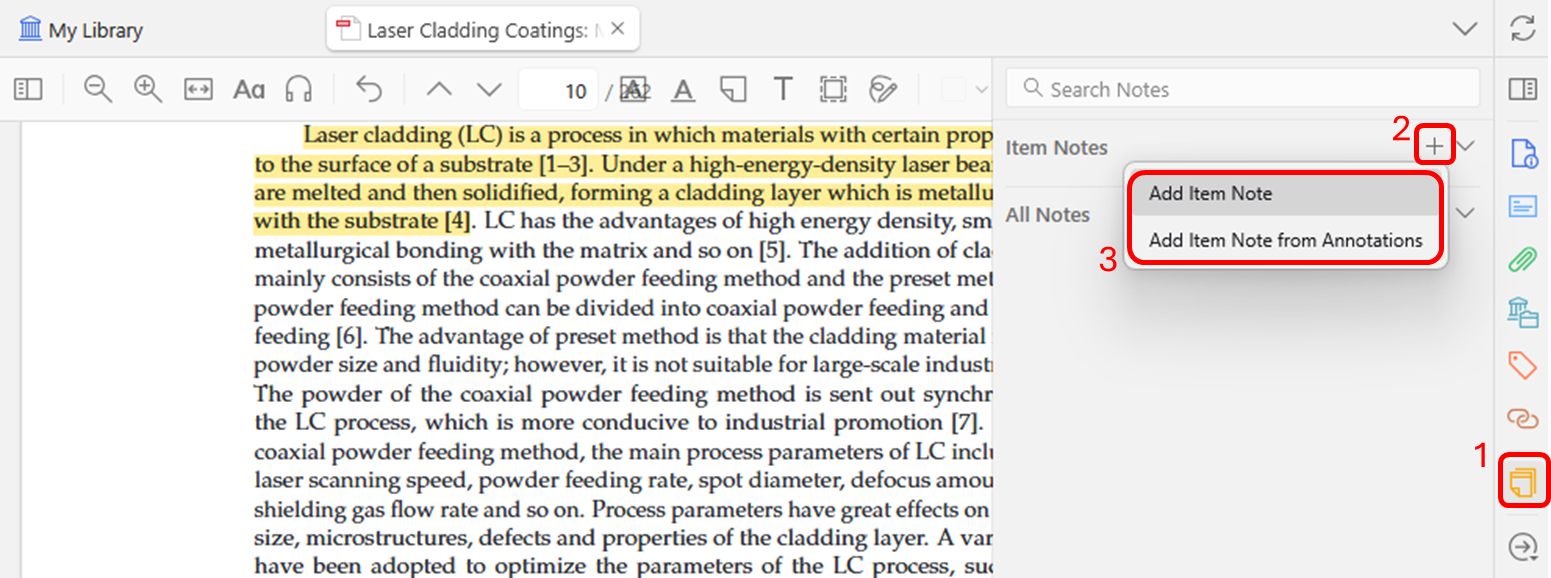
You can easily add annotations to notes right from the PDF reader. First, use the Notes button in the top-right corner to open the Notes pane, where you can create a new note or open an existing note.
To create a new note from all annotations in the current PDF, click one of the “+” buttons and select Add Item Note from Annotations or Add Standalone Note from Annotations.
If you already have a note open in the Notes pane, you can drag individual annotations from the PDF or from Annotations tab in the left-hand sidebar as you type your note. Alternatively, you can select one or more annotations in PDF or in the Annotations tab of the left-hand sidebar, right-click one of the annotations, and select Add to Note.
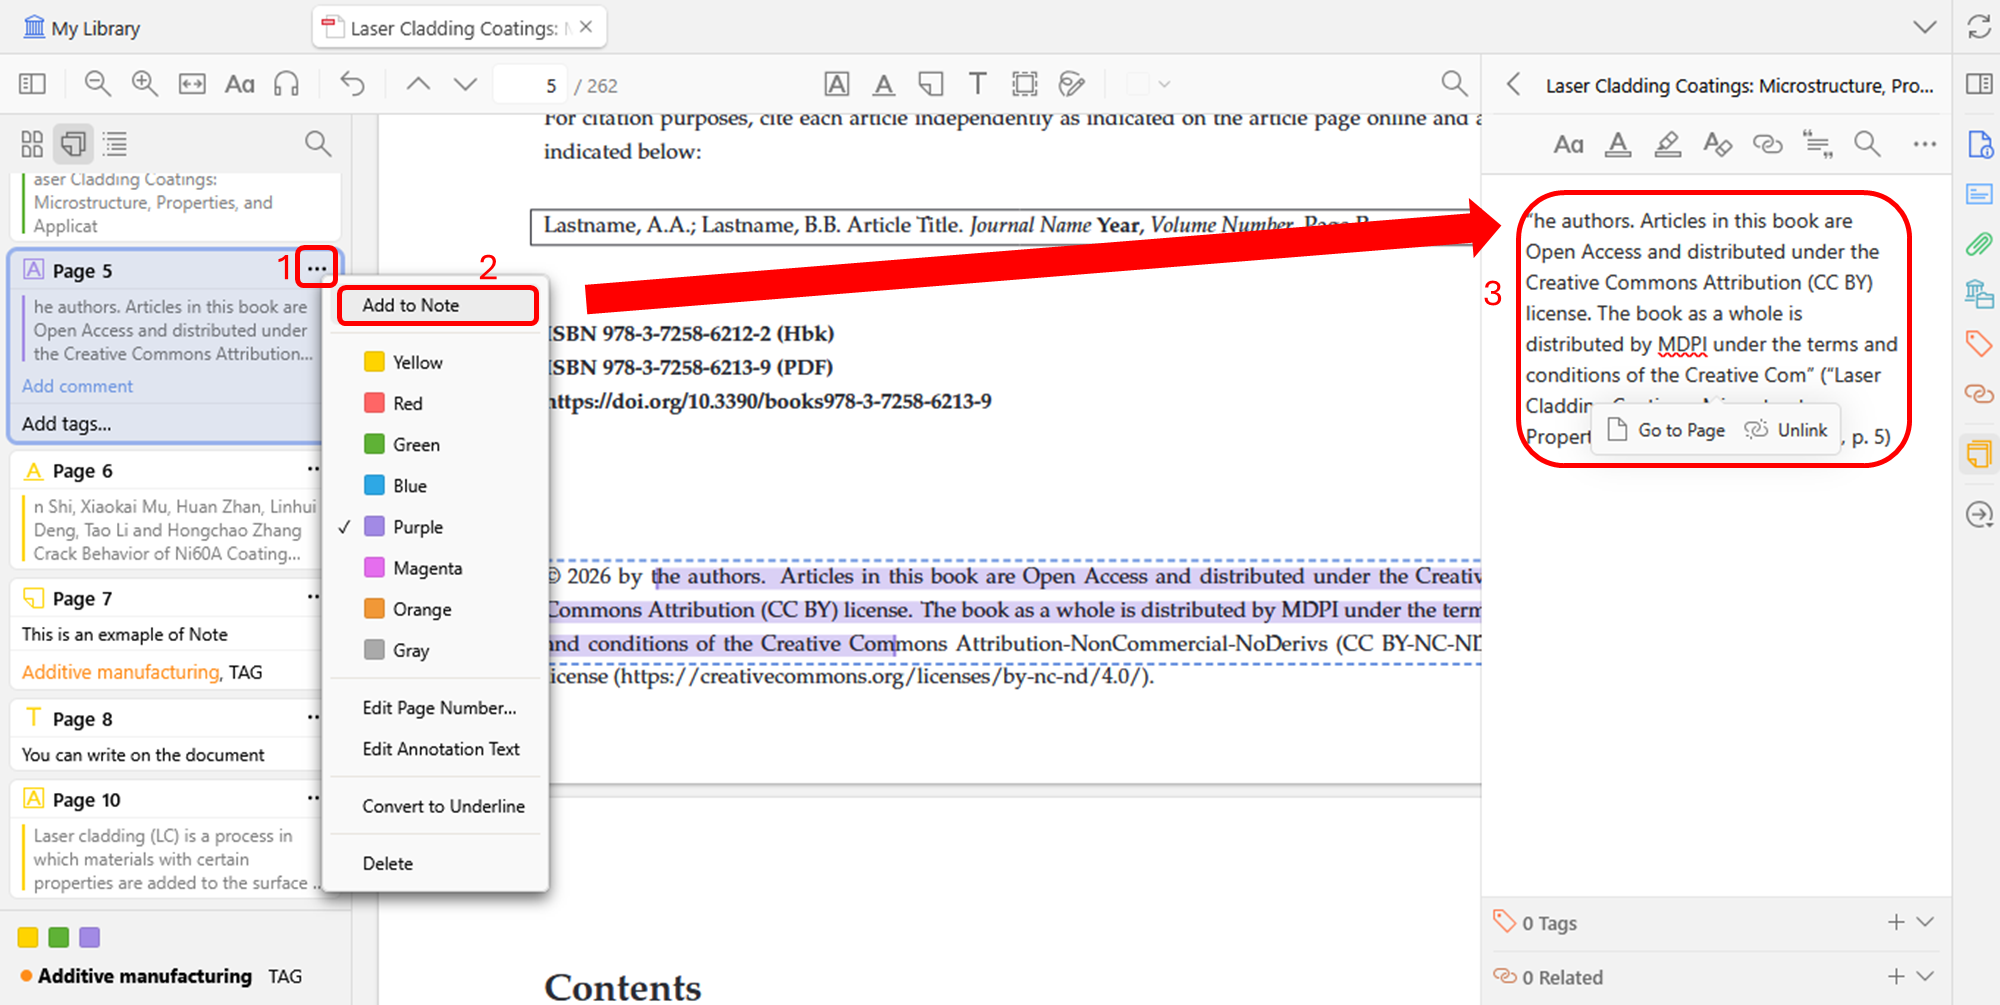
You can also drag annotations from the PDF reader to a note that’s opened in a separate window. If you’re sure you won’t use a quote more than once, it’s also possible to add quotes to Zotero notes without creating an annotation first. Simply select text in the PDF and drag it to an open Zotero note.
In the items list#
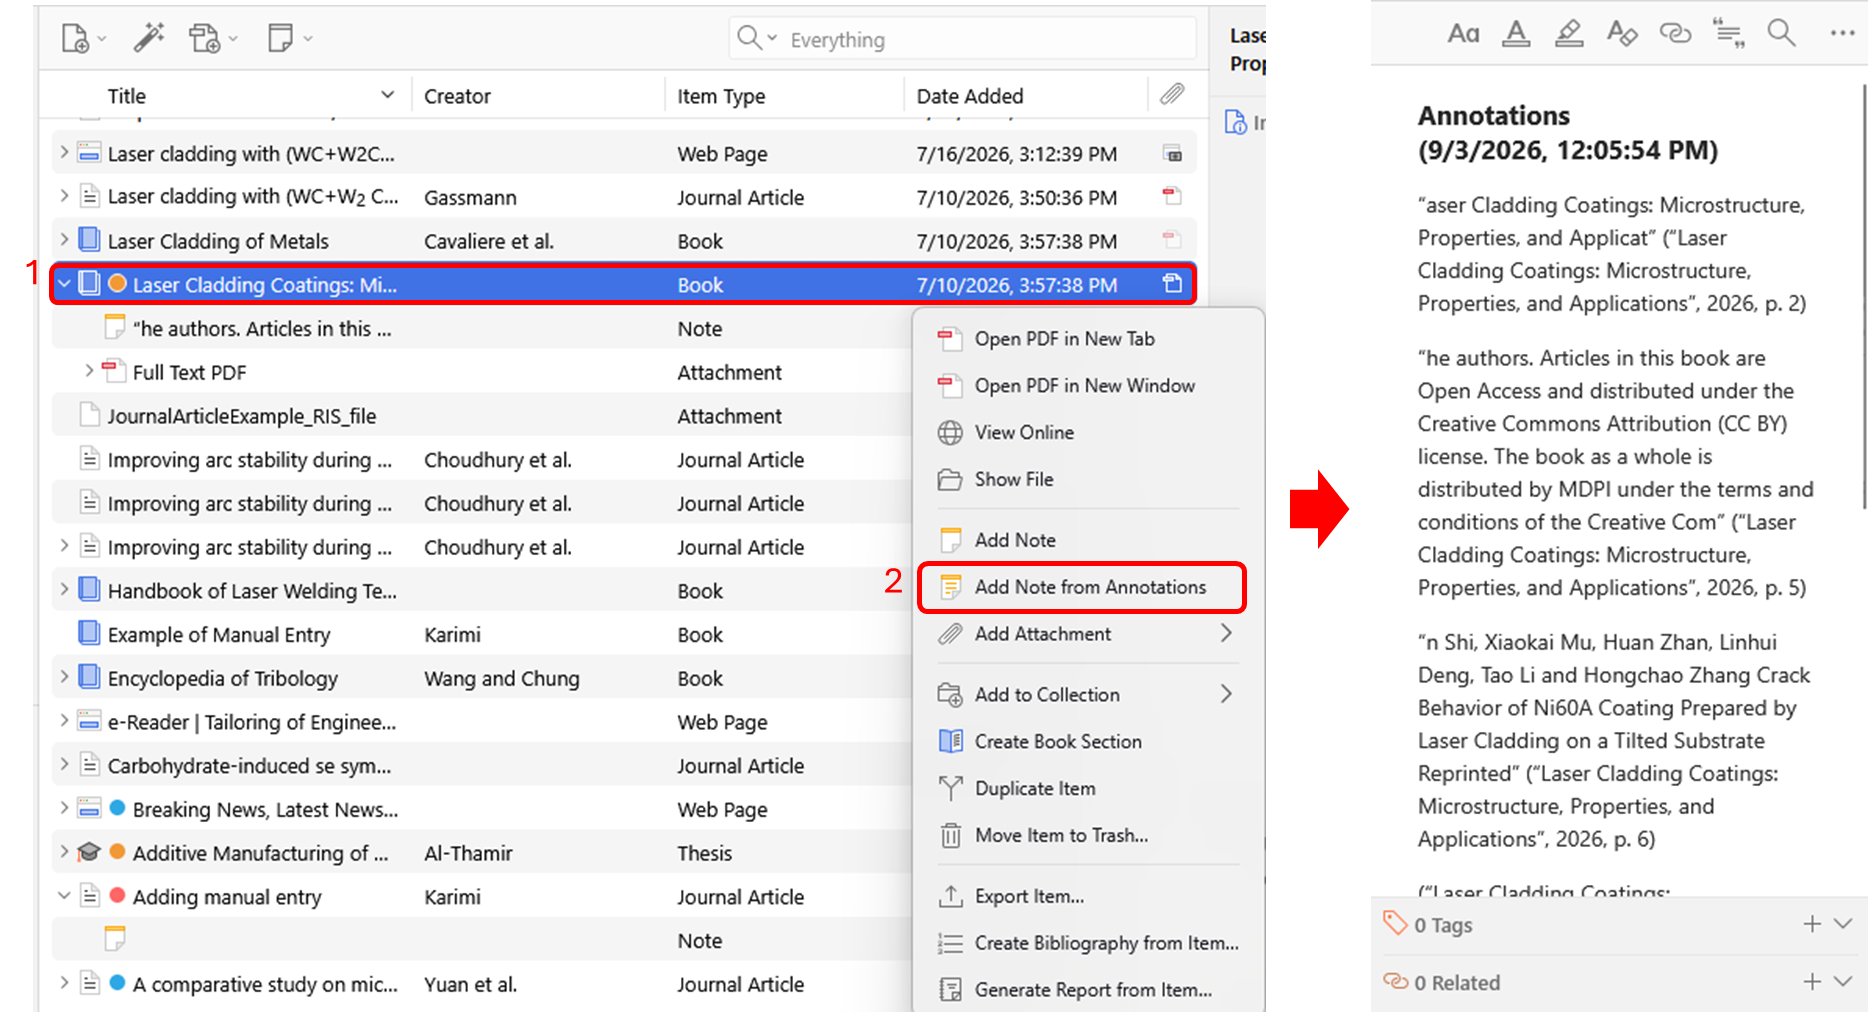
You can create a child note from all annotations in a PDF by right-clicking on the parent item in the items list and choosing Add Note from Annotations.
You can also create a standalone note with annotations from multiple items by selecting the parent items, right-clicking, and choosing Create Note from Annotations.
Customizing Annotations in Notes#
You can customize how annotations are added to notes by using note templates.
Working with Annotations in Notes#
Viewing an Annotation in Context#
When you add an annotation to a note, it will add both an annotation and a citation by default.
To view the annotation in context, click the annotation and click “Show on Page” in the popup that appears. This will open the original PDF in either the built-in PDF reader or an external PDF reader if you’ve configured one in the General pane of the preferences. When possible, Zotero will open the PDF to the page where the annotation was made — this works for the built-in PDF reader and most, but not all, popular external PDF readers (e.g., Acrobat on Windows, Preview on macOS, evince on Linux).
To view the associated item in your library, click the citation and select “Show Item”.
Displaying Annotation Colors#
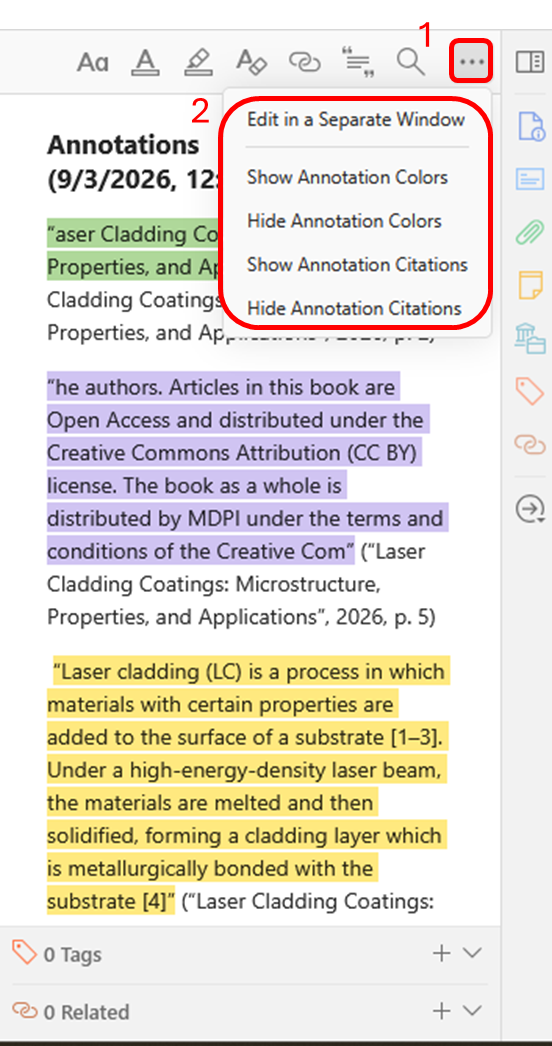
To show annotation colors in your note, click the “…” button in the top-right corner of the note editor and select “Show Annotation Colors”. You can remove colors later with “Hide Annotation Colors”.
Hiding or Showing Citations in the Note#
To hide or show all citations in a note, click the “…” button in the top-right corner of the note editor and select “Hide Annotation Citations” or “Show Annotation Citations”.
You can hide an individual citation by clicking on it in the editor and selecting “Hide Citation” from the popup, or simply by deleting the citation completely. You can add the citation back at any time by clicking on the highlighted text and selecting “Add Citation” from the popup or by using “Show Annotation Citations” in the “…” menu.
Using an External PDF Reader#
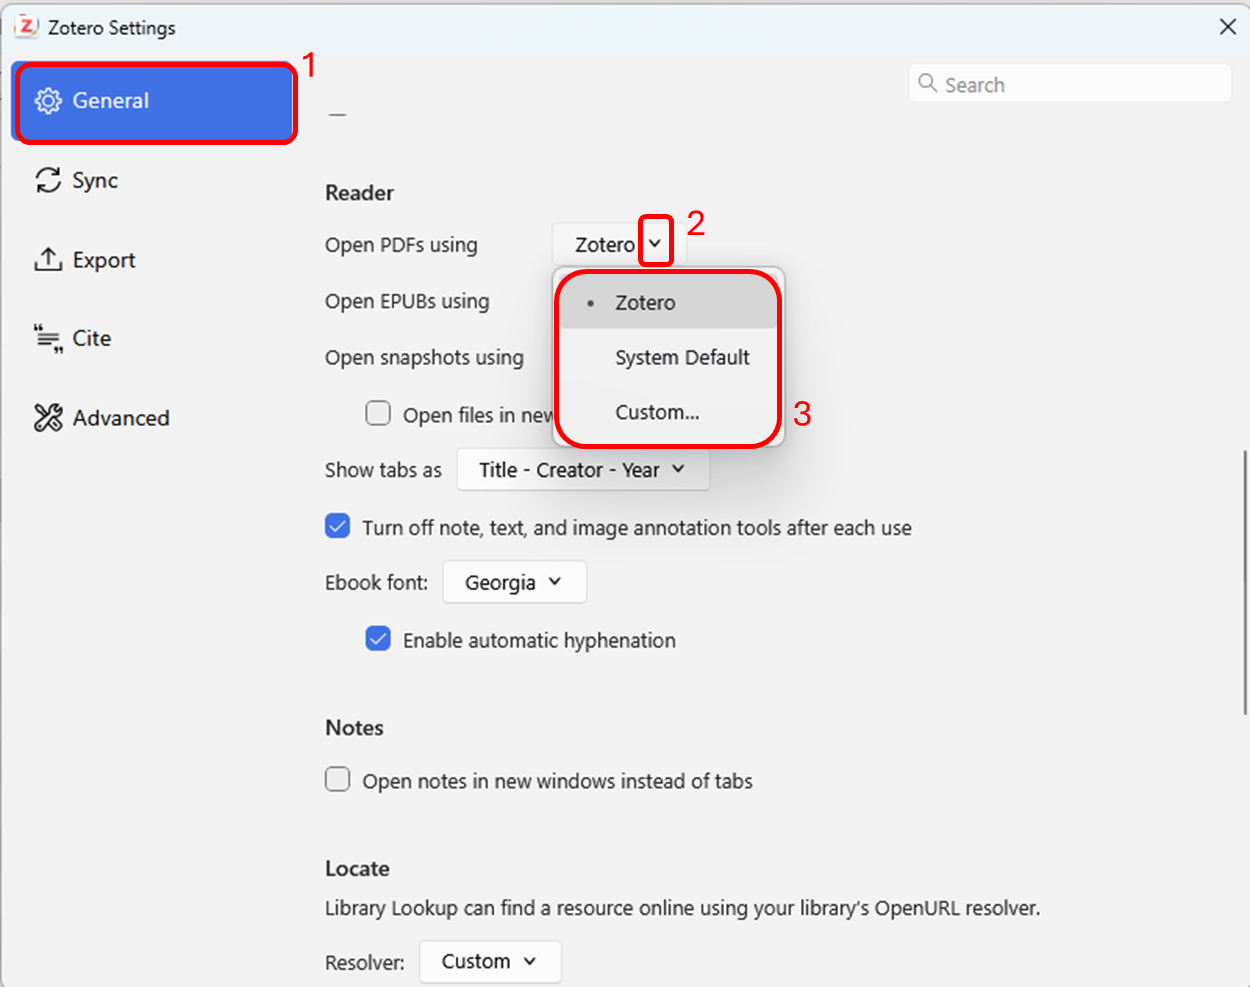
If you’d prefer to open PDFs in an external PDF reader, you can choose one from the General pane of the Zotero preferences.
To open a single PDF in an external reader, right-click on the item and choose Show File, and then open the PDF from your OS file manager. Some changes you make in external PDF readers will cause problems in the built-in reader — e.g., adding, deleting, reordering, or rotating pages will cause annotations to appear on the wrong page or in the wrong position. (Pages can be deleted or rotated from the Annotations tab in the Zotero reader sidebar.)
Note that annotations created in the built-in PDF reader are stored in the Zotero database, so they won’t be visible in external PDF readers unless you export a PDF with embedded annotations. See Annotations in Database for more info.
Related Items
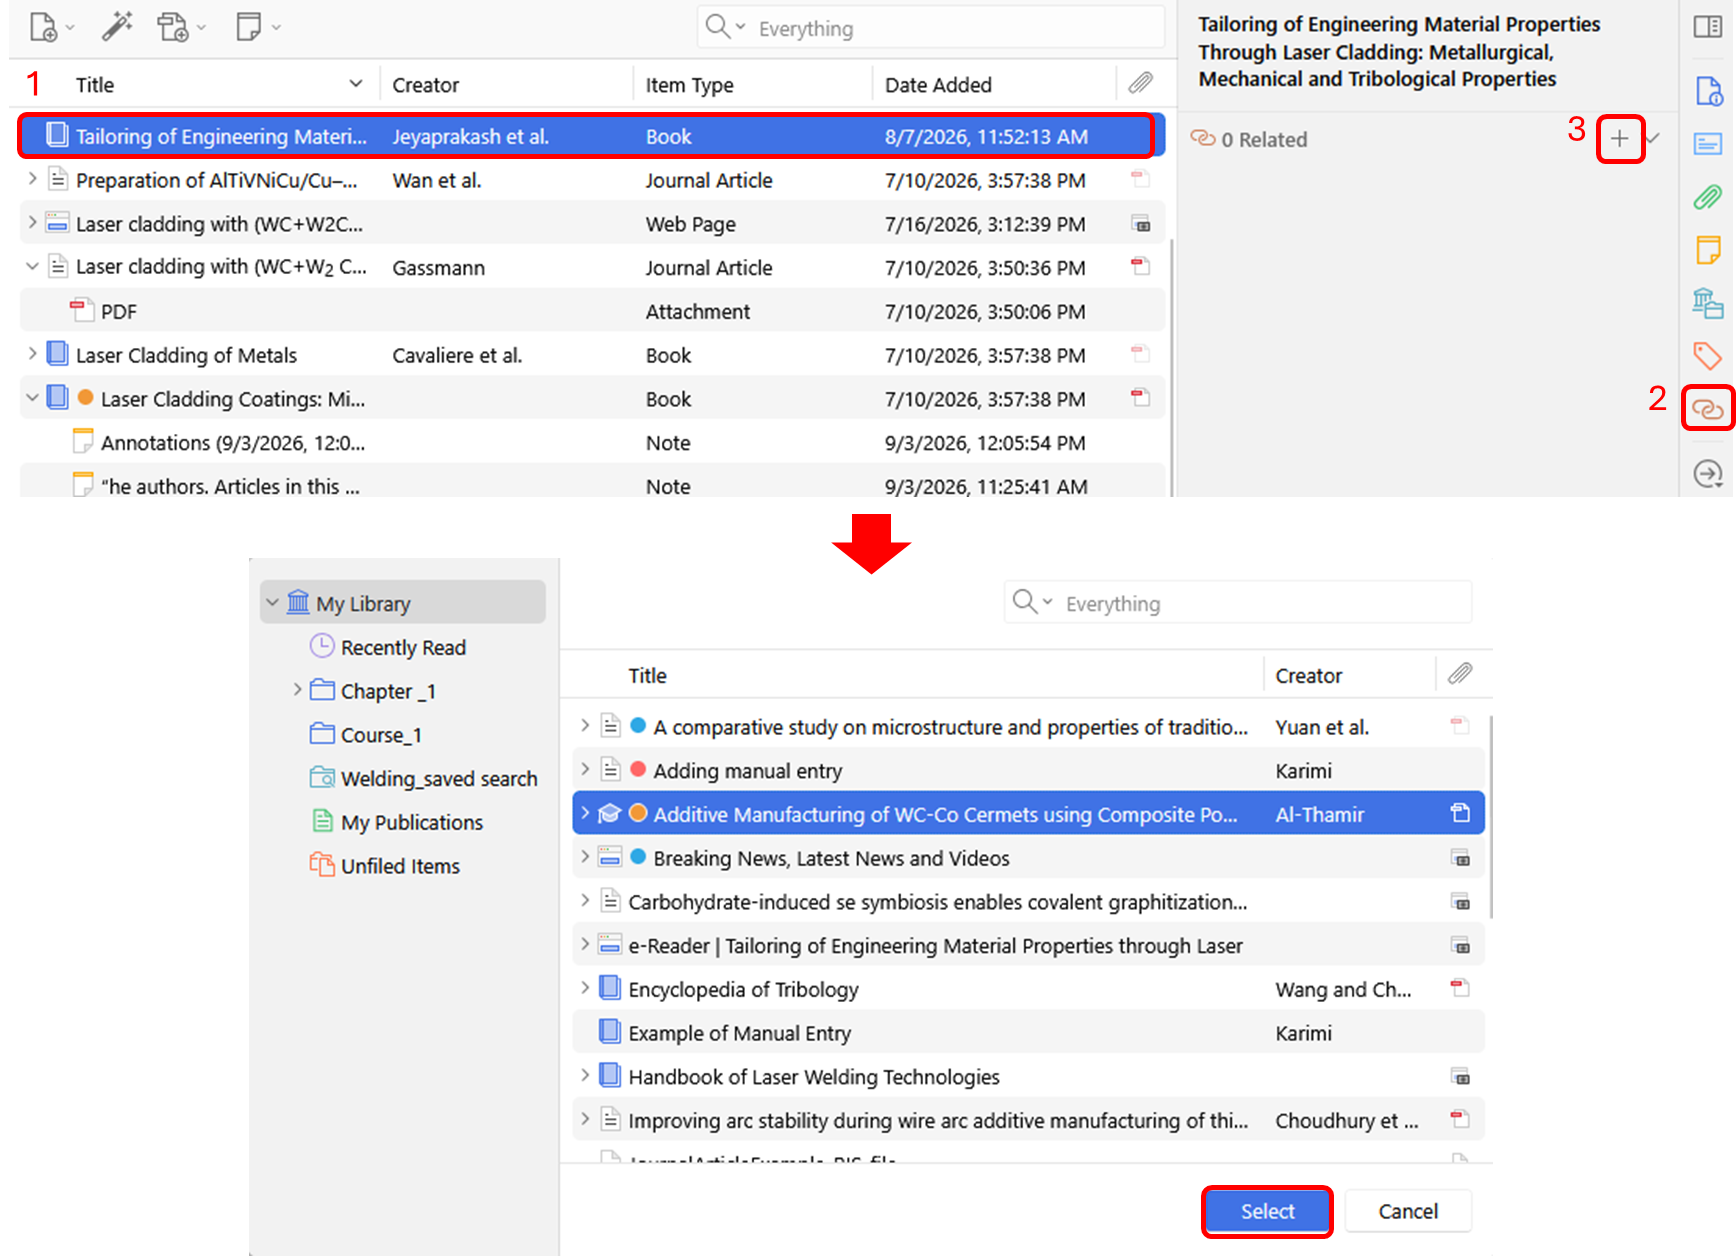
In addition to collections and tags, a third way to express relationships between items is by setting up “relations”. Relations can set up between any pair of items in a library (it is not possible to relate items from different libraries).
To create a relation, select an item in the center pane and go to the “Related” tab of the right pane. Click the “Add” button, and select one or more items from the same library in the pop-up window (hold down Ctrl or Shift [Windows/Linux] or Cmd or Shift [Mac] to select multiple items) and click “OK”. The selected items will now show up as related items in the “Related” tab, and clicking an item will take you straight to that item.
Note that when you relate item A to B, B will be automatically related to A. But relations are not transitive: relating A to B, and B to C, will not automatically relate A to C.
Some suggestions of how you could use this feature:
-
connect book chapters to their parent volume
-
connect book reviews to the book reviewed
-
connect different versions of a work (e.g., connecting a conference presentation that eventually became an article that eventually became a book)
-
link associated items from different collections
-
link items that form parts of a single work (e.g., articles in a series)
-
connect standalone notes to the items they discuss
-
link one item to another discussed in the Abstract or Notes fields
-
link items that have similar comments in the Abstract or Notes fields
Duplicate Detection
As you build your Zotero library, you might introduce a few duplicated items. For example, you could have saved the same item twice from a webpage, or imported items already in your library. Fortunately, Zotero can help you identify possible duplicates and allow you to merge them.
Finding Duplicates#
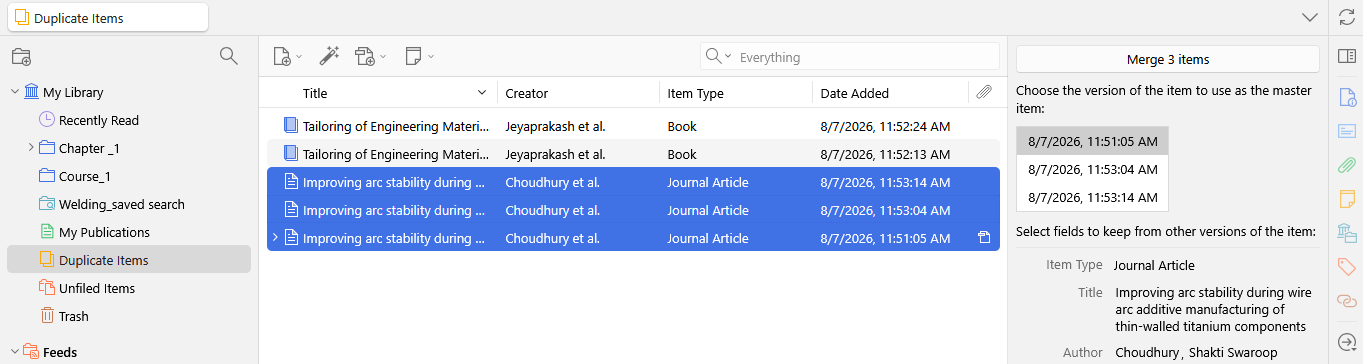
Clicking on the “Duplicate Items” collection in your library will show the items Zotero thinks are duplicates in the center pane.
Zotero currently uses the title, DOI, and ISBN fields to determine duplicates. If these fields match (or are absent), Zotero also compares the years of publication (if they are within a year of each other) and author/creator lists (if at least one author’s last name plus first initial matches) to determine duplicates. The algorithm will be improved in the future to incorporate other fields.
At this time, it is not possible to mark false positive matches as non-duplicates. This functionality will be added in the future.
Note that duplicate detection only works within a library. Items in different group libraries are separate items. They won’t show up in the “Duplicate Items” collection of any one of the libraries.
Merging Duplicates#
You should always resolve duplicate items by merging them, rather than deleting one of the duplicates. Merges will retain all of the collections and tags of the merged items; deleting one item will lose these data. Merges are also automatically recognized by the word processor plugins and don’t affect your automatically generated citations and bibliographies.
To merge items in the “Duplicate Items” collection, select an item in the center pane. Zotero will automatically co-select the other items that it thinks are duplicates. Click the “Merge <number> Items” button in the right pane to merge the items. If the item fields don’t match completely, you can select one item to be the “master” from the list at the top of the right pane, then select alternative versions of mismatched fields using the icons to the right of each field.
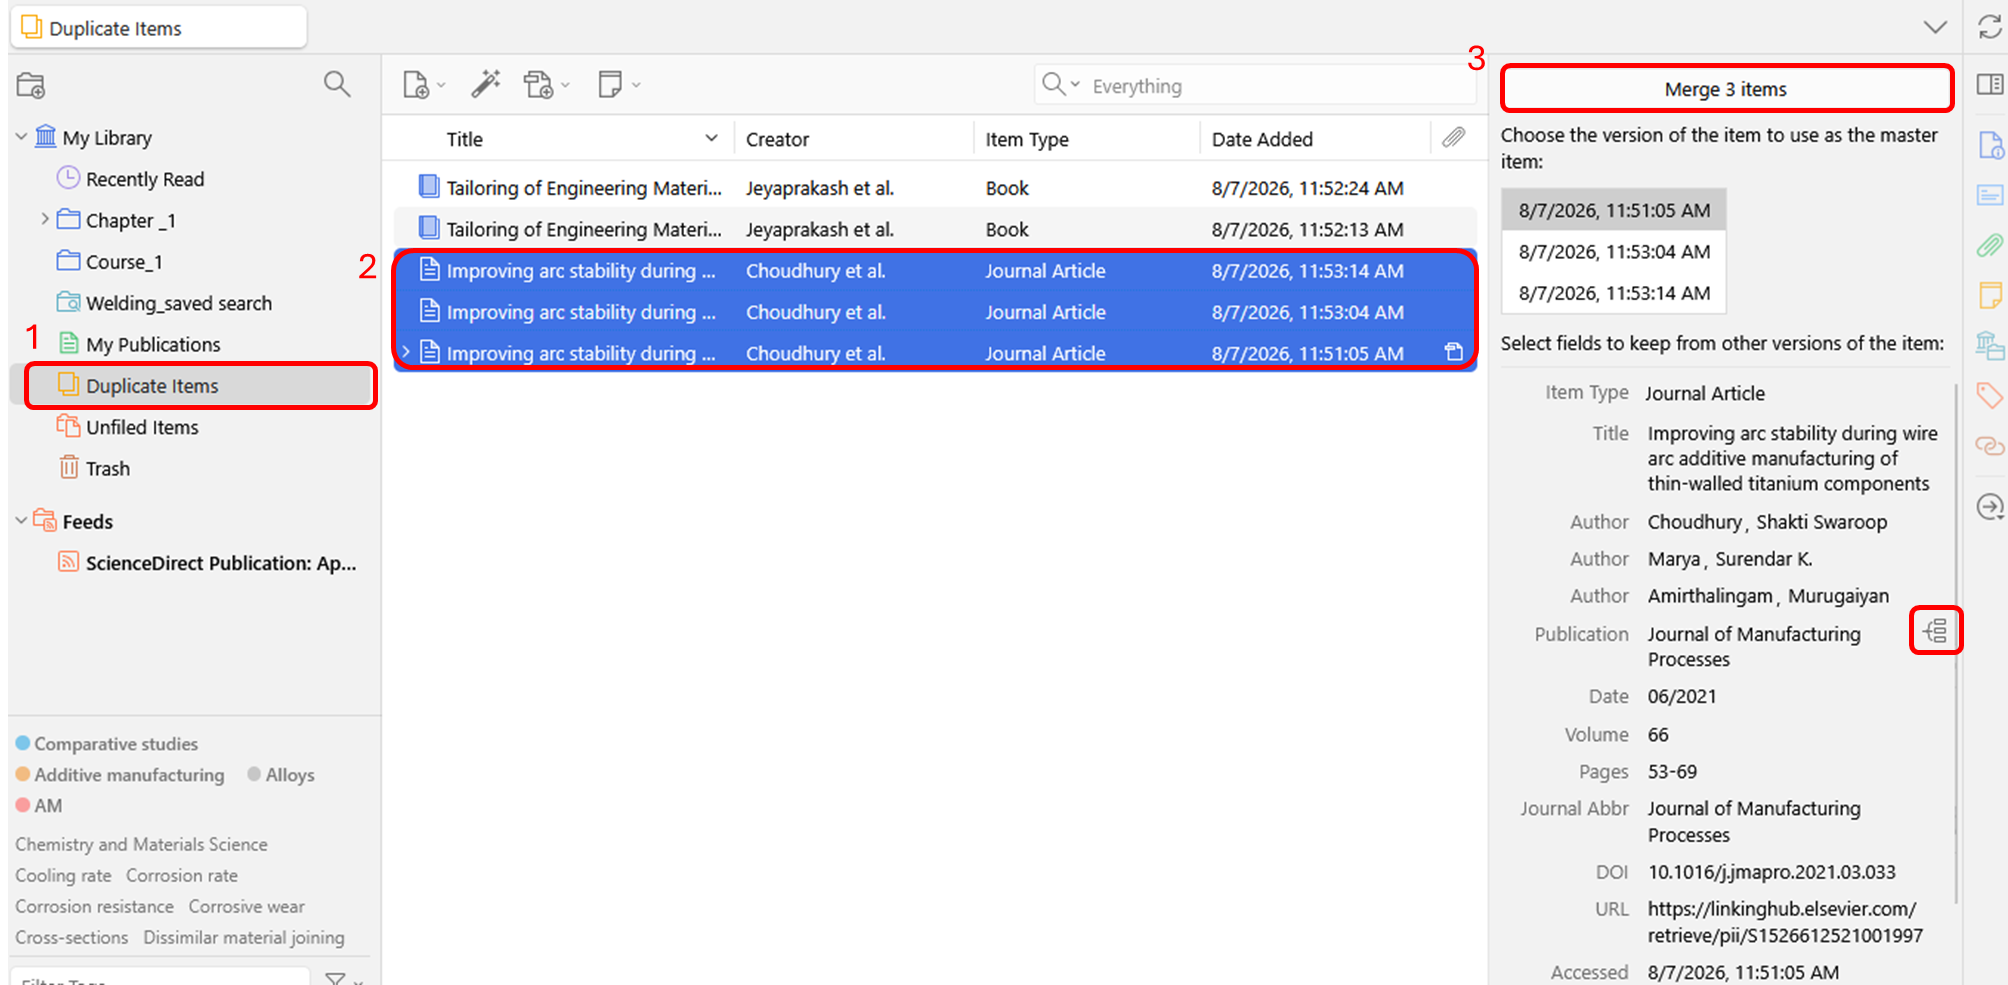
It may be easier to see which items are selected if you sort the items by Title. You can select a single item in the “Duplicate Items” view by holding down Alt/Option while clicking. You can de-select an item from a set of duplicates by holding down Ctrl (Windows/Linux) or Cmd (Mac) while clicking.
You can also select a group of two or more items of the same item type anywhere in your Zotero library, right-click, and select “Merge Items…” from the context menu.
Creating Bibliographies
Word Processor Integration#
Of the different ways to automatically generate bibliographies (as well as in-text citations and footnotes), the easy-to-use word processor plugins are the most powerful. These plugins, which are available for Microsoft Word, Google Docs, and LibreOffice, create dynamic bibliographies: insert a new in-text citation in your manuscript, and the bibliography will be automatically updated to include the cited item. Correct the title of an item in your Zotero library and with a click of a button the change will be incorporated in your documents.
In the following we will only cover Microsoft Word, but the basics applies if you are using other word processors. Third-party plugins are also available for integrating Zotero with other word processors and writing systems.
Zotero Word Plugin
Zotero Plugin Tab#
Installing the Zotero Word plugin adds a Zotero tab to Microsoft Word. The Zotero tab contains these icons:

| Add/Edit Citation | Add a new citation or edit an existing citation in your document at the cursor location. |
|---|---|
| Add/Edit Bibliography | Insert a bibliography at the cursor location or edit an existing bibliography. |
| Add Annotation | Add the selected annotation along with its citation (if any) at the cursor location. |
| Add Note | Add the selected note at the cursor location. |
| Document Preferences | Open the Document Preferences window, e.g. to change the citation style. |
| Refresh | Refresh all citations and the bibliography, updating any item metadata that has changed in your Zotero library. |
| Unlink Citations | Unlink Zotero citations in the document by removing the field codes. This prevents any further automatic updates of the citations and bibliographies. Note that removing field codes is irreversible, and should usually only be done in a final copy of your document. |
####
Citing#
You can begin citing with Zotero by clicking the “Add/Edit Citation” ( ) button. Pressing the button brings up the citation dialog. The citation dialog is used to select items from your Zotero library, and create a citation. Note if this is your first time using Zotero, it usually asks you to select your citation style (which you can change later using Document Preferences) and then show you the citation dialog window.

Start typing part of a title, the last names of one or more authors, and/or a year in the dialog box. Matching items will instantly appear below the dialog box.
Matching items will be shown for each library in your Zotero database (My Library and any groups you are part of). Items you have already cited in the document will be shown at the top of the list under “Cited”.
Select an item by double-clicking on it or by pressing Enter/Return when it is highlighted. The item will appear in the dialog box in a shaded bubble. Press Enter/Return again (or click the check mark[ ])to insert the citation and close the Add Citation box.
In the Add Citation dialog box, you can click on the bubble for a cited item, then click “Show in Library” to view the item in Zotero. Items that are orphaned (not connected to any items in your Zotero database) will not have an this option. Orphaned items can exist if they were inserted by a collaborator from their My Library or a group you don’t have access to or if you they were deleted from your Zotero library.
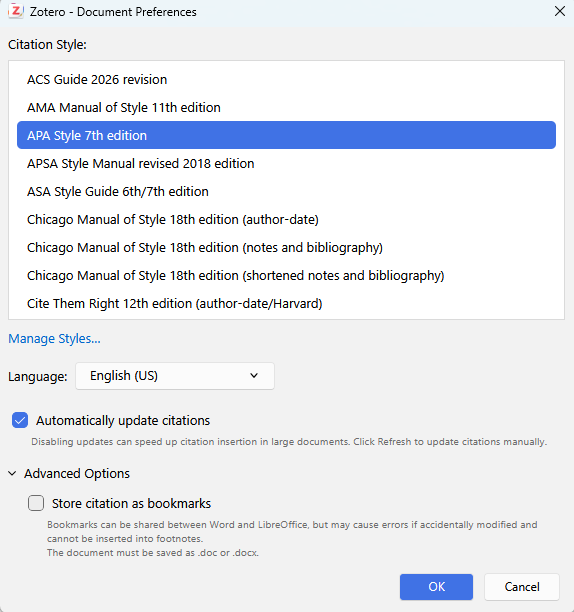
Document Preferences/Citation Style#
Clicking the “Document Preferences” ( ) lets you set the following document-specific preferences:
-
The citation style.
-
The language to use to format citations and bibliography.
-
For note-based styles (e.g., “Chicago Manual of Style (Note)”), whether citations are inserted in footnotes or endnotes.
- Note that Word, not Zotero, controls the style and format of footnotes and endnotes.
-
Whether to store citations as Fields or Bookmarks.
- Unless you need to collaborate with colleagues using LibreOffice, you should always choose Fields.
-
For styles that abbreviate journal titles (e.g., “Nature”), whether to use the MEDLINE abbreviations list to abbreviate titles.
- If this option is selected (the default), the contents of the “Journal Abbr” field in Zotero will be ignored.
Customizing Citations#
Citations can be customized in various ways.
If a citation is simply incorrect or missing data, start by making sure that the item metadata in Zotero is correct and complete, and then click Refresh in the plugin ( ) to update your document with any changes.
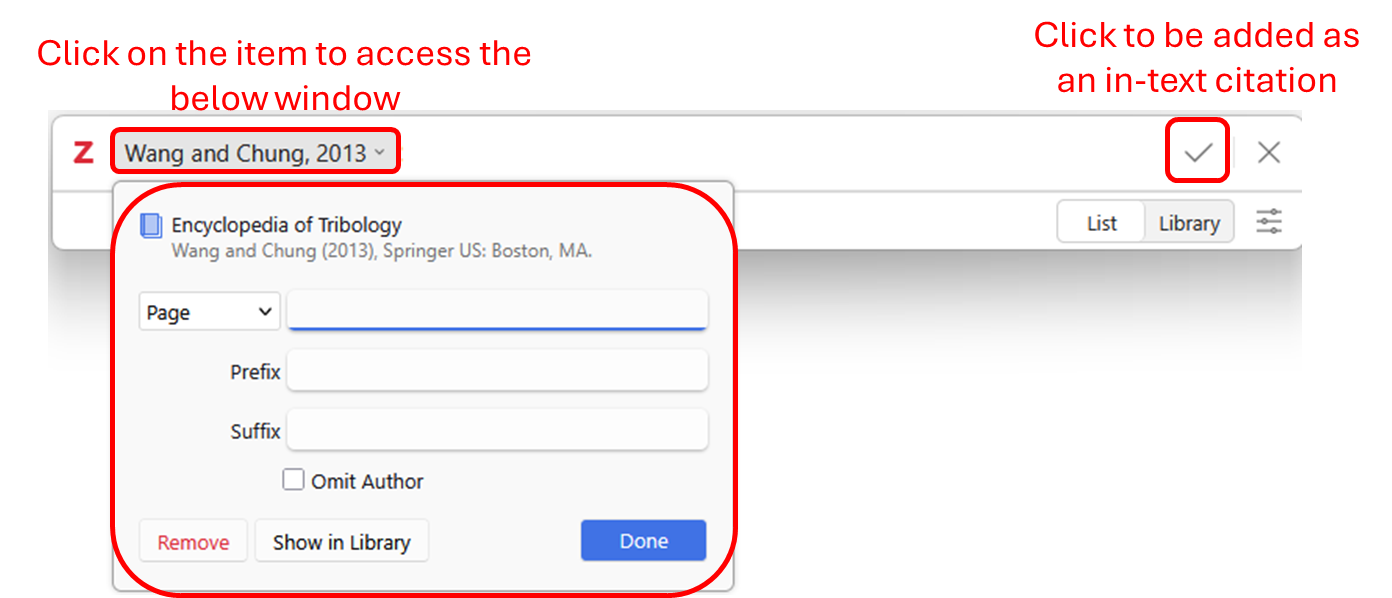
Other customizations can be made via the citation dialog. Click an existing citation in your document and click Add/Edit Citation to open the citation dialog, and then click the citation bubble to open the cite options window, where you can make the following changes.
Page and Other Locators#
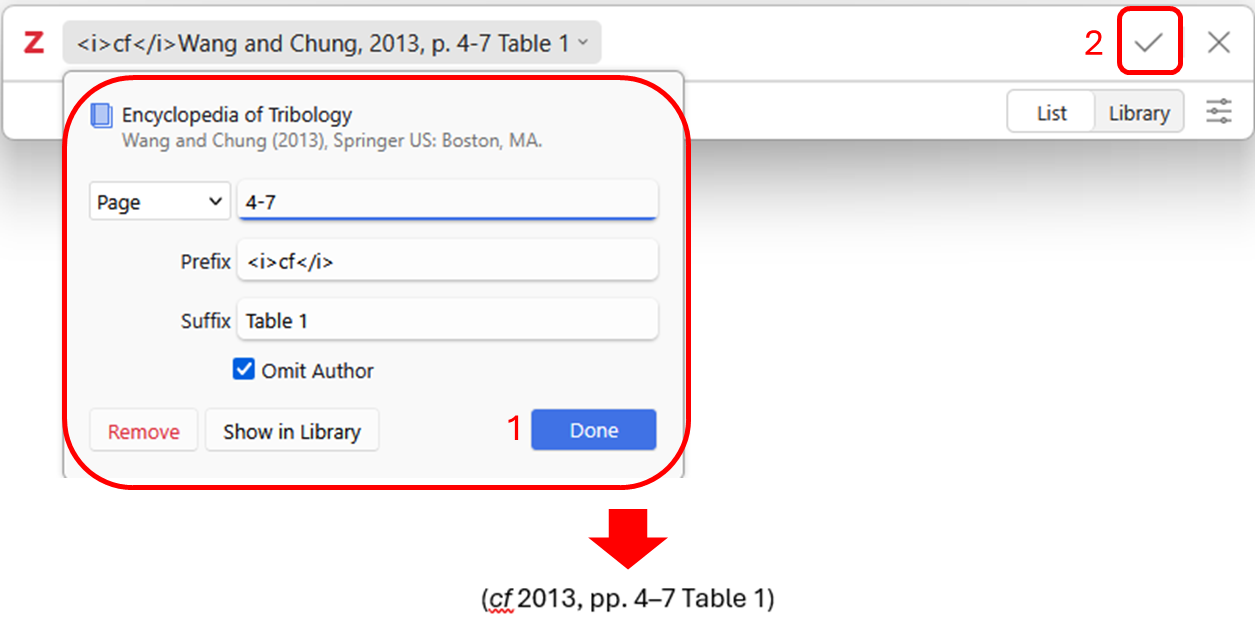
In some cases you want to cite a certain part of an item, e.g. a certain page, page range or volume. This additional cite-specific information (e.g. “pp. 4-7” in the cite “Doe et al. 2001, p. 4-7”) is called the “locator”.
The cite options windows has a drop-down list of the different locator types (“Page” is the default), and a text box in which you can enter the locator value (e.g. “4-7”). To cite a locator other than the ones listed (e.g., “Table), use the Suffix field.
You can also add page numbers from the keyboard as you insert citations. Search for an item and, before or after selecting it, but before pressing Enter to insert the citation into the document, type “p.34”, “p34”, or even just “34”. The page number will be added to the citation.
Prefix and Suffix#
The “Prefix” and “Suffix” text boxes allow you to specify text to respectively precede and follow the automatically generated cite.
Any text in the prefix and suffix fields can be formatted with the HTML tags <i> (for italics), <b> (bold), <sub> (subscript), and <sup> (superscript). For example, typing “<i>cf</i>. the classic example” will be displayed as “cf. the classic example”.
Prefixes and suffixes can be applied to each item in a citation to create complex citations. For example: “(see Smith 1776 for the classic example; Marx 1867 presents and alternate view)”. Modifying citations by entering text into the Prefix and Suffix fields is always preferable to directly typing in the citation fields in Word. Manual modifications will prevent Zotero from automatically updating the citation.
Narrative Citations with Omit Author (“According to Smith (1776)”)#
With author-date styles, authors are often moved into the text and omitted from the following parentheses-enclosed citation, e.g.: “According to Smith (1776), the division of labor is crucial…”. To omit the authors from the cite, check the “Omit Author” box, which will result in a cite like “(1776)” instead of “(Smith, 1776)”, and write the author’s name (“Smith”) as part of the regular text in your document.
Citations with Multiple Cited Items#
To create a citation containing multiple cites (e.g., “[2,4-6]” for numeric styles or “(Smith 1776, Schumpeter 1962)” for author-date styles), add them one after the other in the Add Citation box. After selecting the first item, don’t press Enter/Return, but type the author, title, or year of the next item.
Some citation styles require that items within one in-text citations are ordered either alphabetically (e.g., “(Doe 2000, Grey 1994, Smith 2008)”) or chronologically (“(Grey 1994, Doe 2000, Smith 2008)”). Zotero will follow these sort rules automatically.
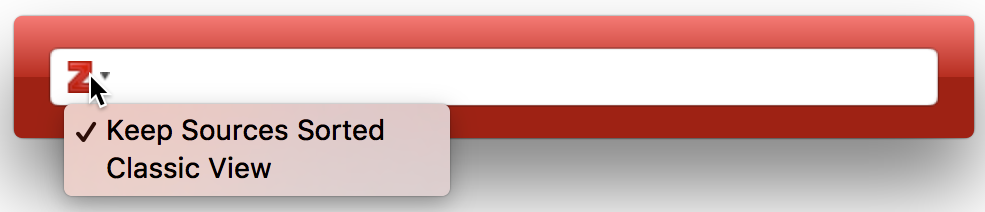
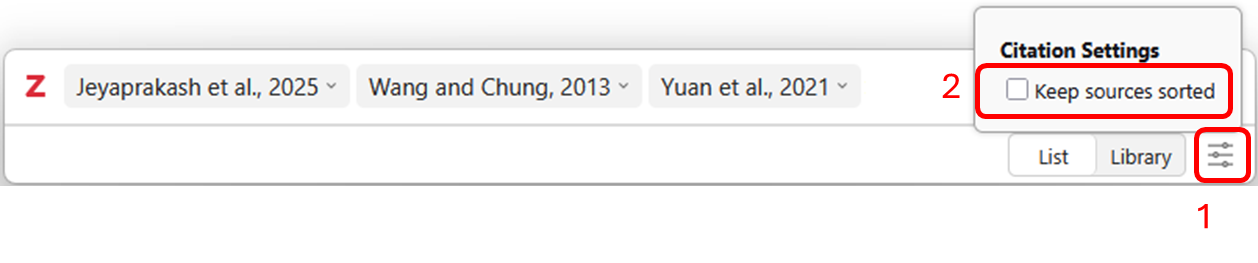
To disable automatic sorting of the cites in the citation, drag the citations to rearrange them in the Citation Dialog box. You can also click the filter icon ( ) on the bottom right side of the citation dialog box and uncheck the “Keep Sources Sorted” option. This option only appears for citation styles that specify a sort order for citations. To restore automatic sorting, re-check the “Keep Sources Sorted” option.
Other Changes#
If your citation still isn’t displaying the way you want, you can edit the citation directly in your document, but note that doing so will prevent Zotero from being able to automatically update the citation to reflect other changes in the document (e.g., for ‘ibid.’ or given name disambiguation). After you make a manual edit, Zotero will ask you to confirm that you want to keep the edit and prevent the citation from being updated automatically going forward. It may be preferable to instead make notes in the text of changes you want to make, wait until you’re ready to submit the document, and make the changes in a copy of the document after using Unlink Citations.
If you believe there’s an error in a citation style, post to the Zotero Forums so that we can investigate and, if necessary, correct the style. If a style is updated, your document will automatically update to reflect any changes the next time you refresh the document.
Bibliography#
Clicking the “Add/Edit Bibliography” button ( ) inserts a bibliography at the cursor location. As you use the plugin, Zotero will automatically update the bibliography based on the citations in the document.
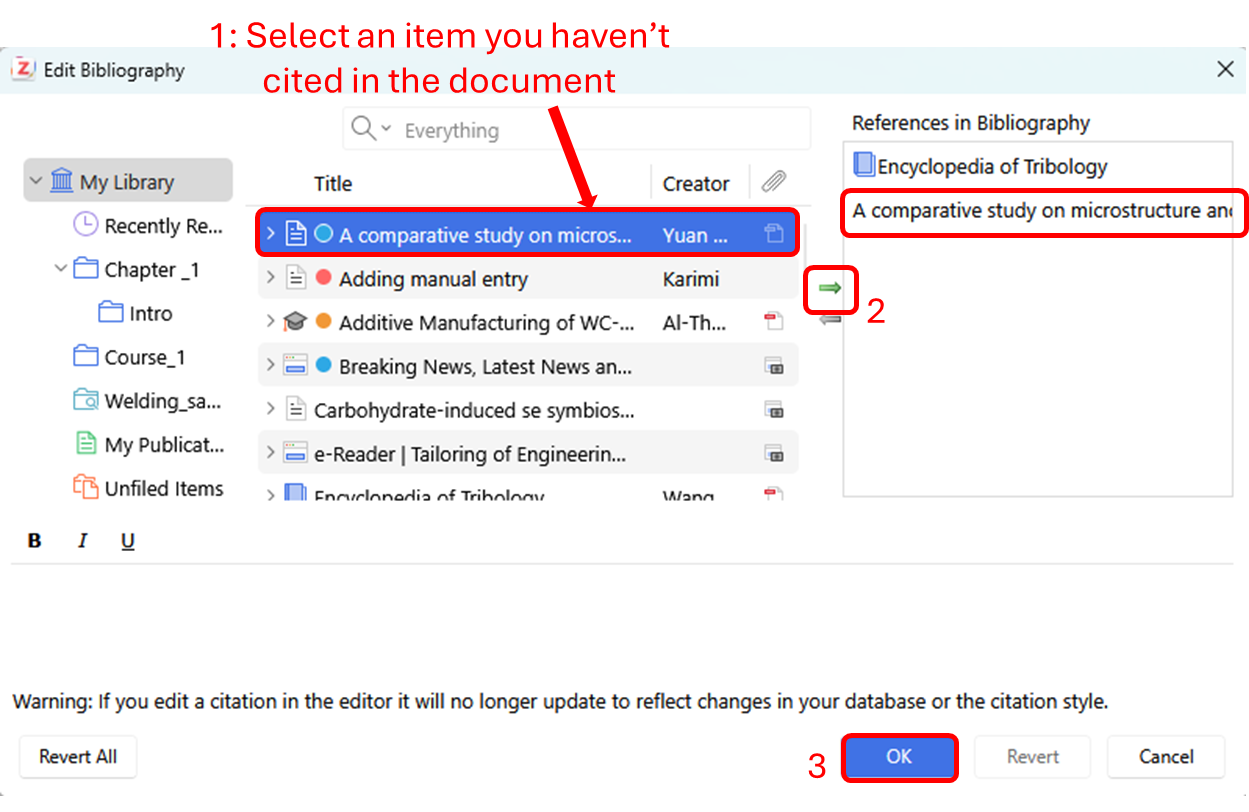
If you want to add items to the bibliography that you haven’t cited in the document, click “Add/Edit Bibliography” again to open the bibliography editor. You can then use the arrows to add or remove items.
While you can also edit the text or formatting of individual bibliography entries in this window, doing so is not recommended. Any manual changes made to the bibliography in Word may be overwritten the next time Zotero refreshes the document. In addition, manually edited references will not automatically reflect changes made to the corresponding items in your Zotero library, and such modifications may not always persist when the document is refreshed.
If you need to edit items in your bibliography, it is best to do this as a final step before submitting the document. First, save a backup copy of the document. Then, click the “Unlink Citations” button ( ) to disconnect your document from Zotero and convert all citations and the bibliography to regular text. Finally, make your adjustments to the bibliography text.
This process can be used for a variety of minor modifications to the bibliography, including:
-
Adding asterisks * before references included in a review or meta-analysis
-
Setting the names of particular authors in bold, italics, or all caps
-
Adding annotations or comments about an item
-
Adding headings for bibliography subsections (e.g., primary versus secondary sources)
Note: General corrections to style formatting should be made in the CSL Citation Style, not here. Corrections to item data should be made in your Zotero library, not here.
Keyboard Commands#
The Zotero Word plugin can be used with just the keyboard for improved accessibility and faster use.
-
Keyboard shortcuts can be set up for all the buttons in the Zotero tab.
-
In the Citation dialog
-
Use the up and down arrow keys to move between search results. Press Enter to select an item.
-
Type “p.45-48” or “:45-48” after a citation to cite a specific page or page range.
-
Type “ibid” to automatically select the last cited work. This works with all citation styles, regardless of whether “ibid” is actually used in citations. If you use Zotero in a language other than English, use the corresponding abbreviation instead of ibid., e.g. “ebd.” in German.
-
Select a citation with the mouse or left/right arrow keys and press down arrow or space bar to open the cite options dialog. Use Tab and Shift-Tab to move between the different elements, use the up and down arrow keys to change the locator type in the locator drop-down list, and the space bar to toggle the “Omit Author” checkbox.
-
####
Troubleshooting#
If you run into problems while trying to use the Zotero Word plugin, make sure to check out the word processor plugin troubleshooting page. It the problem still not resolved, reach out to citation management team for help.
#OPTIONAL_ Quick Copy#
If you just want to quickly add references to a paper, email, or blog post, Zotero’s Quick Copy is the easiest way to go. Simply select items in the center column and drag them into any text field. Zotero will automatically create a formatted bibliography for you. To copy citations instead of references, hold down Shift at the start of the drag.
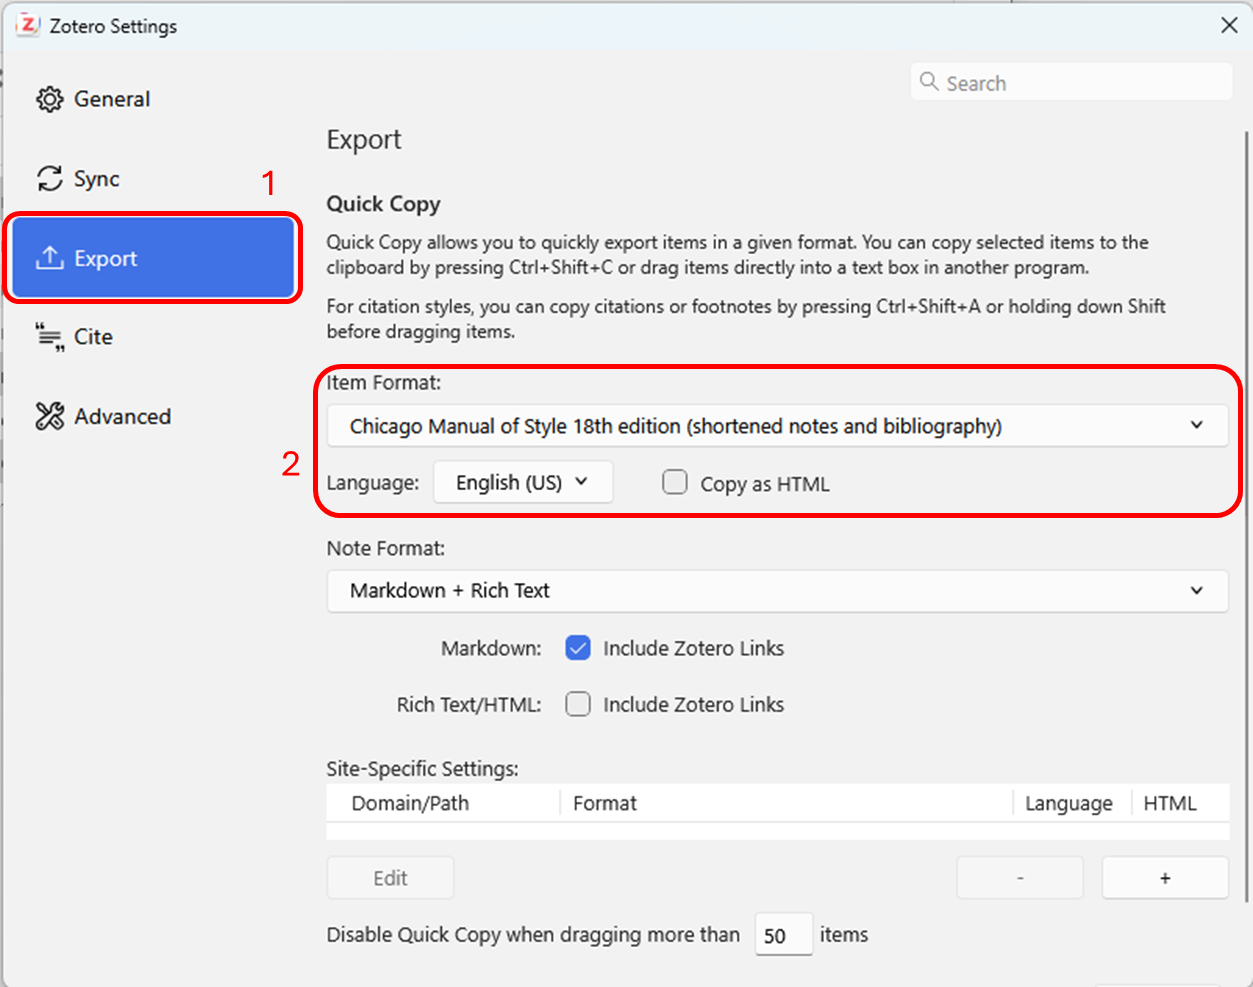
To configure your Quick Copy preferences, open the Zotero settings and select Export. From this tab you can do the following:
-
Select the export format
-
Set up site-specific export settings
-
Choose whether you want Zotero to include HTML markup when copying
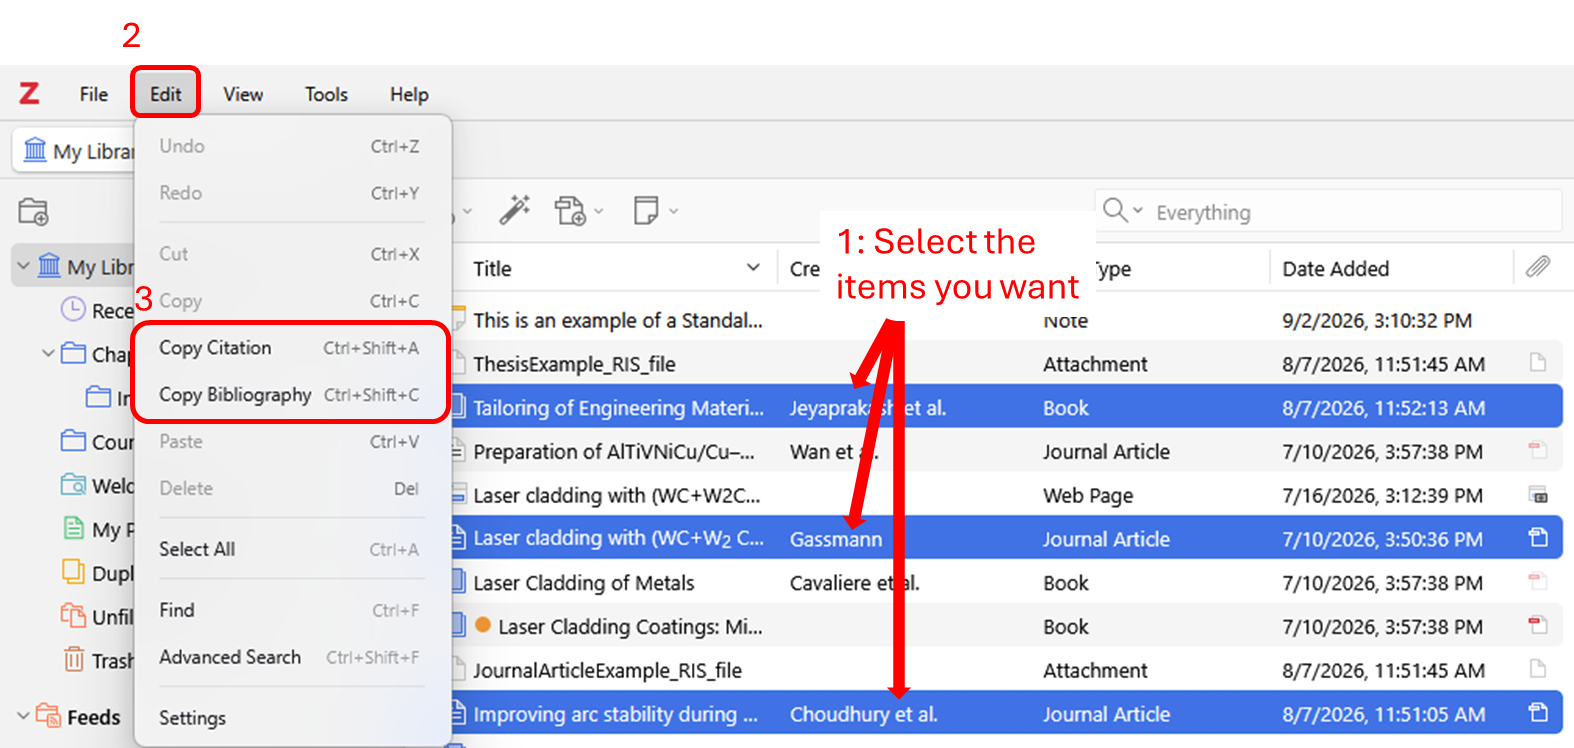
You can also use Edit → Copy Bibliography or press Ctrl/Cmd-Shift-C to copy bibliography entries to your system clipboard and then paste them into documents. To copy citations instead of bibliography entries, use Edit → Copy Citation or Ctrl/Cmd-Shift-A.
In addition to bibliographic output, Quick Copy also supports export formats such as BibTeX and RIS.
#OPTIONAL_ Right-Click to Create Citation/Bibliography#
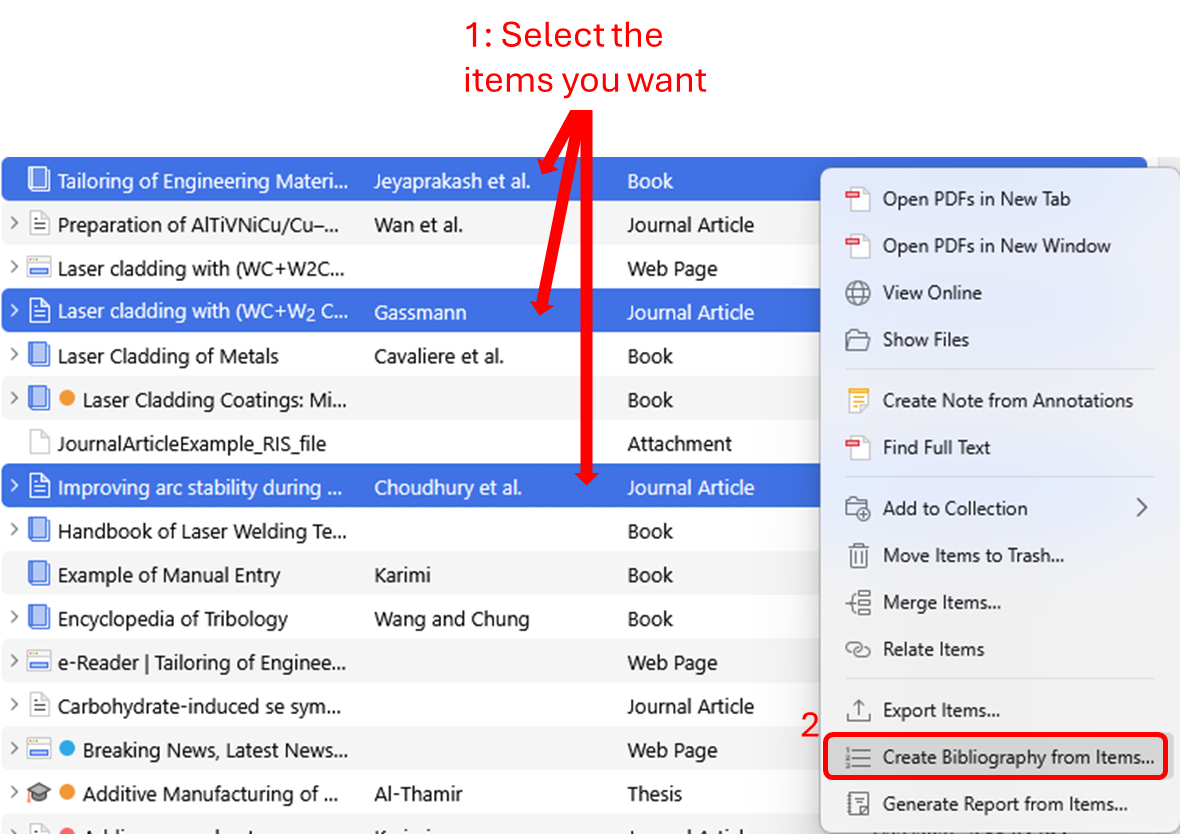
To create a bibliography or a citations list in Zotero, highlight one or more items, right-click them, and select “Create Bibliography from Item(s)…”. Then select a citation style for your citation/bibliography format and choose either to create a list of Citations/Notes or a Bibliography. Then choose one of the following four ways to create your citation/bibliography:
-
Save as RTF will save the bibliography as a rich-text file.
-
Save as HTML will save the bibliography as an HTML file for viewing in a web browser. This format will also embed metadata allowing other Zotero users viewing the document to capture bibliographic information.
-
Copy to Clipboard will copy the bibliography to your clipboard for pasting into any text field.
-
Print will send your bibliography straight to a printer.
Zotero Groups
Zotero groups provide a powerful way to share collections with a class, work closely with colleagues on a project, keep track of conversations in your field more broadly, and keep tabs on what people at your institution or in your department are working on. There is no limit on how many members may join your groups, and your full storage subscription is always available to your personal and group libraries.
Group Libraries are separate from your personal My Library, so you can also use Zotero groups as a way to keep separate libraries within one Zotero profile.
Creating Groups#
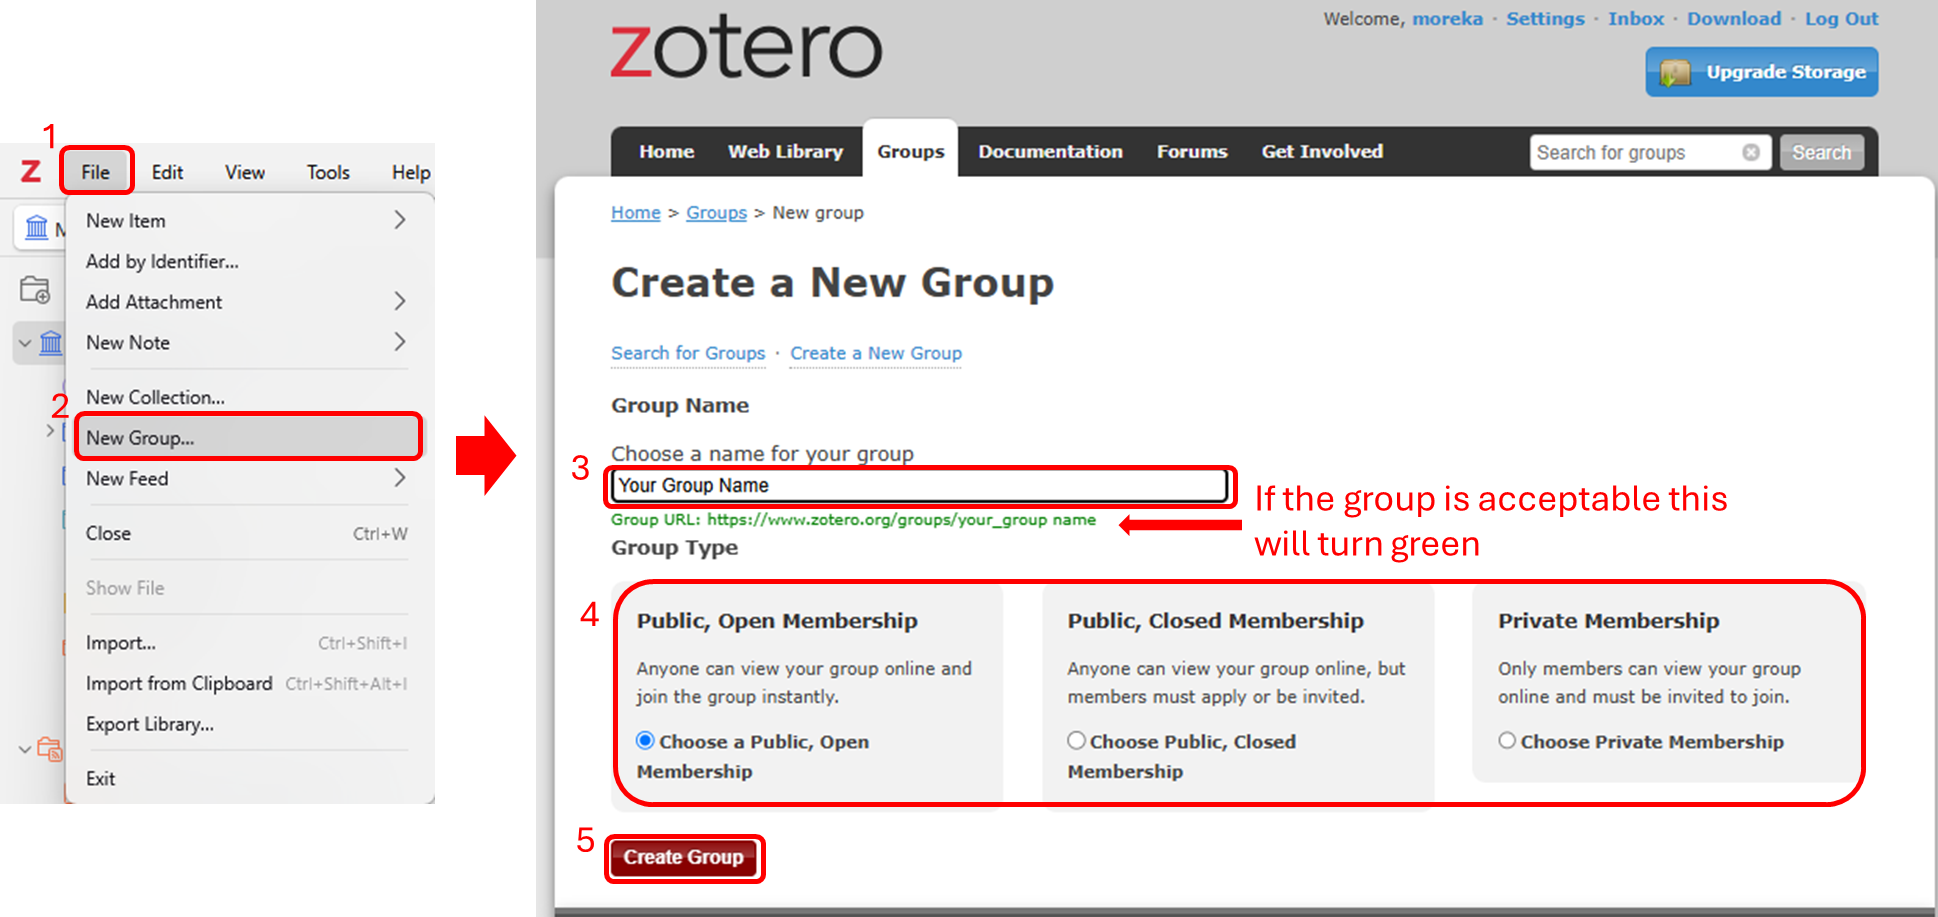
To create a Zotero group in the Zotero Desktop App, go to File → New Group… Alternatively, you can click “Create a New Group” on the Groups landing page on Zotero.org. Then, select your preferred Group Type and click “Create Group.”
Group Types#
Private Groups#
-
Private groups provide a means of collaboration among group members without creating any public face for the group online.
-
Only group members and users invited to join the group are able to see the group’s page.
-
Private groups are completely hidden from group searches. They are not shown on members’ public profile pages and will not appear in search engine results.
-
If administrators enable file sharing, group members can access and share files in addition to references.
Public, Closed Membership#
-
Closed-membership groups are useful for creating a controlled group environment with a public presence. This allows a group to publicly present its work and sources, or develop new membership in a controlled fashion.
-
Anyone can view the group page, but the only way to join the group is by invitation or by requesting an invitation.
-
If the group has a library, administrators can choose to show or hide the library from non-members.
-
If administrators enable file sharing, group members can access and share files in addition to references.
Public, Open Membership#
-
Open public groups are useful for the broadest discussion and collaboration.
-
The group page is public, and anyone who wants to can join instantly.
-
If the group has a library, administrators can choose to show or hide the library from non-members.
-
Open public groups do not allow file sharing.
Group Settings#
Group Profile Settings#
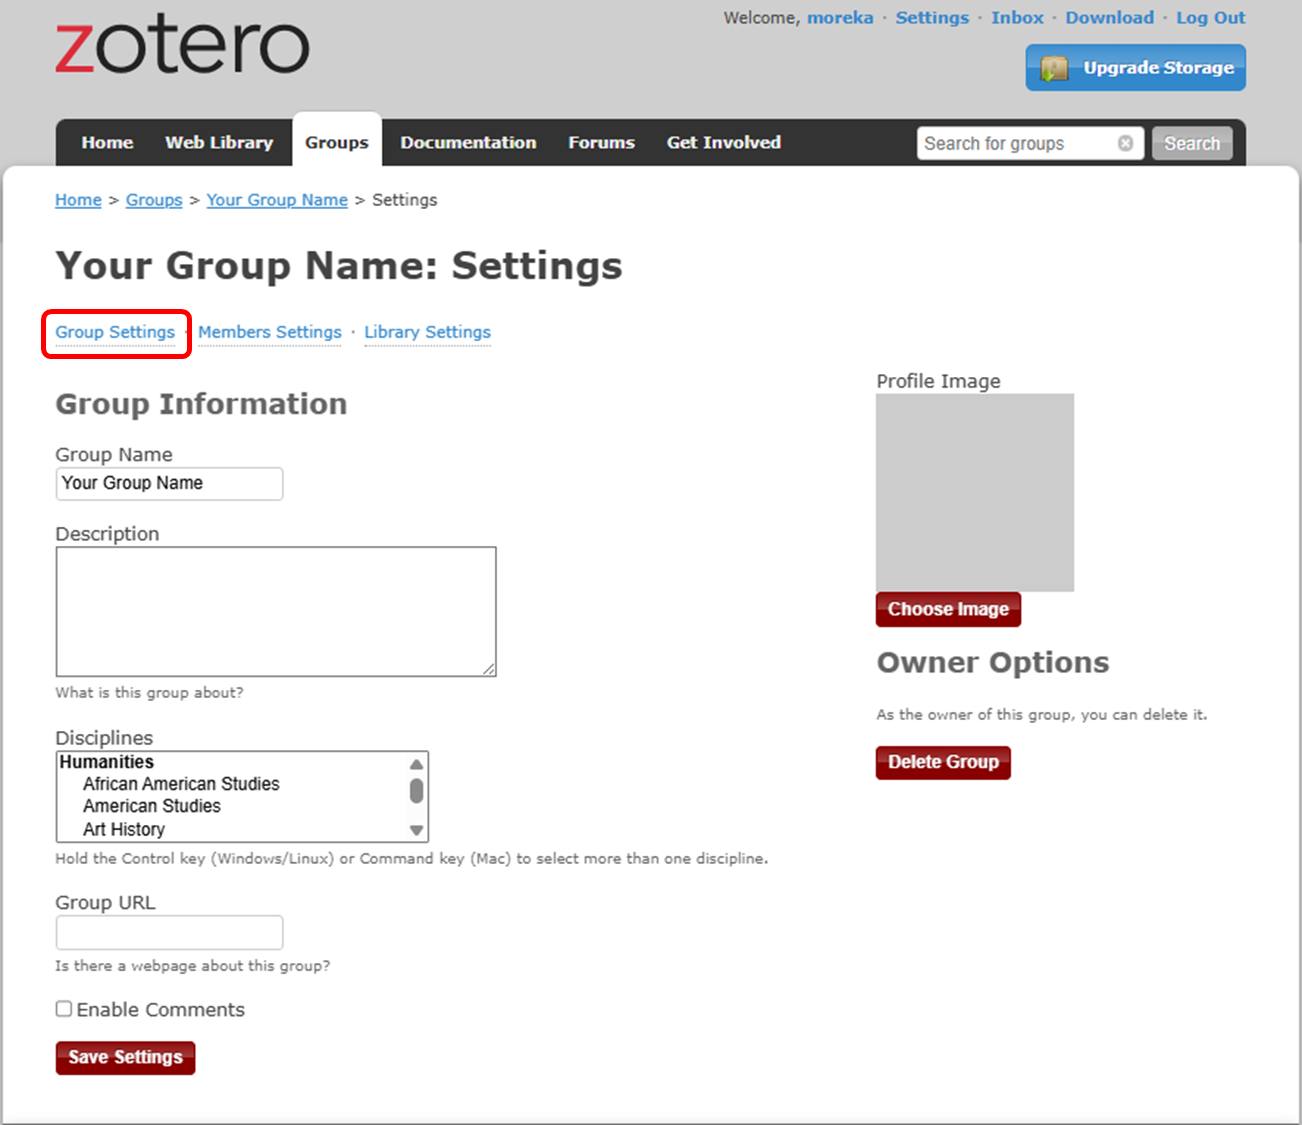
This page allows you change the group’s name, description, academic discipline, and group type (private/public, open/closed). You can also add a group profile picture, give a URL for a webpage about the group, and enable/disable comments.
To transfer group ownership to another user, use the “Transfer Ownership” option from this page. Only the group owner can initiate transferring ownership. If the member offered accepts ownership, they will become the new group owner (and any group file storage will start to count against their storage quota).
Group owners can also delete the group from this page.
Members Settings#
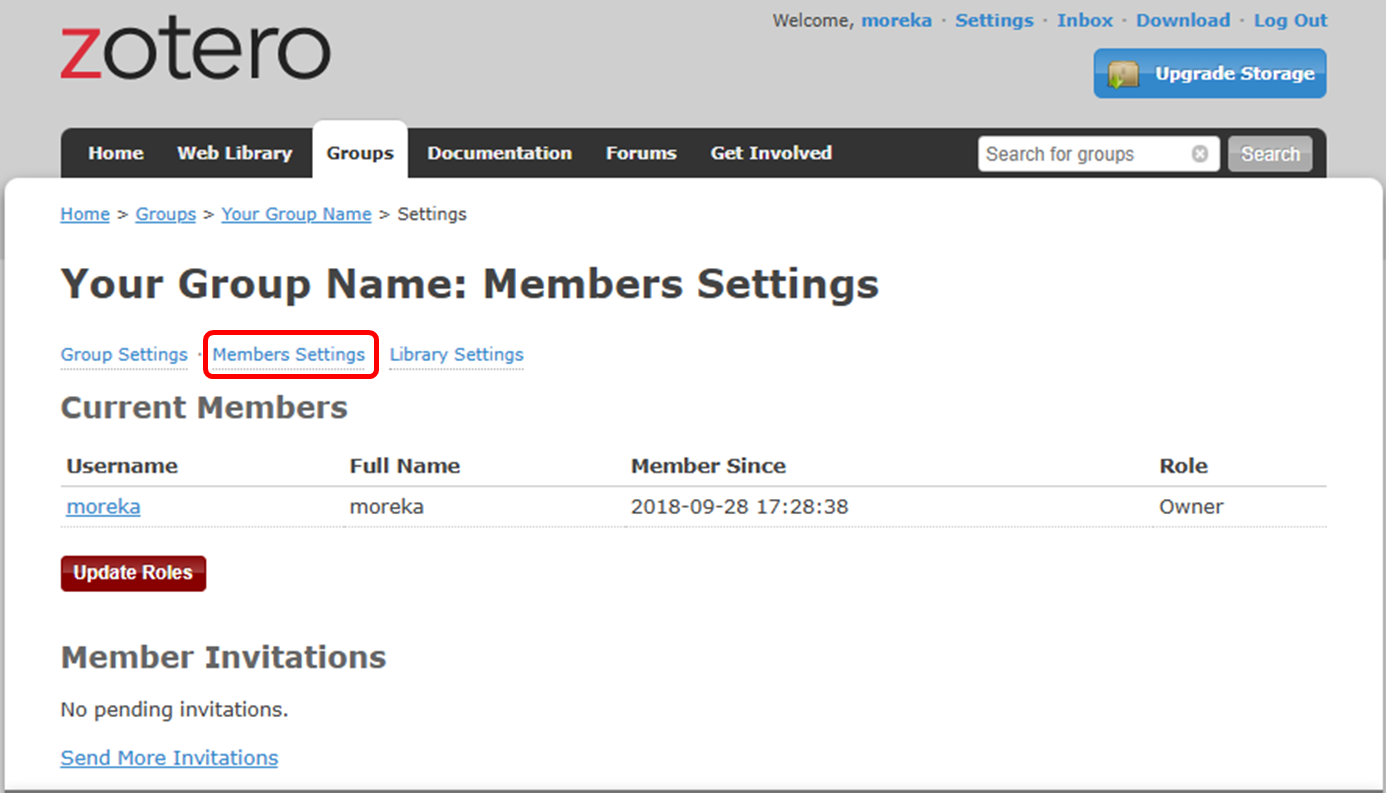
There are three roles for users in groups: regular members, administrators, and group owners. Administrators can change a group’s public/private status, members’ roles, and group library settings. Group owners have all the same privileges as administrators, but can also delete the group or transfer ownership to another member.
If group file storage is enabled, it will count against the owner’s storage quota. Other group members’ storage quotas will not be affected by the group files.
If this is a group for a team, lab, or organization, we recommend setting up a separate account for the team to function as the owner of the group, with at least two people knowing the login information. This way, you will not be locked out of the group if the group owner were to leave the team or organization.
To invite new group members, click the “Send More Invitations” link at the bottom of this page. Pending invitations can also be cancelled from this page.
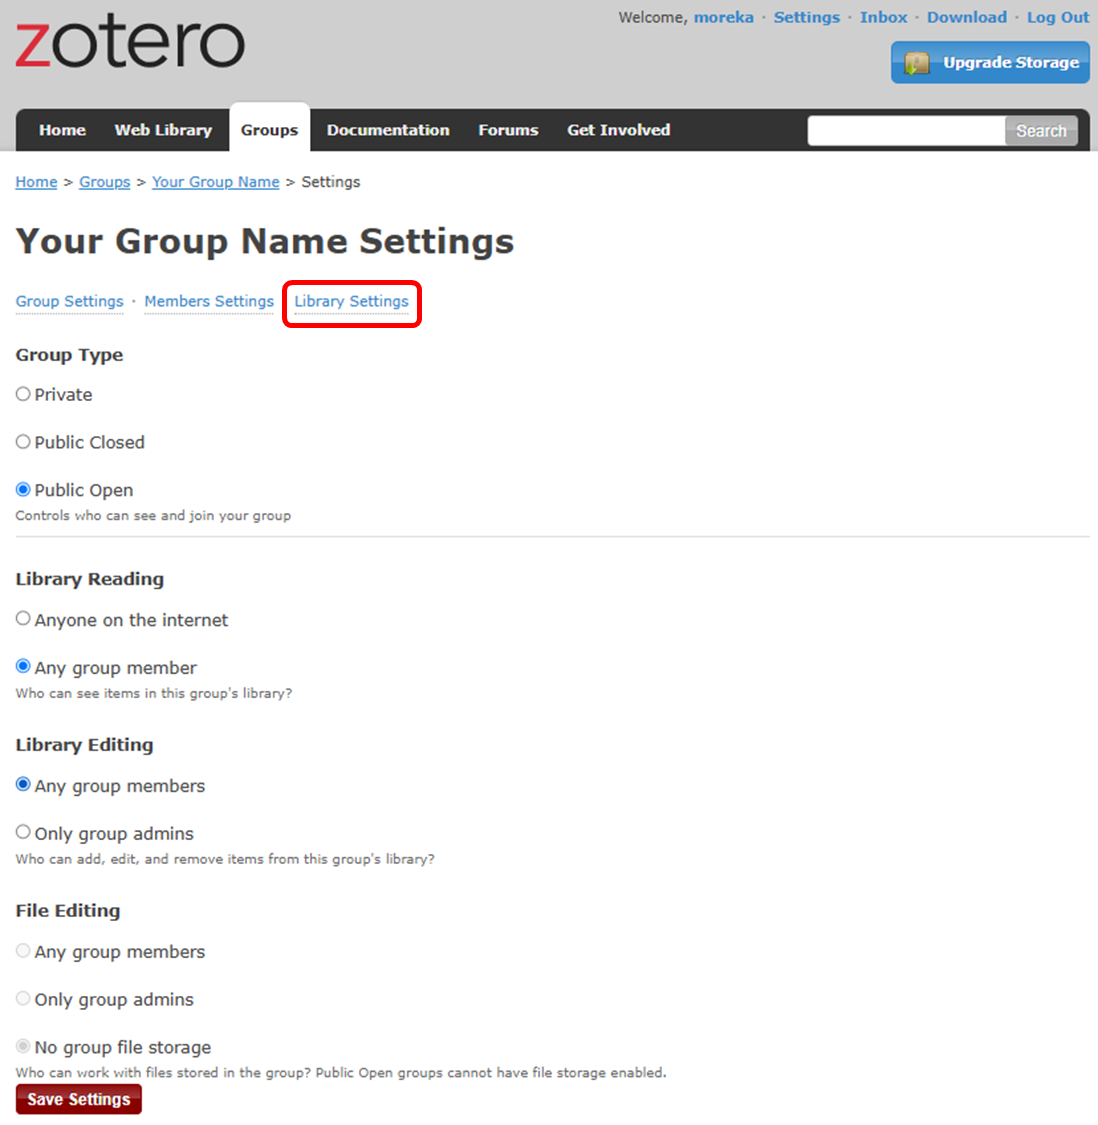
Library Settings#
Group Type The group type (private/public, open/closed) can be changed from this page.
Library Reading (Who can see items in this group’s library?):
-
Anyone on the internet
-
Any group member
Library Editing (Who can add, edit, and remove items from this group’s library?):
-
Any group member
-
Only group admins
File Editing (Who can work with files stored in the group? Public Open groups cannot have file storage enabled.):
-
Any group member
-
Only group admins
-
No group file storage
Interact With Groups Through the Zotero Client#
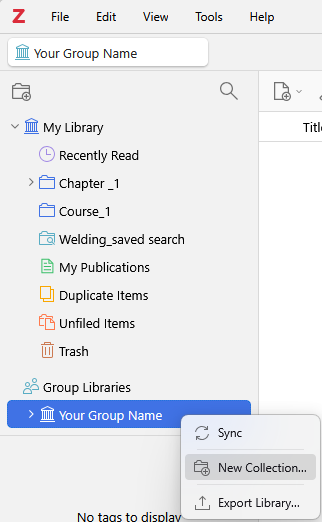
If you have enabled data syncing and are a member of a group with an enabled library, the group library will appear in Zotero’s left pane. Items can be dragged into a group from My Library or another group and viewed or edited by other group members, if their permissions allow it. To create a collection, right-click on a group library and select “New Collection…” or “New Saved Search…”.
Note that group libraries are wholly separate from My Library. Any items dragged into them are separate copies and changes to the items will not be reflected in your own copy of the item until you drag it back into My Library.
##
#OPTIONAL_ RTF Scan#
With RTF Scan, you can write in plain text, and use Zotero to finalize your citations and bibliographies in the style you want.
#OPTIONAL_Citation Styles
Zotero ships with several popular citation styles for creating citations and bibliographies, and over 10,000 additional styles can be found in the Zotero Style Repository. All these styles are written in the Citation Style Language (CSL), a format also supported by many other programs.
Installing Additional Styles#
Zotero Style Repository#
You can install styles from the Zotero Style Repository by going to the Cite pane of the Zotero settings and clicking on the “Get additional styles…” option in the Zotero Style Manager. Search for the style you want and click the style title to install it into Zotero. You can also visit the Zotero Style Repository webpage in your browser with the Zotero Connector installed to install styles directly into Zotero.
The repository allows you to search by style name and filter by style type and academic field of study. By checking the box “Show only unique styles”, duplicate styles that share the exact same format are hidden (e.g., for the journal-specific styles “Nature”, “Nature Biotechnology”, “Nature Chemistry”, etc., only the independent “Nature” style is shown).
Alternative Installation Methods#
You can also install CSL styles (with a “.csl” extension) from local files on your computer (e.g., styles that you edit yourself or that you download from another website). In the Zotero Style Manager, click the ‘+’ button, then find the style file on your computer.
Managing and Editing Styles#
You can remove installed styles by clicking the ‘-’ button in the Zotero Style Manager. From this tab, you can also preview style output for the selected items in Zotero and edit installed styles.
Reporting Style Errors#
If a CSL style doesn’t give the expected output, first make sure that you are running the latest version of Zotero and have the most recent version of the style installed from the Zotero Style Repository. Once you have made sure that the style deviates from the style guide, instructions for authors, or published examples, report the error in the Zotero Forums. For your post, use the title “Style Error: [Name of style]”, and give a link to, or excerpt from, the style guide that shows that the CSL style is wrong. You can also try to edit the style yourself.
Requesting New Styles#
If you can’t find the style you’re looking for in the Zotero Style Repository, feel free to request a style. When requesting styles, please provide formatted references for the Campbell/Pedersen article and the Mares chapter listed on the linked page. Please also provide a link to a free-to-access article using the style (if available). You can also try to create the style yourself.
#OPTIONAL_ Importing from Other Reference Managers
It’s easy to migrate your data from other reference management tools to Zotero. Instructions for popular tools are linked below.
You can also import from other tools, such as Reference Manager, RefWorks, Papers, Google Scholar Library, ReadCube, etc., by exporting to a standardized reference format, such as RIS, BibTeX, or CSL JSON, and then importing into Zotero by clicking File → “Import…” and choose “A file”.
If you already have data in a Zotero library on another computer, follow these instructions to transfer your library to your new computer.
Loading last updated date...