Liquid
Jekyll uses the Liquid templating language to process your site’s pages. Liquid follows simple templating rules and helps you to add logic or supplemental content to your simple HTML or Markdown pages. To use Liquid in HTML or Markdown pages, you need to add “Front matter” notation.
Jekyll support both Liquid Tags and Filters. You can find the list of all Liquid tags and filters in the Liquid Documentation.
Liquid Objects
Objects contain the content that Liquid displays on a page. To output content into a page, two curly braces e.g. {{ variable }} are used. In this case, Liquid is rendering the content of the title property of the page object.
Liquid Tags
Tags create the logic and control flow for templates. To perform logic statements or run a loop, curly braces are used with a percentage sign on each side e.g. {% if statement %}
An if/elsif/else statement in liquid looks like this:
{% if page.title == 'Session 1' %}
  The page title is Session 1.
{% elsif page.url == 'Session 2' %}
  The page title is Session 2.
{% else %}
  The page title is not known.
{% endif %}
A for loop in Liquid looks like this:
{% for post in site.posts %}
  {{post.title}}
{% endfor %}
You can also assign variables on your pages:
{% assign myVariable = "foo"; %}
Liquid Filters
You can use filters to change strings or manipulate a list of items. To change the output of a Liquid object or variable, variables are written in double curly braces and filters are separated by a pipe character |, e.g. {{ "/my/fancy/url" | append: ".html" }}
For example, the following line counts the number of characters in the string and shows it on your webpage.
{{ "How many characters are in this string?" | size }}
For more Liquid examples, take a look at this Github gist.
Front matter
Front matter contains information about your webpage. Front matter must take the format of valid YAML or JSON wrapped between triple-dashed lines. When Jekyll finds this information in your files, it processes them differently. The front matter must be the first thing in your file.
---
layout: post
title: Blogging Like a Hacker
---
YAML and JSON files use key:value notation. You can also add comments in YAML files with a # sign.
Front matter mainly specifies the layout of the page and its location on your website but it can also include custom page variables that you’ve created and can be later accessed with “dot notation”, such as page.title.
You can build a permanent link using the data provided in Front matter or include tags and categories that can be processed later by Jekyll to create lists of tags. To find the regular variables in Jekyll, look at Jekyll documentation. These variables can be expanded by other variables you need to save and later recall from that webpage.
If you open Hyde and look at the code in page.html in the _layout folder, you will find examples of Front matter and Liquid tags:
---
layout: default
---

<div class="page">
  <h1 class="page-title">{{ page.title }}</h1>
  {{ content }}
</div>
At the top of the file, Front matter is wrapped in triple hyphens. Here, we are specifying that this file should be processed as the content of default.html, which contains the website’s header and footer.
{{ page.title }} and {{ content }} are Liquid tags and output the title of the page and its content that are retrieved from the Markdown files.
Layouts
When browsing a website, many sections stay the same across multiple pages. Layouts in Jekyll give you an easy solution to build an HTML file and use it across your website. You have seen one of them just in the previous section.
page.html was one of the layouts of Hyde. Layouts specify the general structure of web pages, which are then populated with data from Markdown files and includes. A simple website only needs two layout files: one for blog posts post.html and one for static pages page.html. A personal academic website might have layouts for a CV or “about me” page. A default layout helps you to put a header, a footer, and all common elements of web pages in a single file.
Now, lets open default.html:
<!DOCTYPE html>
<html lang="en-us">

  {% include head.html %}

  <body>

    {% include sidebar.html %}

    <div class="content container">
      {{ content }}
    </div>

  </body>
</html>
The file starts with tags that declare the type and language of the file. Here, we are not using Front matter since the file is not inheriting any other layout. The <head> tag is replaced with an include file. We learn more about them in the next section. In the <body> tag, the sidebar is created by another include file. The content will be replaced after interpreting the .md files.
Includes
While layouts specify the skeleton of web pages, includes are snippets of code that we want to use over multiple pages. Google analytics tags or social media forms are some examples. You can also wrap headers and footers of your website as include components.
Includes are stored in the _include folder. You can find two HTML files in the _include folder of Hyde. Lets look at the content of head.html here:
<head>
<link href="http://gmpg.org/xfn/11" rel="profile">
<meta http-equiv="X-UA-Compatible" content="IE=edge">
<meta http-equiv="content-type" content="text/html; charset=utf-8">
<!-- Enable responsiveness on mobile devices-->
<meta name="viewport" content="width=device-width, initial-scale=1.0, maximum-scale=1">
<title>
{% if page.title == "Home" %}
{{ site.title }} · {{ site.tagline }}
{% else %}
{{ page.title }} · {{ site.title }}
{% endif %}
</title>
<!-- CSS -->
<link rel="stylesheet" href="{{ site.baseurl }}public/css/poole.css">
<link rel="stylesheet" href="{{ site.baseurl }}public/css/syntax.css">
<link rel="stylesheet" href="{{ site.baseurl }}public/css/hyde.css">
<link rel="stylesheet" href="http://fonts.googleapis.com/css?family=PT+Sans:400,400italic,700|Abril+Fatface">
<!-- Icons -->
<link rel="apple-touch-icon-precomposed" sizes="144x144" href="{{ site.baseurl }}public/apple-touch-icon-144-precomposed.png">
<link rel="shortcut icon" href="{{ site.baseurl }}public/favicon.ico">
<!-- RSS -->
<link rel="alternate" type="application/rss+xml" title="RSS" href="/atom.xml">
</head>
The content of this file replaces the <head> section of all HTML files in Hyde. In the <title> section, you can find a conditional statement that changes the value in the <title> tag based on your location on the website.
Includes can be used in other web pages via Liquid tags:
{% include head.html %}
Passing parameters to an include
You can also pass parameters to include to change the content of a component based on the location on your website. For example, we want to add YouTube videos to the site and present them in a consistent way. We can put a placeholder for the YouTube video id.
<div class="spacing youtube">
  <iframe width="400" height="300" src="https://www.youtube.com/embed/{{ include.youtube_id }}" frameborder="0" allowfullscreen></iframe>
</div>
We save the HTML structure shown above in _includes/youtube.html. We can use it throughout the site and pass the video id
{% include youtube.html youtube_id="xtMBD1P3tz0" %}
Variables
When Jekyll processes your site, it looks for data in the Front matter, _config.yml, and _data files to assign values to variables. The data in the Front matter of each page will be stored in page global variable while data in _config.yml is stored in site global variable.
For example, site.title is retrieved from the _config.yml file and store the title of your website, shown on the tab on your browser, but page.title is retrieved from each page’s Front matter. A simple website generally uses site and page variables. You can find all variables in your disposal here.
You can also create your own variables by defining them in the Front matter or _config.yml and later using them in Liquid statements.
Take a look at the _config.yml in the root directory of Hyde. You can find a series of key:value that either set properties of Jekyll, such as the Markdown interpreter, or are later called to be used in different web pages, such as site.description or site.url.
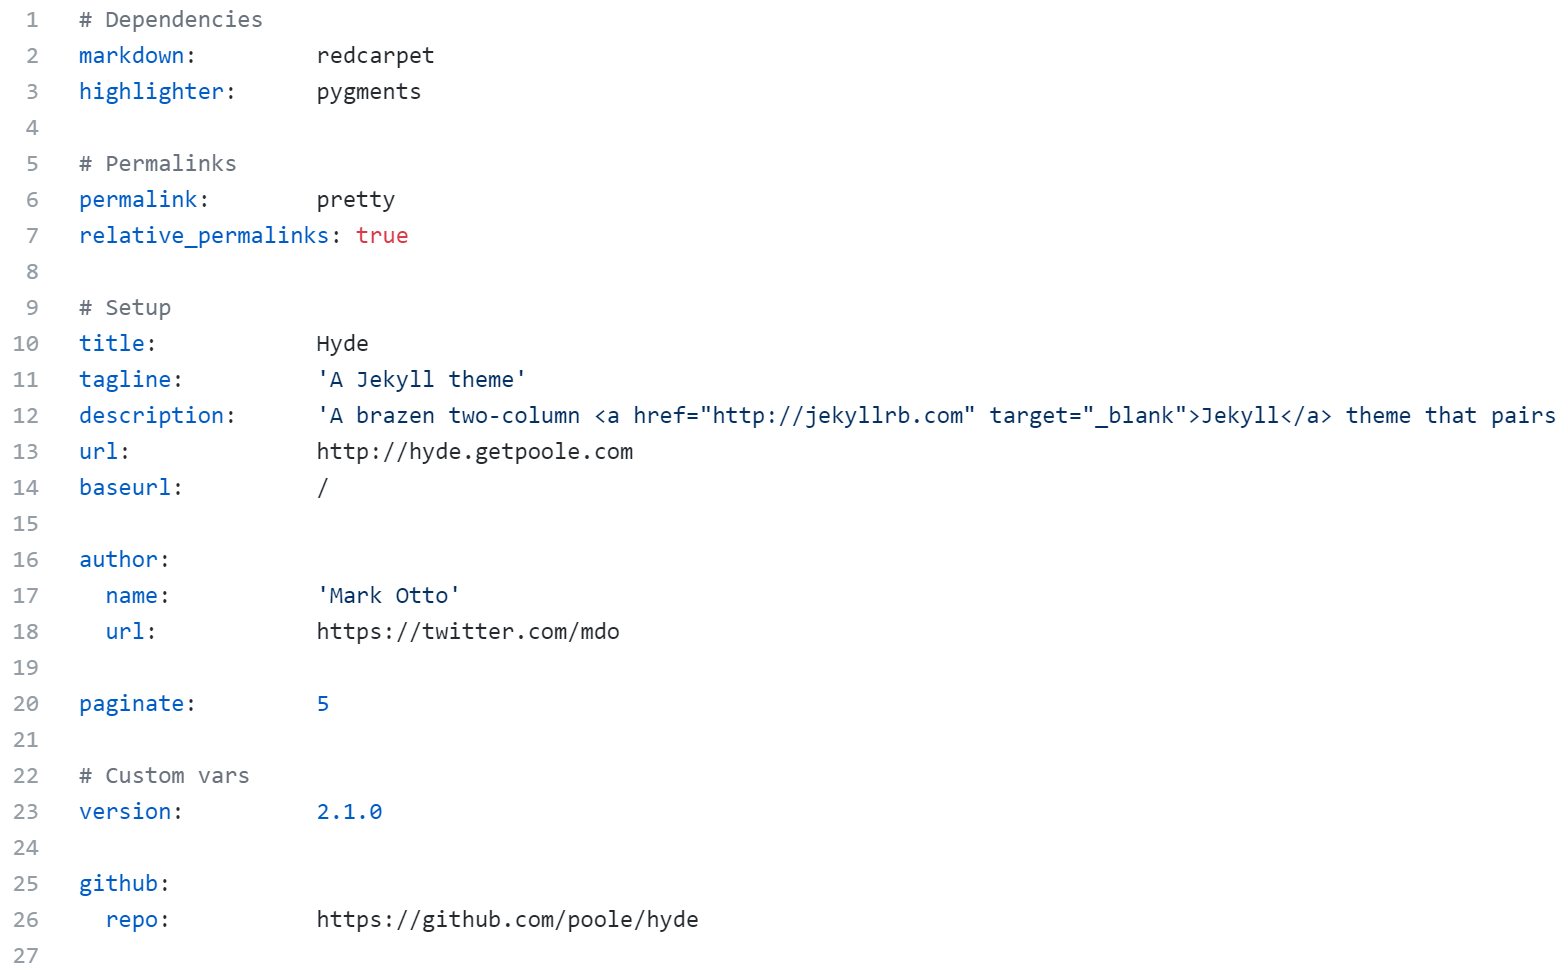 _config.yml in Hyde
You can add supplemental data, much like a database or API, in Jekyll by building other YAML files and putting them in a _data folder in the root directory of Jekyll.
For example, if the name of the YAML file is students.yml, we can simply access them by putting {{site.data.students}} in the HTML or Markdown page. You can use Liquid tags and filters, such as for loops, to navigate data and process them before putting them on your website.
Loading last updated date...