Git basics
One of the challenges of learning Git is becoming familiar with its terminology and command structure. Git commands consist of verbs such as init, add, commit, and push preceded by the word git. These base commands are often followed by options that provide more information about how and where Git should act.
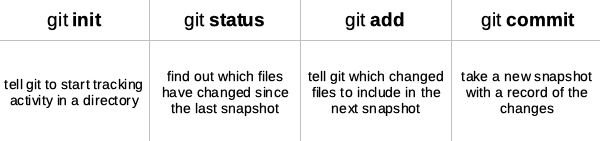
Below are some basic git commands and what they do in the git workflow. We’ll use all of them during the workshop and it’s helpful to understand how they work together.
The best way to learn git commands is through practice. In this workshop, we will learn about and go through the following Git workflows:
- Making and maintaining a repository on your machine
- Creating a repository on GitHub
- Syncing local repository with GitHub
- Forking projects and working collaboratively
Table of contents
Creating a repository
You can think of a repository as a group of files that Git tracks. When you create a repository Git generates a hidden directory named .git in the same folder. Information about the repository, changes to the files, and previous versions are all stored in this hidden directory so they are accessible but don’t get in the way.
You can create repositories using GitHub’s web interface, or on your own computer using the command line. Let’s use the command line to create a Git repository for a new project. (On a Mac, open Terminal, on a PC open Git Bash.)
First, create a directory called hello-world and navigate to the new directory.
Input
$ mkdir hello-world
$ cd hello-world
If you’re not sure you’re in the right place use the command pwd (print working directory) to display the complete path of your current directory.
We will now create a Git repository to track changes to our project. Use the git init command, as shown below, to initialize a git repository.
Input
$ git init
Output
Initialized empty Git repository in <your file path>/hello-world.git/
Your hello-world directory is now a git repository.
If you run the ls command to list the contents of the hello-world directory, your repository may seem empty. But running ls -a shows the hidden files in the list, thus, revealing the new hidden directory named .git.
Displaying project status
The git status command displays the current state of a project.
Input
$ git status
Output
On branch main
No commits yet
nothing to commit (create/copy files and use "git add" to track)
The output introduces two new Git concepts:
-
branch main. A Git repository can be split into multiple branches that can be changed and modified independently before merging them eventually. New repositories start with only one branch, named main by default. In this workshop, we mainly work on the main branch.
-
commit. The
git commitcommand saves your changes to the repository. The output above tells us there is nothing new to save in our repository.
Adding and committing
We will now create and save our first project file. This is a two-stage process. First, we add any files for which we want to save the changes to a staging area, then we commit those changes to the repository. This two-stage process gives us fine-grained control over what should and should not be included in a particular commit and helps us to review the changes.
Let’s create a new file using the touch command, which is a command used to quickly make an empty file using the terminal.
Input
$ touch index.md
The .md extension is for text files written using Markdown, a lightweight markup language with plain text formatting syntax. For more on Markdown see the Mastering Markdown guide.
Let’s check the status of our project again.
Input
$ git status
Output
On branch main
No commits yet
Untracked files:
  (use "git add <file>..." to include in what will be committed)

    index.md

nothing added to commit but untracked files present (use "git add" to track)
Git has noticed a new file in our directory that we are not yet tracking. With colourised output, the filename will appear in red. To change this, and tell Git we want to track any changes we make to index.md, we use git add.
Input
$ git add index.md
This adds the file to the staging area, telling Git that index.md is a file that should be tracked. To see the effects of this change on the status of our repository, we run git status again.
Input
$ git status
Output
On branch main

No commits yet

Changes to be committed:
  (use "git rm --cached <file>..." to unstage)

    new file:   index.md
Note: if you want to add all the modified files to the staging area in a single command, you can use git add -A.
The index.md file now appears under changes to be committed. If you are using colourised output in your terminal, the filename may have changed colour from red to green.
Before committing the new file, open index.md in a text editor, add a line of text, then save the file. (In this example we enter the text Hello, world!). Use git status to see what has changed from Git’s perpective.
Input
$ git status
Output
On branch main

No commits yet

Changes to be committed:
  (use "git rm --cached <file>..." to unstage)

	new file:   index.md

Changes not staged for commit:
  (use "git add <file>..." to update what will be committed)
  (use "git checkout -- <file>..." to discard changes in working directory)

	modified:   index.md
Note: To remove the files from the staging area, you can use git reset command.
This lets us know that Git has indeed spotted the changes to our file, but that it hasn’t yet staged them, so let’s add the new version of index.md to the staging area.
Input
$ git add index.md
Now we are ready to commit our first changes. Commit is similar to saving a file, but in addition to saving the contents of a file, git commit stores information about the file’s history, including what changes were made, when, and by whom.
Input
$ git commit -m 'Add index.md'
Output
[main (root-commit) e9e8fd3] Add index.md
 1 file changed, 1 insertion(+)
 create mode 100644 index.md
We can see that one file has changed and that we made one insertion, which was a line with the text Hello, world!. We can also see the commit message Add index.md, which we added by using the -m flag after git commit. The commit message is used to record a short, descriptive, and specific summary of what we did to help us remember the changes without having to look at the them.
If we just run git commit without the -m flag, Git will launch the preferred text editor to write a message describing the commit.
Having made a commit, we now have a permanent record of what changed, along with information about who made the commit and at what time.
Note: Before committing your changes to index.md, you can use the following command to cancel all the changes you made and return the file to the latest commit:
Input
$ git checkout index.md
Another look at the git workflow
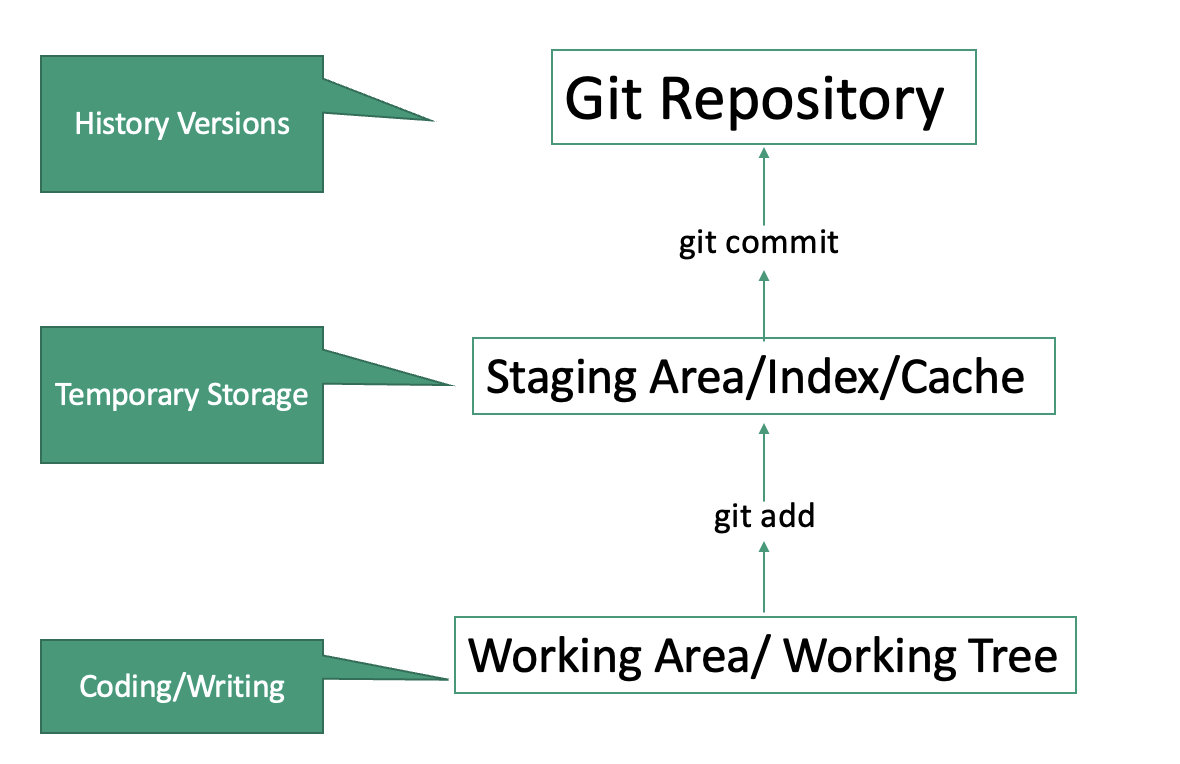
If you think of Git as taking snapshots of changes over the life of a project, git add specifies what will go in a snapshot (putting things in the staging area), and git commit then actually takes the picture and makes a permanent record of it (as a commit). If you don’t have anything staged when you type git commit, Git will prompt you to use git commit -a or git commit --all. This will automatically stage and commit all changes to all files in your repository at once, so use this option with caution.

figure depicted from Library Carpentry: Introduction to Git
Git branches
Git branches allows you to work on different feature or part of a project collaboratively without impacting the main branch. When the work is complete, the newly created branch can be merged with the main branch. Each branch is a separate version of the main repository.
To see all the branches in your current repository:
Input
$ git branch
We want to make a new branch called new-feature and add your name to the bottom of index.md and a new file about-me.md
Input
$ git branch new-feature
Now, if you run git branch again, you should see two branches with only one of them active. Git uses the keyword checkout to switch between branches. The default branch in Git is master or main. This branch is no different than any other branch in a Git repository. To move to the newly created branch, new-feature, we ask git to “checkout” this branch:
Input
$ git checkout new-feature
You can run git status to check the current/active branch. Some shell themes provide graphical hints to inform you of the current branch at all times.
When your feature is ready, you can merge it with the master branch. To do so, you first need to checkout to the master branch:
Input
$ git checkout master
$ git merge new-feature
The output shows the updated files after the merge. When you merge a branch, it does not get removed from the Git tree. To delete a Git branch after merging it with another branch:
Input
$ git branch -d new-feature
.gitignore file
A .gitignore is the name of a text file in the main folder of your git repository that includes the names of the files and directories that should be ignored by git. Each new line should list a new rule and Git will match the rule with the names of files or folders to find the ones that must be ignored.
For example, in Mac, a .DS_store file is added by the filesystem to each directory. You can ignore it as well as all files with the extension of .env and all the files in _site folder by making a .gitignore file like below:
Input
.DS_Store
*.env
_site\
Note: Git is not good in managing binary files. If you are doing frequent updates to your binary files, you might need to solve merging conflicts frequently and git diff does not return useful information.
Reviewing local changes
The git diff command shows the changes we have made before a commit. To test this, open index.md with any text editor and enter a new line of text (in this example we added It’s a beautiful rainy day on the second line of index.md). Save the file, then use git diff to see the changes.
Input
$ git diff
Output
diff --git a/index.md b/index.md
index aed0629..989787e 100644
--- a/index.md
+++ b/index.md
@@ -1 +1,2 @@
 # Hello, world!
+It's a beautiful rainy day
Here’s what the output reveals:
- Line 1 tells us Git is comparing “a” and “b” versions of the index.md file
- Line 2 indicates which tracked versions “a” and “b” correspond to; “aed0629” and “989787e” are unique computer-generated identifiers for each version
- The last two lines show the changes to the “index.md” between the compared versions:
- there were no changes to the
# Hello, world!line - a line was added with the text
It's a beautiful rainy day(“+” indicates an addition and “-“, a deletion)
- there were no changes to the
When working with Git, only one branch can be checked out at a time. This is called the “HEAD” branch or “active” or “current” branch. Git makes note of this current branch in the .git/HEAD file in the Git repository. To find the current HEAD, you can print this file:
Input
$ cat .git/HEAD
With the following command, you can compare the current state of your files with your latest commit and review the changes applied after your latest commit:
Input
$ git diff HEAD
If you are going to commit the staged files and like to review the changes in the staged files, you can use the following diff command:
Input
$ git diff --staged
We can now add and commit the updated version of “index.md”:
Input
$ git add index.md
$ git commit -m 'Add note about the weather'
The git log command provides another way to view past activity in our git repository.
Input
$ git log
Output
commit 8e2eb9920eaa0bf18a4adfa12474ad58b765fd06
Author: Your Name <your_email>
Date:   Mon Jun 5 12:41:45 2017 +0100

    Add note about the weather

commit e9e8fd3f12b64fc3cbe8533e321ef2cdb1f4ed39
Author: Your Name <your_email>
Date:   Fri Jun 2 18:15:43 2017 +0100

    Add index.md
git log lists information about all commits in reverse chronological order, including the commit messages we wrote to describe them. It is important to add meaningful commit messages, especially when working with teams. The best practice is to write commit messages in the imperative (e.g. ‘Add index.md’ instead of ‘Adding index.md’).
To get more information about a particular commit, you can enter the commit hash in front of git show command.
In some rare cases, for example when you checkout a specific commit or tag or remote branch, the HEAD file does not contain a branch reference. Your repository is then in a state called Detached HEAD. To solve the issue, you can make a new branch, commit the changes, and merge the changes back to the main branch.
Why staging is useful
The index or staging is a place to hold the current changes that will be committed when git commit is executed. It allows you to only commit parts of the working area into the repository.
For example, when you are working on a big feature with a few different subtasks, you can modify the files as you plan, then group the changes and add them separately to the staging area, and finally commit them with appropriate messages focused on the respective change. It also makes reviewing changes more straight-forward.
Undoing changes in Git
You want to go back to the previous version in a number of scnearios:
- 1. Undoing Local Changes That Have Not Been Committed: If the changes have not been committed yet, you should check out the file or files that you want to revert back to its previous version:
$ git checkout <filename>
- 2. Undoing Your Last Commit (That Has Not Been Pushed): If you made a mistake on your last commit and have not pushed it yet, you can undo it by moving the HEAD of your repository. For this purpose, run the following commands in the repository directory.
$ git reset --soft HEAD~
Now, your latest commit is undone. The changes remain in place and the files go back to being staged so you can make additional changes or add any missing files and make a new commit.
Git tags
The common practice is to use at least two branches, development and production, for a project. The latest features are implemented in the development branch and the tested features will be merged into the production branch.
Git also supports tags, which you can use to specify a version for the current project. Tags can be viewed as versions for your code and can help you to quickly checkout your project up to a certain commit.
Input
git tag -a v1.0 -m 'This is the first version of my project'
Tags and branches are fundamentally different. A branch always points to the top of the development line and only changes when a new commit is pushed. A tag will not change by making a new commit and will always stay on that version of the code.
Loading last updated date...