Table of contents
Collaborating on GitHub
The GitHub platform facilitates collaboration by managing access and tracking activity on multi-author projects. A common workflow for teamwork is to use the fork, clone, and pull request features of Git and GitHub. Consider this example:
A team of 10 people is writing a textbook. Everyone will contribute content and the files will be stored in the main branch of the project repository. To avoid unintended conflicts each team member will work in their own copy of the repository, periodically merging their work back into the main project repository.
Here are some of the Git commands and GitHub features you will encounter in this workflow.
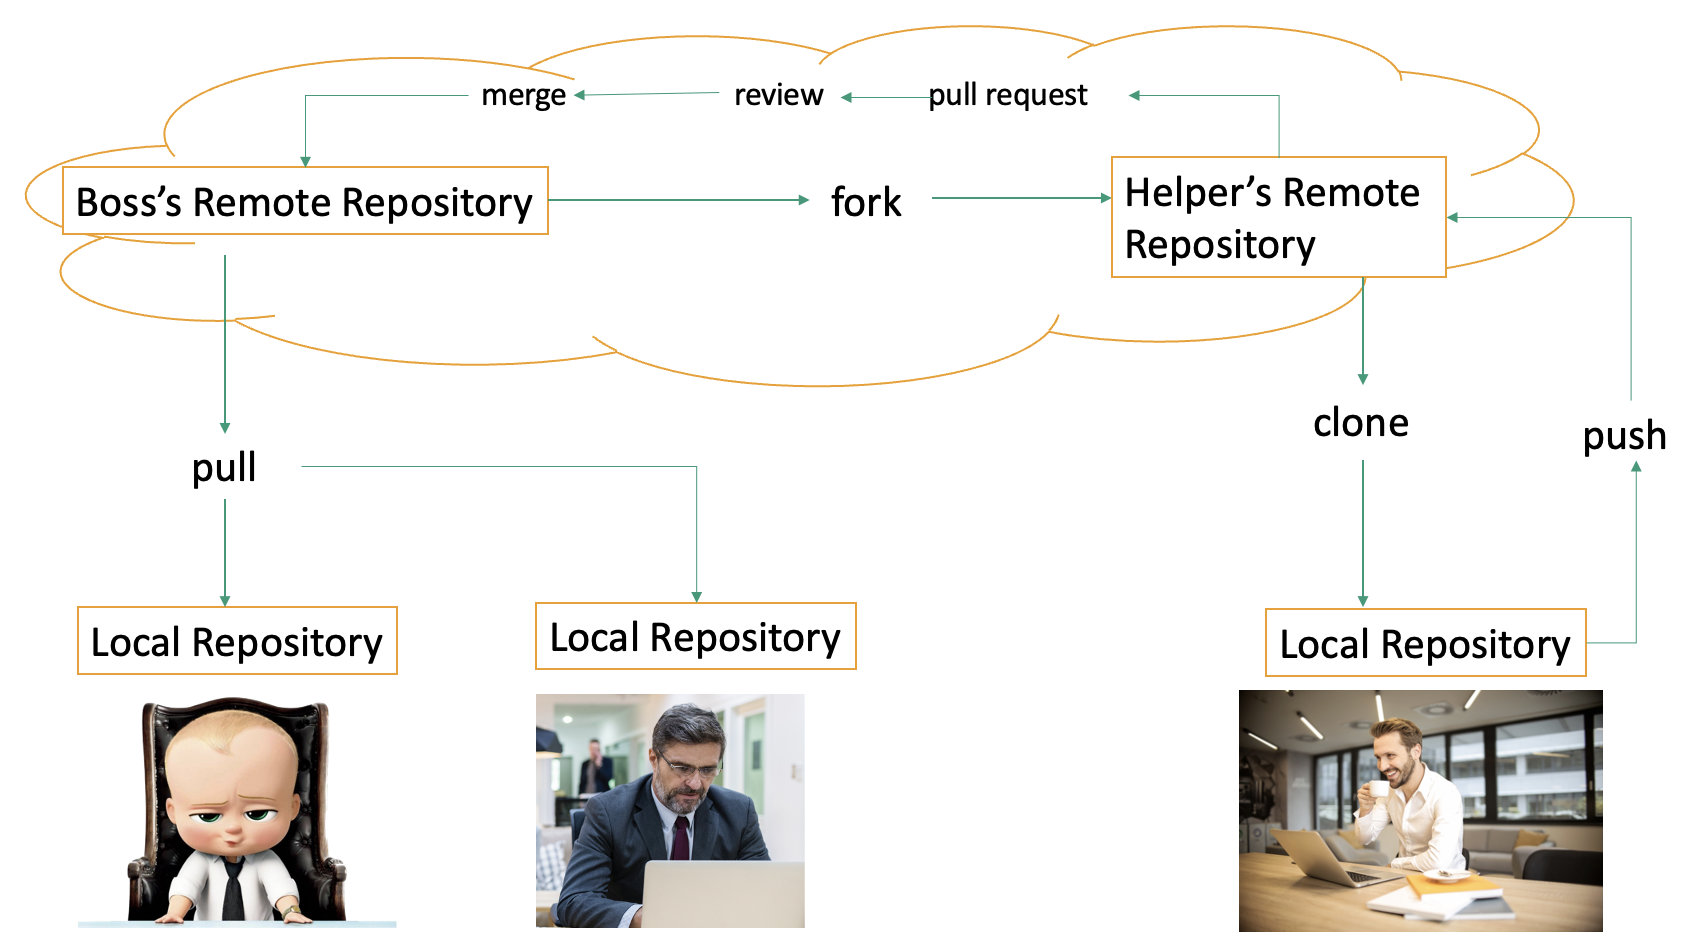
- Fork. A GitHub feature that makes a copy of another GitHub user’s repository in your own GitHub account. You have full control over the fork because it’s in your account.
- Clone. A Git command that makes a local copy of a GitHub repository on your own computer. It allows you to write and edit using your preferred software, then commit and push your changes back to the repository on GitHub. (You can only push the changes back to GitHub if you have permission to edit the repository on GitHub.)
- Pull request. A GitHub feature that allows the owner of the main project repository to “pull” in changes made in forks of the repository. When it’s time to merge your own work with the main project repository, submit a “pull request” from your fork.
Creating a fork
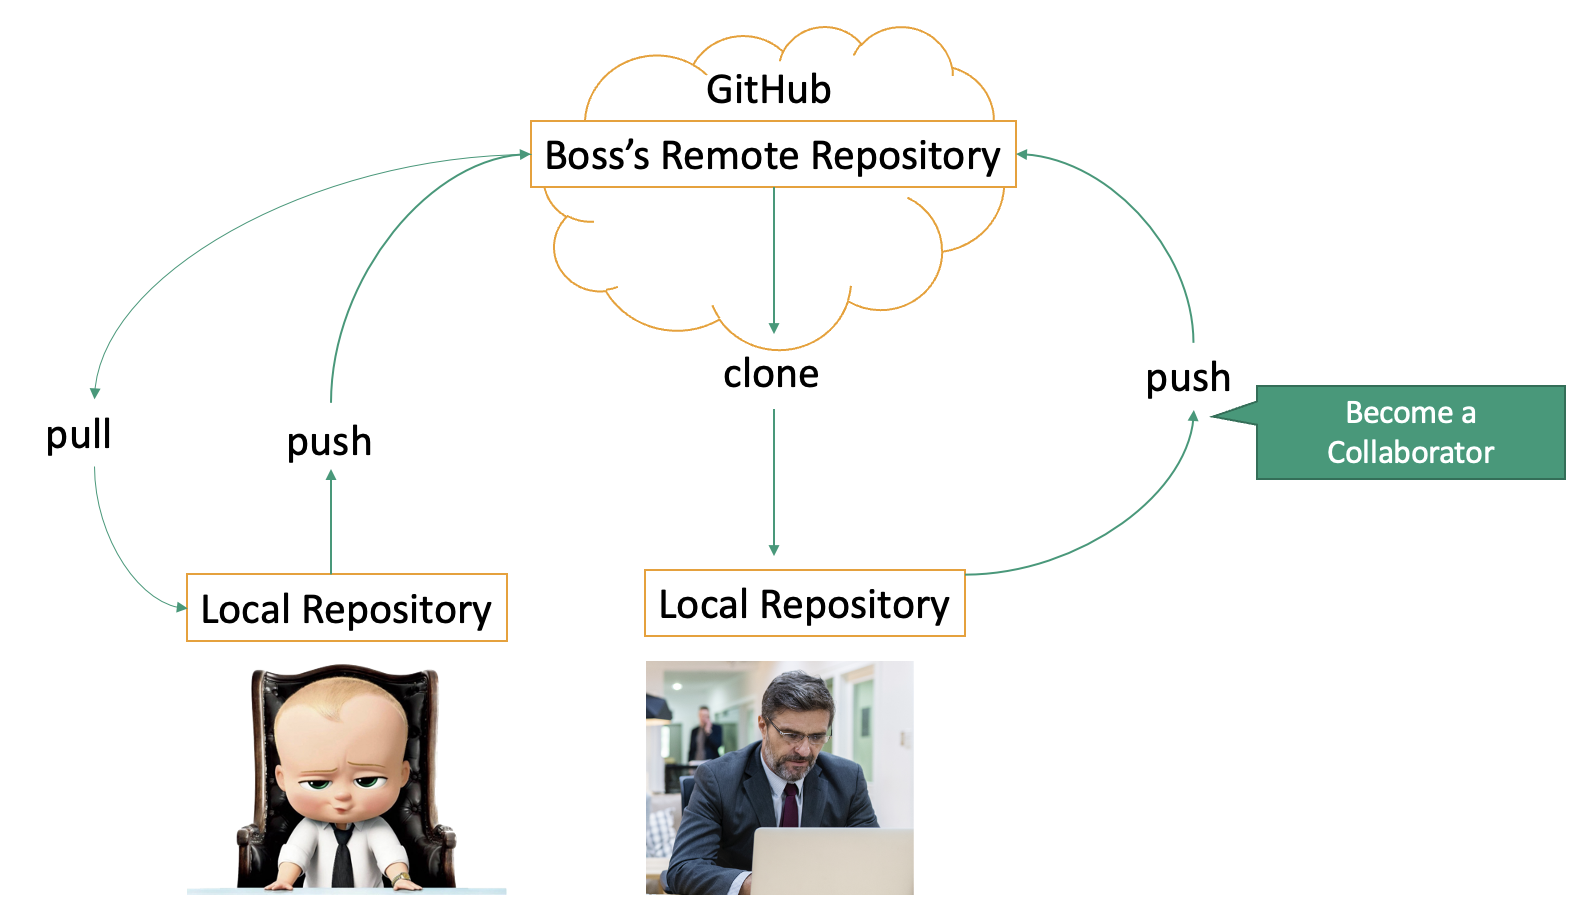
In this scenario team members never edit the main project repository: each person’s work is done in a fork, a copy of the main repository that exists in their own GitHub account.
To create a fork sign in to GitHub, navigate to the main project repository, then click the Fork button in the top right corner. 
Clone the fork to your own computer
GitHub is great for storing and sharing files but it’s not a good platform for editing. The recommended practice is to clone your repository, which creates a local copy on your own computer where you can edit the files with your preferred text editor.
1 In GitHub, find the repository to clone and click the Code button. Copy the URL to use in the command below.
2 Open a terminal and navigate to the directory where you would like to copy the repository files.
3 In the terminal use the command below to clone, replacing the URL with the one copied in step 1 above.
Input
$ git clone https://github.com/YOUR_GITHUB_USERNAME/REPOSITORY_NAME.git
Output
Cloning into 'practice'...
remote: Enumerating objects: 6, done.
remote: Counting objects: 100% (6/6), done.
remote: Compressing objects: 100% (4/4), done.
remote: Total 6 (delta 0), reused 0 (delta 0), pack-reused 0
Receiving objects: 100% (6/6), done.
Git will create a new directory named after the source repository. The directory is automatically tracked by git and it can be synchronized with its counterpart in your GitHub account.
Synchronizing forks and clones
As you edit the files on your local computer use the git add and git commit commands to take snapshots of your work. In a team environment it will be important to periodically synchronize the forks and clones so everyone’s work is represented in the main project repository.
Pushing local changes to your fork
It is good practice to regularly synchronize your local copy of the repository (the clone) with the repository in your own GitHub account (the fork).
To do this, open a terminal in your clone directory and run the command git push
Only local changes that have been committed will be pushed back up to the fork on GitHub.
Contributing to the main project directory
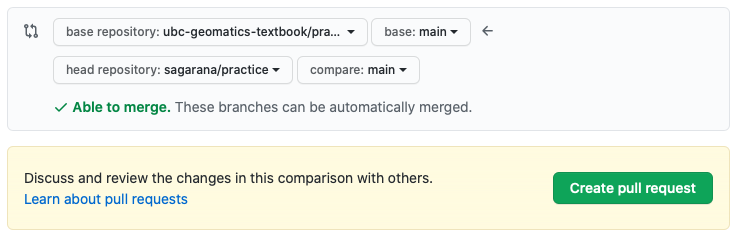
Once your work is in your fork in GitHub you can contribute it to the main project repository by using a Pull request. This alerts the owner of the project repository and invites them to “pull” your contributions into the project repository, merging them with changes from other team members.
1 To create a Pull request navigate to your fork in GitHub and click the Pull requests link.

2 In the next step click Create pull request
3 You will be prompted to provide a title and optional comment that helps the team understand your contribution to the main project repository.
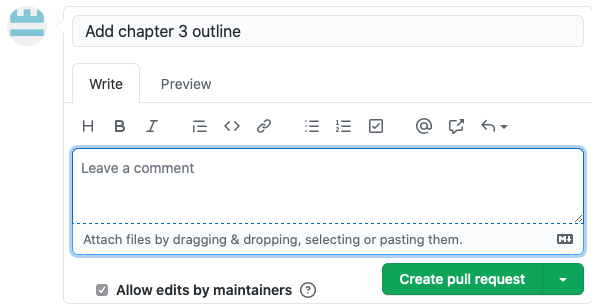
4 The final step is to click Create pull request to save your contribution. The project repository owner then has the opportunity to review your contributions before merging them into the main project.
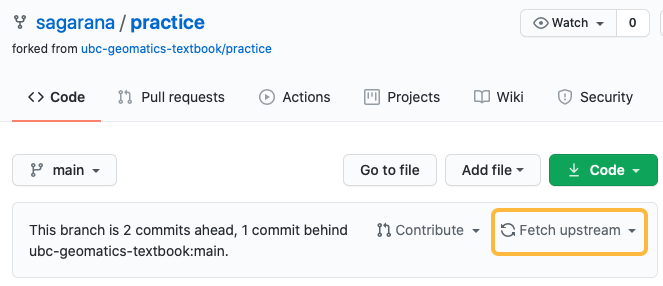
Keeping your fork current
A fork is a copy of a directory at a moment in time. As other team members make contributions to the project repository your own fork may no longer reflect the current state of the project. When a fork is “behind” the project repository a note will appear in GitHub above the list of files. To incorporate changes from the main project into your local copy click the Fetch upstream link.
Keeping your local copy current
Fetch upstream will update your fork with other team members’ changes. To bring those same changes back down to the clone on your local machine use the git pull command.
1 Open a terminal and navigate to the cloned repository in your local file system
2 Use the command git pull to incorporate content from the fork on GitHub
A Basic Collaborative Workflow
When collaborating it’s important to work from an updated version of the repository so you should git pull before making any changes. A basic workflow for collaboration might look like this:
- update your local repo with
git pull origin main, - make your changes and stage them with
git add, - commit your changes with
git commit -m, and - upload the changes to GitHub with
git push origin main
Note: it is a good idea to make frequents commits to keep a history of changes in the git repository and prevent conflicts with other collaborators of the project
Exercise
In this exercise, you are going to use Git and GitHub to fix mistakes in a repository. Please begin with viewing, forking, or cloning the sandbox repository.
This repository is supposed to have two folders. In the folder text, we would like to keep pieces of news as text files. In the second folder, figures, we would like to keep on figure for each file. The whole repository is a simplified version of a database for the news website.
There are several major mistakes in the repository, such as files with wrong extensions or in the wrong place, and a few minor mistakes, such as misspelled words. You are asked to add one more piece of news or fix the repository either directly on GitHub or by forking/cloning a local repository, fixing the problems, and pushing it to the remote repository.
Another Exercise:
For the next step, get into pairs. One person will be the “Owner” and the other will be the “Collaborator”. The goal is for the Collaborator to add changes into the Owner’s repository. If there is time we will switch roles at the end so everyone can play Owner and Collaborator.
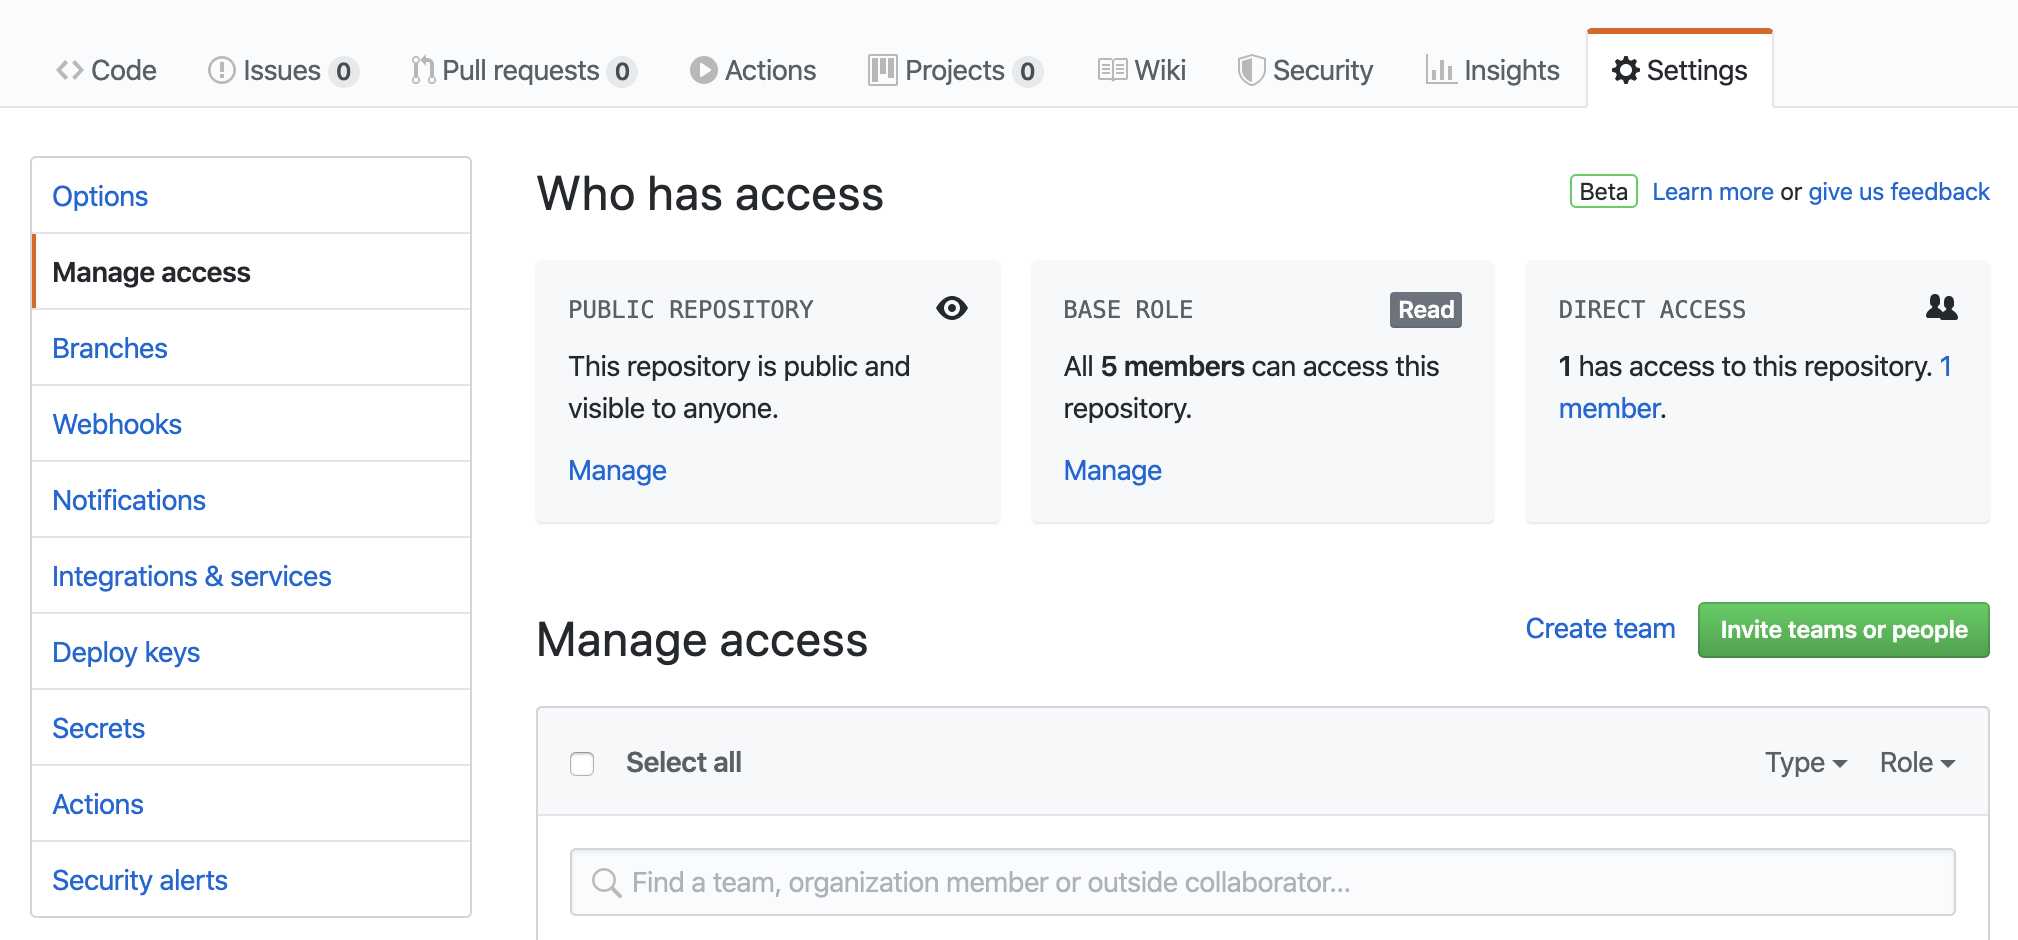
First the Owner needs to give the Collaborator access to their repository. Navigate to your repository on GitHub, click the settings button on the right, then select Manage access. Click the green Invite a collaborator button and enter your partner’s GitHub username in the search bar.
To accept access to the Owner’s repo the Collaborator needs to go to https://github.com/notifications.
Next, the Collaborator needs to download a copy of the Owner’s repository to their computer. This is called “cloning” a repository. To clone the Owner’s “hello-world” repository onto their Desktop the Collaborator would enter this command:
Input
$ git clone https://github.com/owner's-github-username/hello-world.git ~/Desktop/owner-hello-world
This creates a local copy of the owner’s hello-world repository in a folder named owner-hello-world. The collaborator can now make changes in their clone of the Owner’s repository using the commands introduced earlier.
- use
cdto navigate to the cloned repository - use
touchto create a new file in the repository - add a few lines to the file using a text editor
- use
git addto stage the file - use
git commit -m "Commit note"to commit the changes
Then push the Collaborator’s change(s) to the Owner’s repository on GitHub:
Input
$ git push origin main
Note that this time we didn’t have to create a remote called origin: Git uses this name by default when we clone a repository. (This is why origin was a sensible choice for a nickname earlier when we were setting up remotes by hand.)
Take another look at the Owner’s repository on the GitHub website (you might need to refresh your browser). You should be able to see the new commit made by the Collaborator.
To download the Collaborator’s changes from GitHub, the Owner now enters this command on their own computer:
Input
$ git pull origin main
Now the three repositories - Owner’s local, Collaborator’s local, and Owner’s on GitHub - are back in sync.
Switch Owner and Collaborator roles if time permits and you’d like more practice
Loading last updated date...