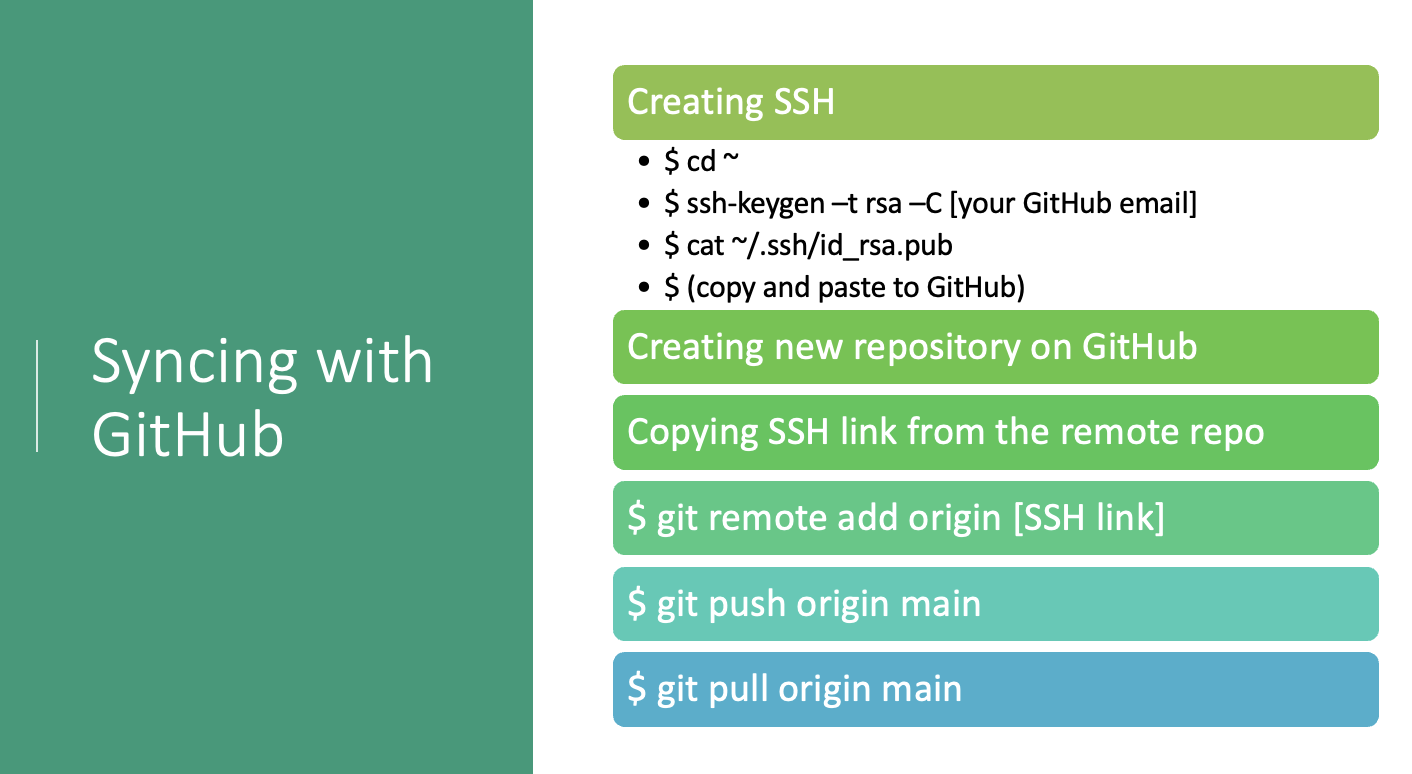
Syncing with GitHub
So far you used Git to create a repository called hello-world on your own computer, but no one else can see those files. Next, you will use GitHub to share the contents of your repository so others can collaborate. This involves creating an empty repository in GitHub, then linking it to your local repository.
Table of contents
Create an empty GitHub repository
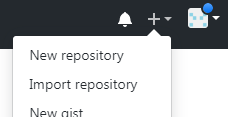
Log into your GitHub account and create a new repository by clicking the + icon in the upper-right corner of any page, then selecting New repository.
- Name the repository “hello-world”
- Add optional description
- Ensure repository is set to “Public”
- Click “Create repository”
Though not mandatory, choosing a license is an important part of openly sharing your creative work online. For help selecting an appropriate license see https://choosealicense.com/.
After creating the “hello-world” repository, GitHub will display the repository main web-page on your browser. This page contains information required to link your GitHub repository, remote, to the repository you created with Git on your own computer.
Linking your local repository to the GitHub repository (using SSH or HTTPS)
We need to set up a way for our local computer to authenticate with GitHub so that GitHub recognizes our computer as belonging to the same person who owns the GitHub repository.
GitHub removed password authentication on August 13, 2021. You have two options to connect your local machine to GitHub.
Option 1. Connecting with SSH
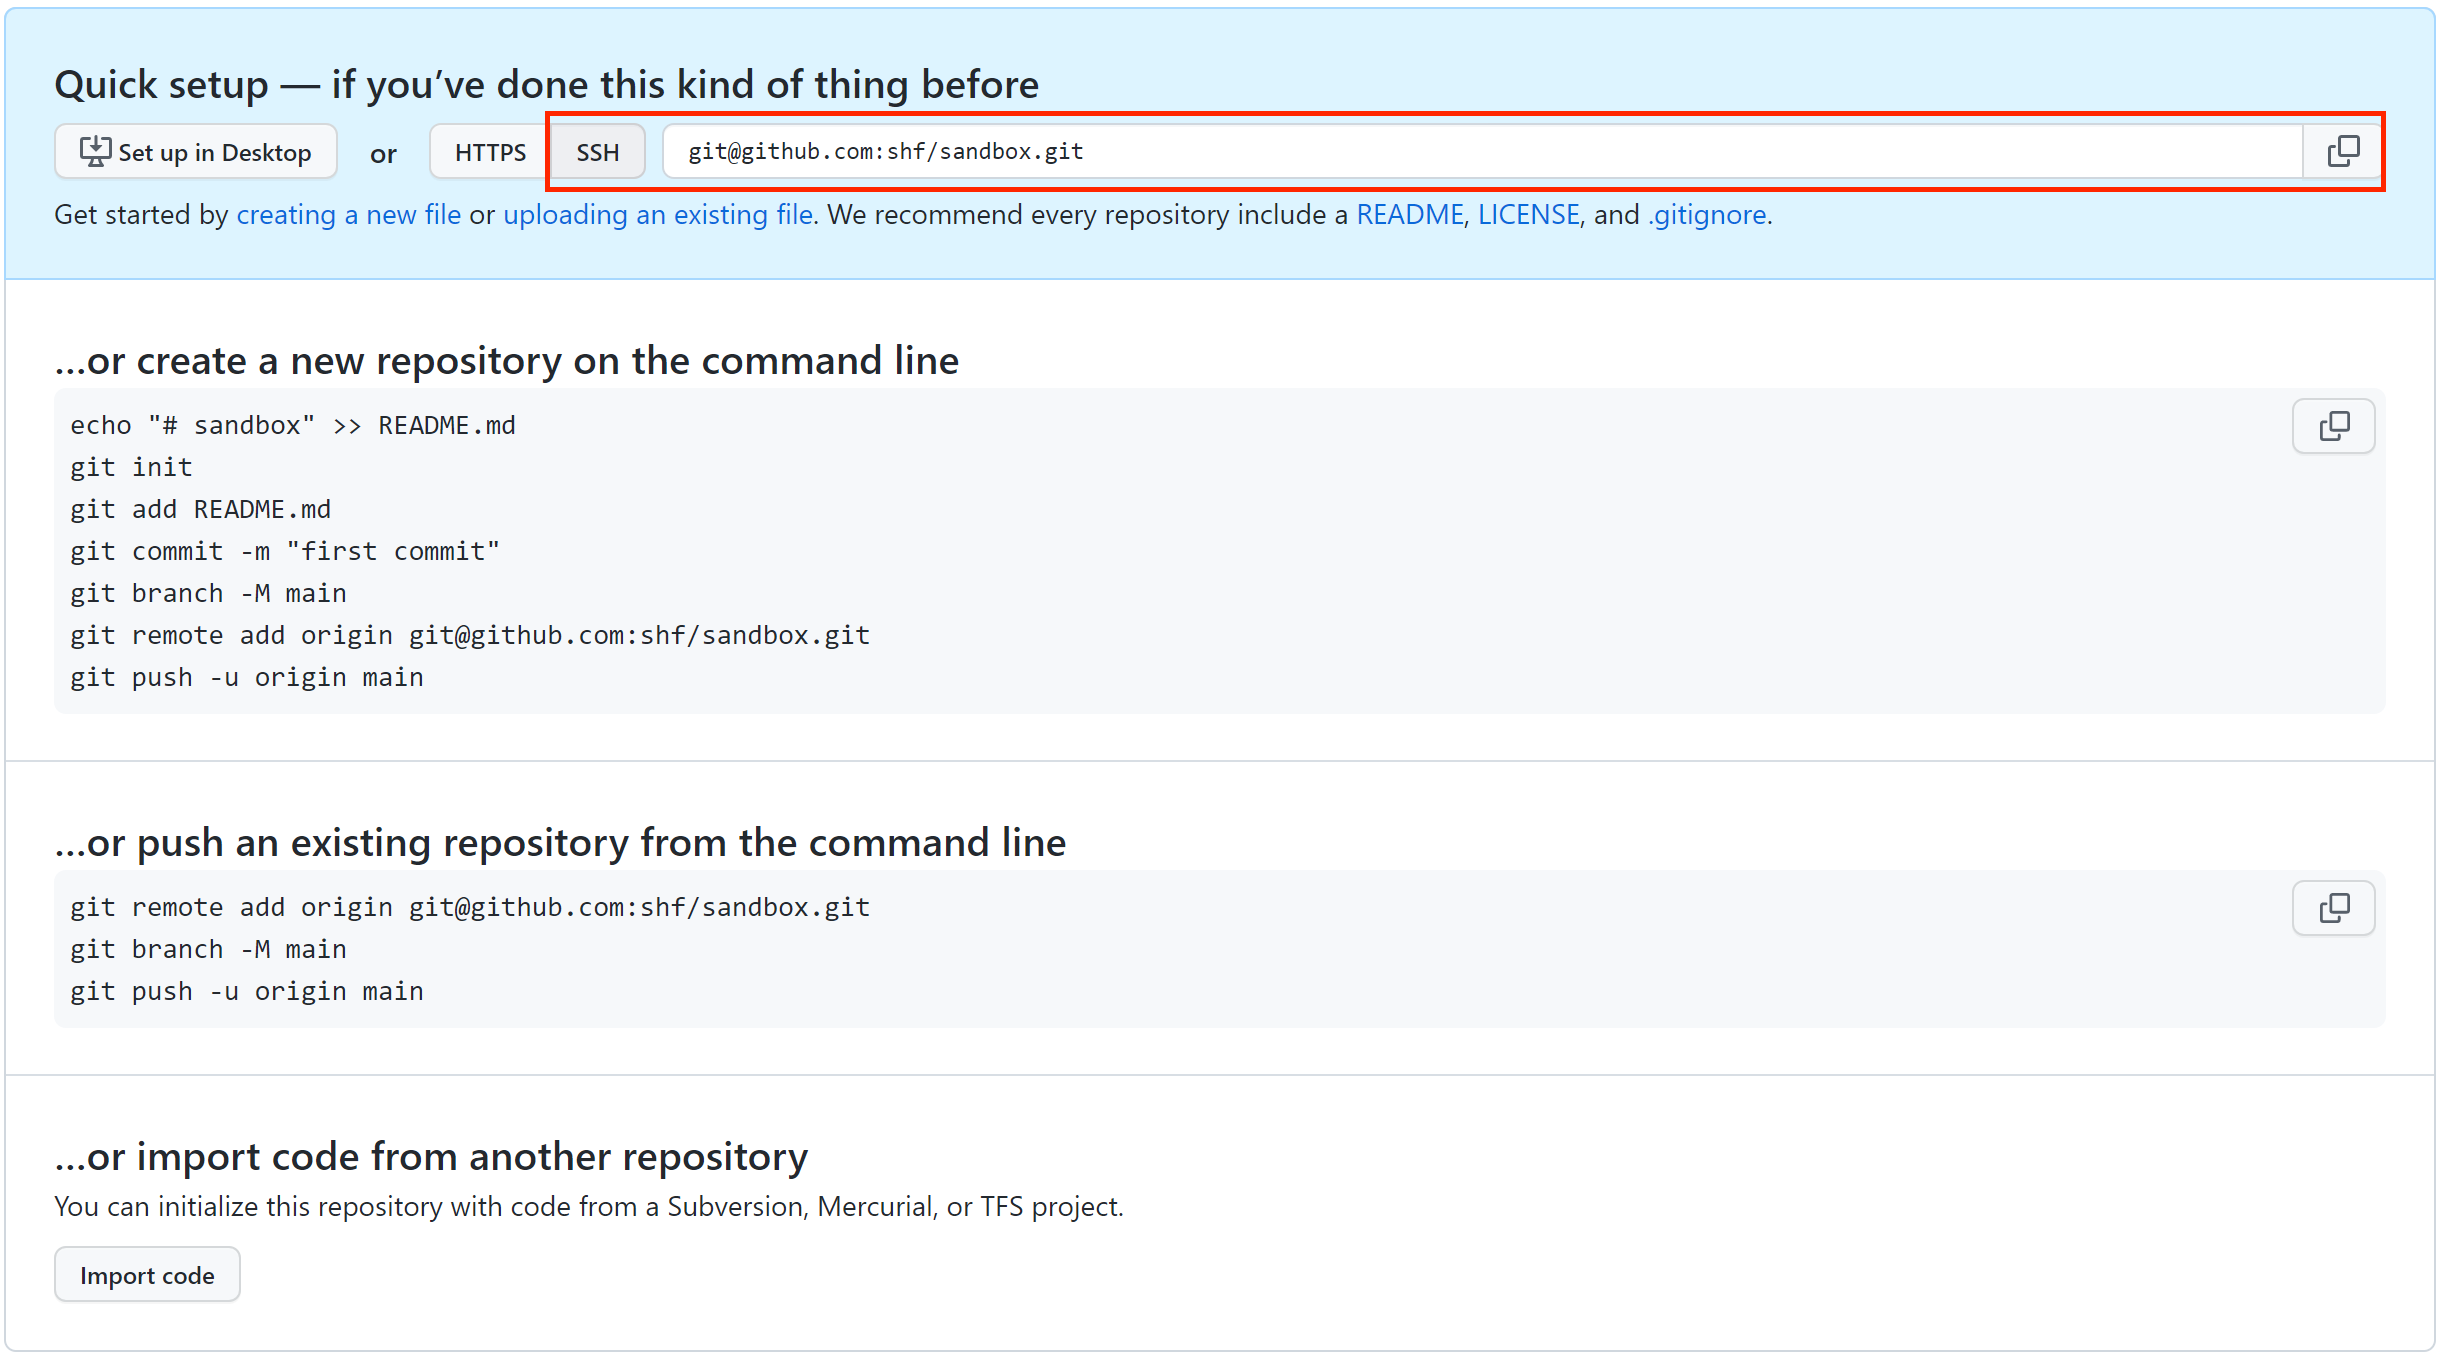
First, copy the URL from your GitHub repository. Move back to your shell application and enter the first command:
$ git remote add origin [git@github.com:yourname/hello-world.git]
SSH Background and Setup
SSH is a security protocol widely used by many applications. You can use the following commands to connect your newly created repository or your existing repository to Github.
We will use SSH as our authentication method. SSH stands for Secure SHell protocol. SSH is a cryptographic network protocol that allows secure communication between computers using an otherwise insecure network.
What we will do now is the minimum required to set up the SSH keys and add the public key to a GitHub account.
The first thing we are going to do is check if this has already been done on the computer you’re on.
Keeping your keys secure
You shouldn’t really forget about your SSH keys, since they keep your account secure. It’s good practice to audit your secure shell keys every so often. Especially if you are using multiple computers to access your account.
We will run the list command (ls) to check what key pairs already exist on your computer. In our command we use the ~ as the shorthand for “my home directory.”
ls -al ~/.ssh
If you have not set up SSH, your output might look like this:
ls: cannot access '/c/Users/YourName/.ssh': No such file or directory
If SSH has been set up on the computer you’re using, the public and private key pairs will be listed. The file names are either id_ed25519/id_ed25519.pub or id_rsa/id_rsa.pub depending on how the key pairs were set up.
If you do not have SSH set up, let’s set it up now. Use this command to create key pairs:
$ ssh-keygen -t rsa -C "yourname@domain.name"
Generating public/private ed25519 key pair.
Enter file in which to save the key (/c/Users/YourName/.ssh/id_ed25519):
We want to use the default file, so just press Enter.
Created directory '/c/Users/YourName/.ssh'.
Enter passphrase (empty for no passphrase):
Your computer is now asking you for a passphrase to protect this SSH key pair. We recommend that you use a passphrase and that you make a note of it. There is no “reset my password” option for this setup. If you forget your passphrase, you have to delete your existing key pair and do this setup again. It’s not a big deal, but easier if you don’t have to repeat it.
Enter same passphrase again:
After entering the same passphrase a second time, you will receive the confirmation
Your identification has been saved in /c/Users/YourName/.ssh/id_ed25519
Your public key has been saved in /c/Users/YourName/.ssh/id_ed25519.pub
The key fingerprint is:
SHA256:SMSPIStNyA00KPxuYu94KpZgRAYjgt9g4BA4kFy3g1o yourname@domain.name
The key's randomart image is:
+--[ED25519 256]--+
|^B== o.          |
|%*=.*.+          |
|+=.E =.+         |
| .=.+.o..        |
|....  . S        |
|.+ o             |
|+ =              |
|.o.o             |
|oo+.             |
+----[SHA256]-----+
The “identification” is actually the private key. You should never share it. The public key is appropriately named. The “key fingerprint” is a shorter version of a public key.
Now we need to give our public key over to GitHub.
First, we need to copy the public key. Be sure to include the .pub at the end, otherwise you’re looking at the private key.
cat ~/.ssh/id_rsa.pub
ssh-ed25519 AAAAC3NzaC1lZDI1NTE5AAAAIDmRA3d51X0uu9wXek559gfn6UFNF69yZjChyBIU2qKI yourname@domain.name
Copy that entire line of output, and we will paste the copied text into GitHub in the next step.
Now, going to GitHub.com, click on your profile icon in the top right corner to get the drop-down menu. Click “Settings,” then on the settings page, click “SSH and GPG keys,” on the left side “Account settings” menu. Click the “New SSH key” button on the right side. Now, you can add the title (A person might use the title “My 2021 work laptop,” just a little description to remind themselves which computer this public key connect to). Paste your SSH key into the field, and click the “Add SSH key” to complete the setup.
Now that we’ve set that up, let’s check our authentication from the command line.
$ ssh -T git@github.com
Hi YourName! You've successfully authenticated, but GitHub does not provide shell access.
Option 2. Connecting with HTTPS & GitHub Access Tokens
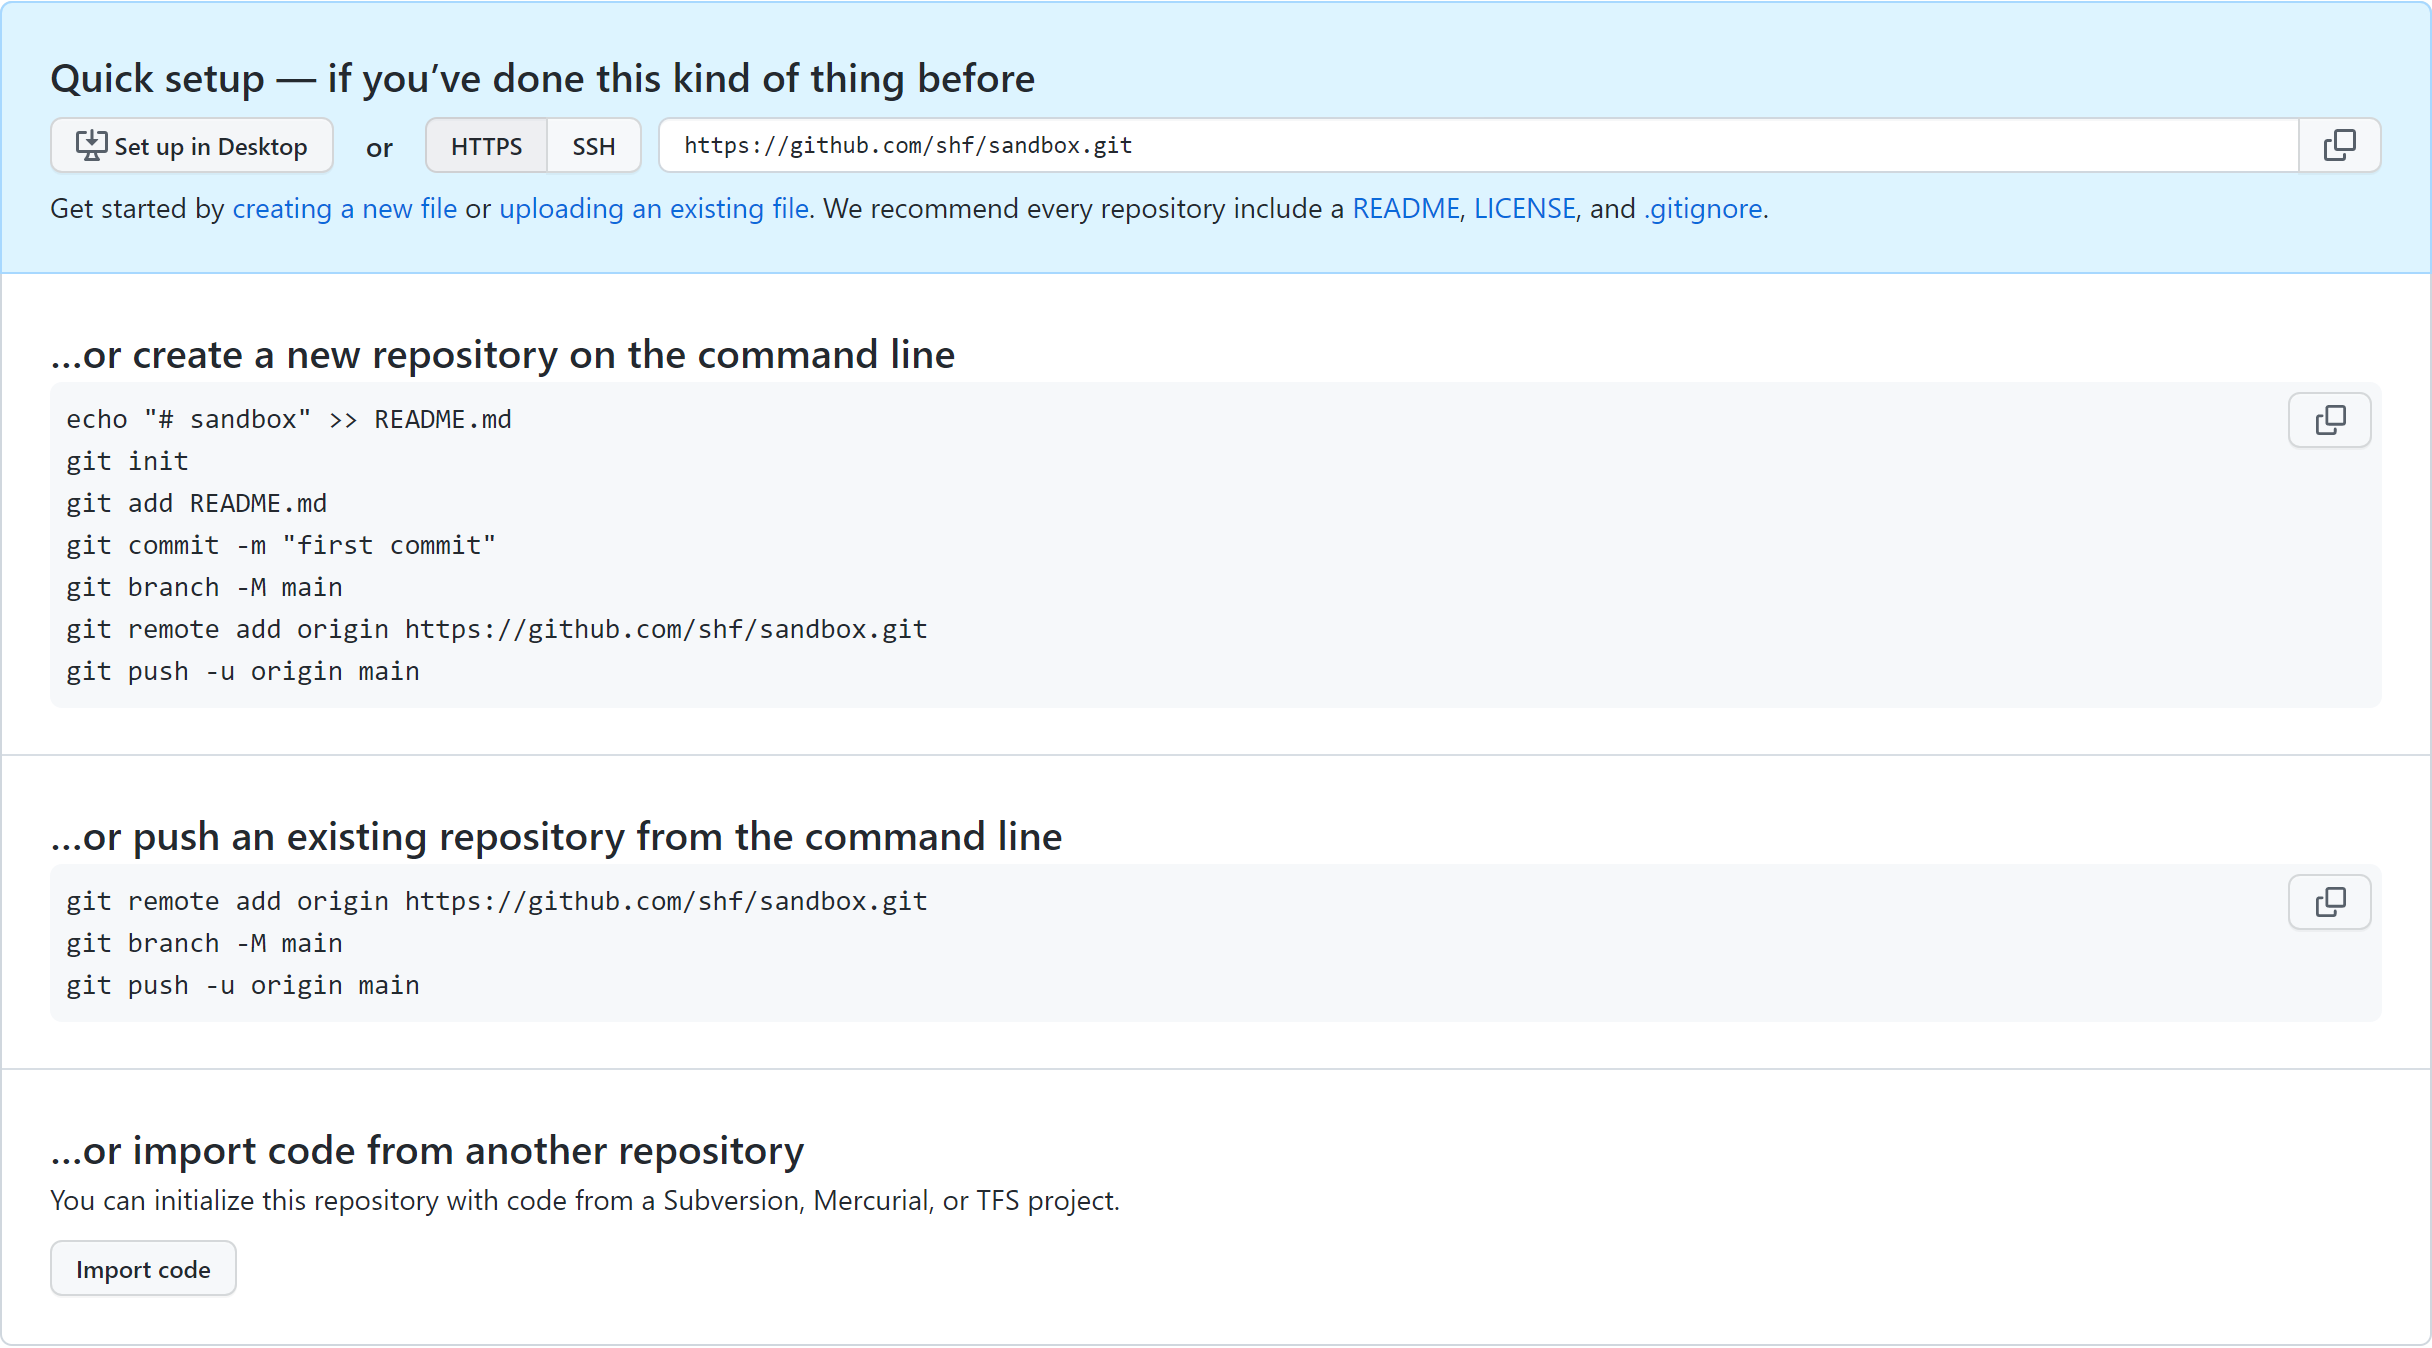
You can also use HTTPS protocol to connect your local repository to GitHub. Take a look at the following figure and find the commands you need to use to sync your local repository with Github. We will explain these commands in the rest of this section.
Now we are going to use the HTTPS protocol and GitHub access tokens (or Git Credential Manager, depending on your OS). GitHub access tokens are simple to obtain, but should be used with caution and should not be shared.
Step 1: link the repositories with “git remote add”
Enter the command below, replacing
Input
$ git remote add origin https://github.com/<your_github_username>/<github-repository-name>.git
This links your local Git repository to a remote one. The link indicates the location of the remote repository, which is nicknamed origin in this example. The nickname can be anything but Git convention is to refer to the remote repository as origin.
We can confirm that it is set up correctly with this command:
Input
$ git remote -v
Output
origin  https://github.com/<your_github_username>/<github-repository-name> (fetch)
origin  https://github.com/<your_github_username>/<github-repository-name> (push)
Step 2: synchronize the repositories with “git push”
The git push command can “push” our local content and tracking information to the GitHub repository, synchronizing the content. If you run git push right now, Git asks for your GitHub username and password. Even if you enter the correct username and password, the command will not work since support for password authentication was removed in 2021. To fix this error, you can use GitHub Access Tokens or use code editors that support API authentication. In this workshop, we use access tokens:
Step 3: Configure Access Token on GitHub
You can use token-based authentication in place of a password when performing Git operations. Github currently supports two types of personal access tokens: fine-grained personal access tokens and personal access tokens (classic). They recommend using fine-grained tokens whenever possible.
In the first step, we will create a personal Access Token on GitHub. Follow these steps to create one for your GitHub account:
- Click on your GitHub profile icon on the top right corner and click on Settings
- Choose Developer Settings on the menu on the left
- Click fine-grained access tokens and Generate new token Add a specific note that will help you identify the scope of the access token
- Choose the Expiration period from the drop down menu and select the scopes you want to grant the corresponding access to the generated access token. Make sure to select the minimum required scopes. For this workshop,
public_reposhould be enough. - Click on Generate Token
Now, a new page is opened in which you can see your personal access token and copy it.
Now, we need to run the following command to use this access token:
Input
$ git remote set-url origin https://<github-token>@github.com/<username>/<repository-name>.git
Pushing the local repository
Now, we have successfully established a connection between the two repositories. To synchronize (merge) the content of the remote and local repositories, we will have to “push” our local changes to the GitHub repository.
Input
$ git push -u origin main
Output
Counting objects: 3, done.
Writing objects: 100% (3/3), 226 bytes | 0 bytes/s, done.
Total 3 (delta 0), reused 0 (delta 0)
The nickname of our remote repository is “origin” and the default local branch name is “main”. The -u flag tells git to remember these parameters, so that next time we can simply run git push and Git will know what to do.
When we do a git push we will see Git “pushing” changes to the specified remote repository - in this case, on GitHub. Because our file is small this happens instantly, but it may take longer if you made many changes or are adding a very large repository. The git status command will indicate the status after “pushing” is complete.
Input
$ git status
Output
On branch main
Your branch is up-to-date with 'origin/main'.
nothing to commit, working tree clean
This output lets us know where we are working (the main branch). We can also see that we have no changes to commit, and you’ll find a copy of the “index.md” file in your GitHub “hello-world” repository.
As mentioned earlier, synchronizing the local repository with its correponding remote repository involves merging the branches, specifically the main branches here. If the local branch is ahead of the remote one, the merge command should proceed without conflicts. However, If you have added a readme file or license file to your GitHub repository, the commit on GitHub will be ahead of your latest commit on the local main branch. In this case, you will need to pull the latest changes to synchronize the two repositories:
Pulling changes
When working with others or on multiple computers we need a way to pull all the remote changes back into our local repository. We can see how this works by adding a file to our GitHub repository, then “pulling” that change back to our computer.
Near the bottom of the “hello-world” repository on GitHub, there is a button to “Add a README” file to your repository. Click the button, enter some text, then scroll to the bottom and click “Commit new file” (The default commit message will be “Create README.md”, which is fine for our purposes).
It is good practice to add a README file briefly describing what the project is about. If the README is in the root directory GitHub will automatically display it like a cover page for your repository.
After adding a README on GitHub your local repository is out-of-sync with the remote repository. Let’s fix that by pulling the remote changes into the local repository with git pull.
Input
$ git pull
Output
remote: Counting objects: 3, done.
remote: Compressing objects: 100% (2/2), done.
remote: Total 3 (delta 0), reused 0 (delta 0), pack-reused 0
Unpacking objects: 100% (3/3), done.
From https://github.com/<your_github_username>/hello-world
   8e2eb99..0f5a7b0  main     -> origin/main
Updating 8e2eb99..0f5a7b0
Fast-forward
 README.md | 1 +
 1 file changed, 1 insertion(+)
 create mode 100644 README.md
The output shows that we have fast-forwarded our local repository to include the file README.md. We could confirm this by entering the ls command.
This section introduces some basic git commands but there are many others that may be useful in more complex and collaborative projects. For a more detailed introduction see the online Software Carpentry course Version control with Git.
To update the local repository but not merging any changes, you have two options. git remote update can update all of your branches set to track remote ones, while git fetch can update only the branch you are on.
Input
$ git fetch
$ git remote update
if you need to sync the local main branch with the remote repository and there are no conflicting changes, you can use “git rebase” instead of merging. This means you can reapply your local commits on top of the latest commit from the remote repository. Rebasing can provide a cleaner commit history since it avoids creating merge commits. You can also use rebase to roll back to an earlier commit. However, this command should be used with caution when working on shared branches, as it modifies the commit history and can cause conflicts if multiple people are working on the same branch.
Input
$ git rebase <commit or branch>
The command git rebase -f is a force option used with the git rebase command in Git. It allows you to forcefully overwrite the existing commit history and replay your commits on top of another branch or commit. It is used when you want to discard or replace the existing commits in your branch, e.g., a merge conflict prevents push or pull actions.
Loading last updated date...