[//]: # (
layout: default title: Labels nav_order: 12 parent: Working with Layers — )
Labels
Another property of the layers in our Map Document that we might want to enable is the labeling of features. This can be accomplished, based upon an attribute value for each of the features. In many cases, this might be the name, or some other identifying attribute of the feature, but in some cases it might be a quantitative value associated with the features. It is even possible to use Arcade or SQL scripting to assemble labels from several attributes and text elements.
In this example, we will label only the trees from the largeDiameter layer which also have a tree height greater than or equal to 8, which is a range identifier representing trees 80-90 ft tall. In order to label only certain features, we’ll create another layer based on a selection.
- Under the Map tab at the top of the screen, click on Select by Attributes to create an expression. Set the following parameters:
- Input Rows: largeDiameter
- Selection type: New Selection
- Click: New Expression
For the Expression, Where:
- Field: Height range
- is greater than or equal to
- 8
- Right-Click on the largeDiameter layer and select Selection > Make Layer from Selected Features. This creates a temporary layer representing the selection.
- Rename this temporary layer Tall trees. It will have retained the symbology from the largeDiameter layer
- Clear the selection from largeDiameter and turn off all the layers except Tall trees and from the top of the map, click on Appearance>Symbology>Single Symbol.
- In the Symbology window to the right of the map, click on the circle next to Symbol.
- In the Format Point Symbol window, select Properties and then choose No color from the Color dropdown.
- Then click on the Layers icon and select No color under Outline color. We will use this layer only for labeling and not for symbolizing.
- Click Apply.
- Right-click on the Tall trees layer and select Label. Pin the labeling properties window. To access the labeling properties, you can also go to Feature Layer > Labeling > Layer and click on the Label icon. Note that this turns on labels for all features and that ArcGIS selects a field containing names, by default.
- Turn on the largeDiameter layer again. Even though we are only trying to label 201 features, you can see that the labels are illegible.
- In the labeling properties window, we’ll choose to label by Common name by double-clicking on it in the Fields window. This will populate the Expression window with an expression that looks like this: $feature.common_nam
- In the Label Symbol window, expand the Appearance option. Use the following parameters and click Apply:
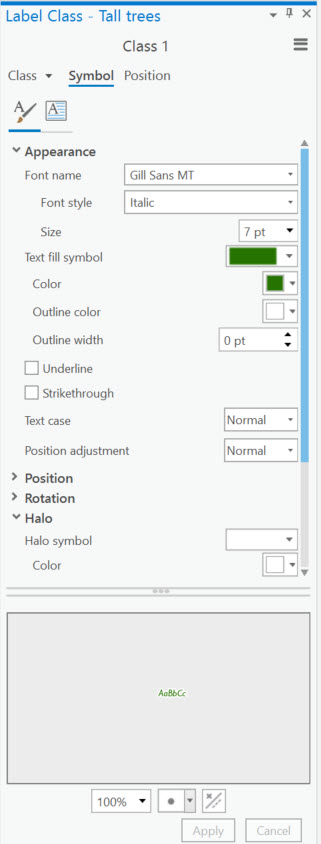
The symbols are still clustered and hard to read, so we need to make additional customized changes. You may also be aware by now that customizing the appearance of a map is one of the most time-consuming aspects of creating a map. In order to make the labels more legible, we’ll add a halo.
- Expand the Halo option and select the White fill 50% transparency from the Halo symbol dropdown. Use the following parameters for the rest of the settings:
- Color: white
- Outline color: none
- Outline width: 0 pt
- Halo size: 1 pt
It is clear that the Topographic default basemap is not compatible with the labels we’re trying to customize. Let’s change the basemap before we make any additional changes.
- From the Map tab, click on the Basemap dropdown arrow and select Oceans.
- Returning to the Labeling Properties window, click on Position.
- Expand Remove duplicate labels and select Remove within fixed distance from the dropdown. Leave the default search radius.
Because the trees we are trying to label appear to be clustered and represent the same species in many cases, we can choose not to show certain labels and still convey a sense of the dominant species which meet both our heighth and width criteria.
- Expand Buffer and check Hard constraint.
- Click on the Fitting strategy icon.
-
Expand Stack and check both boxes next to Forced split.
- Next expand Reduce size and check Reduce font size.
Use the following parameters:
- Lower limit: 3.0 pts
- Step interval: 0.5 pts
- Under Font width compression:
- Lower limit: 70%
- Step interval: 3%
- Expand Abbreviate and check Use abbreviation strategies and also Truncation with a Minimum word length of 2.
- Expand Strategy order and use this hierarchy:
- Font compression
- Font reduction
- Stacking
- Abbreviation
- Click on the Position option and expand Orientation.
- Graticule alignment: Straight
We’ll want to ensure our map legend reflects the complexities of the symbology and labeling we customized, which we’ll address when we go through the steps of building a map to export.